LT-40153, LT-46153, LT-52153
LT-40151, LT-46151, LT-52151
For Your Records
FCC Declaration of Conformity
Contents
Outdoor Antenna Grounding
Replacement Parts
Important Information About Your TV
Installation Notes
TV Software
If Your TV Gets Damaged
Special Features of Your TV
Remote Control Batteries
Package Contents
Wall-Mounting
Stand Installation
Home Fast Power On Retail
First-Time Power-On
Before You Begin
Welcome screen
TV Controls
Remote Control
System Reset
Power Indicator
TV Control Panel
IR Sensor
Setting Up Other Inputs
Setting Up TV Inputs
Channel Scan for Digital Channels
Memorizing Channels with Channel Scan For the ANT input
Hdmi USB
About Auto Input Sensing Auto Output Sensing
Inputs Name menu
Basic TV Operation
Cancel
Watching Broadcast TV
Watching DVDs or Videos
Audio Settings
Making Picture Adjustments
Other TV Features
Other Information
Auto Input/Auto Output Sensing
Cable Management
Connection Types
Picture Quality
Inputs and Outputs
Connector Panels
ANT Antenna
IR-NetCommand Output/External Controller Input
Hdmi Inputs High-Definition Multimedia Interface
Pb Pr Component Video
Hdmi Device
Pb Pr Component Video Device
Hdtv Cable Box, Satellite Receiver, DVD/ Blu-ray Player
Suitable for use with Sound Projector surround sound
DVI Video Device
Antenna or Cable TV Service
Composite Video Device
Cable Box, Satellite Receiver, DVD Player
Antenna or Wall Outlet Cable
VCR or DVD Recorder to an
Receiver with Hdmi Output
Receiver
DVD player
Audio-Only Device
Subwoofer
Selecting an Input
Sleep Timer
Sleep
ChannelView Channel Listings
Controlling A/V Receiver Volume
Redirecting Audio Output
About Channel Numbers
Status Display
Standard-Definition Analog Channels
Standard-Definition Digital Channels
Signal Definitions
TV Signals and Display Formats
DVD Image Definitions
TV Display Format Definitions
This TV accepts digital computer signals only
Connecting a Computer to the TV
Computer Video Connection Audio Video Output
Digital DVI
Computer Video Adjustments
Using the TV with a Personal Computer
Image Resolution
Computer Display Formats
USB Media Player Menu
Camera Images and Music Files
Playing a Slide Show or Playlist
Displaying the Menu
Picture Files Compatible with the USB Port
Thumbnail and Playlist Menus USB Media Setup Menu
Slideshow + Music --Slideshow Music only
Press ACTIVITY, select Watch Movie Cam, and press Enter
Photos and Moving Video As Composite Video
Sound Projector
Basic Setup
Sound Projector Technology
Before You Begin
Adjusting Levels
Adjusting Beam Angles
Adjusting an External Subwoofer
Custom menu
Microphone Placement
Auto Setup
Start Auto Setup Press Menu and go to Initial SoundPro
Initial Preparation
Introduction to Home-Theater Control
Source device connected directly to the TV
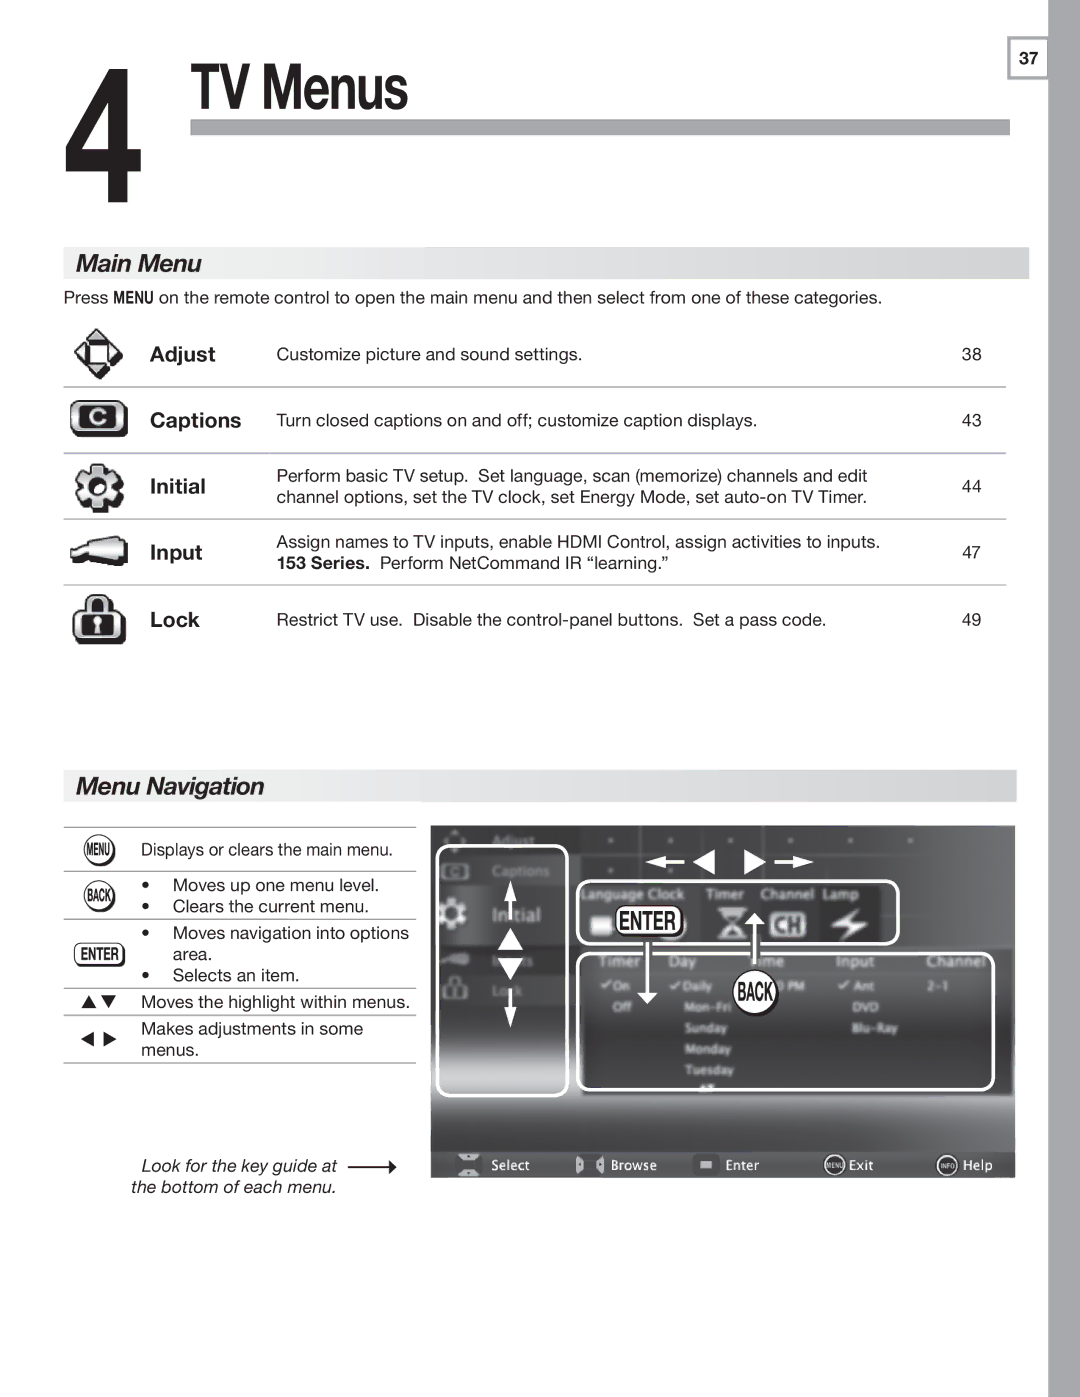
Menu Navigation
Main Menu
From the Adjust Picture menu
Adjust
ADV
From the Adjust Audio menu
Mono
Audio Listen To Stereo
SAP
Language
Film Mode Auto, Off
Reset
Enter twice
Advanced Picture Global
Using PerfecTint 153 Series
Using PerfectColor
Picture+ PerfectColor PerfectColor Sliders
PerfectTint Sliders
Captions on Analog Channels
Captions
Captions on Digital Channels
DST
Initial
Energy Energy Usage Standard Fast Power
Adding/Deleting Channels Using the Channel Edit Menu
Channel Ant Air
Ant Cable
Start
AVR
Inputs
Inputs Activity menu
How is the Activity Menu Generated?
Photos Music
DVD DVD2 DVR
Lock
TV-Y
Parental
TV-G
TV-PG
Lock Time
Lock by Time
Unlock Time
Panel
Important Note on NetCommand
About NetCommand IR Control
Power key
IR Emitter Placement
If You are Unable to Locate a Device’s IR Sensor
Adding or Removing Device Keys from NetCommand Control
Initial NetCommand Setup
If the device has no Power OFF key, skip this step
Special Operation Description and Setup How to Use
Operating NetCommand-Controlled Devices
Controlling Most Device Types
Special Operation Methods
SP/EP
More Key Menu and NetCommand
NetCommand Specialized Device Keys
Controlling A/V Receiver Power
Switching Audio to and from the A/V Receiver
Controlling Other A/V Receiver Functions
With Any Connection Type
Power and Volume
Setting Up A/V Receiver Control
Setup to Control A/V Receiver Power and Volume
Before You Begin
Use this setup for
Automatic Switching Audio or Audio/Video
DVD Input key
More About Using an Hdmi Connection
Case 3 Automatic Audio Video Switching via Hdmi
Before You Begin
Open the Inputs Learn menu
NetCommand and press Enter
Appendices
Bypassing the Parental Lock
Mitsubishi Unisen LCD Hdtv
This page intentionally left blank
Functions Available for Other A/V Devices
Appendix B Programming the Remote Control
More Menus
Control modes
Audio Lock Universal A/V Receiver Control
Programming the Remote Control
DVD
CABLE/SAT VCR DVD Audio
Audio Amplifiers
Programming Codes
Cable Boxes
VCRs
Satellite Receivers
Appendices71
DVD and Blu-ray Players
SVA
Appendices73
Enabling Hdmi Control of CEC Devices
Appendix C Hdmi Control of CEC Devices
New Device Found screen
Device does not have CEC compatibility Action
Device Found screen will appear
Hdmi Control of an Hdmi A/V Receiver and Connected Devices
Resolving CEC Conflicts
Using Hdmi Control
Care of the Remote Control
Cleaning Recommendations
Appendix D TV Care
TV Reset Comparison Guide
Appendix E Troubleshooting
Service and Customer Support
Service
If the New Device
Initial Channel Edit menu
Read the ON-SCREEN
Tions
General TV Operation Symptom Remarks
TV Power On/Off Symptom Remarks
TV Channels Symptom Remarks
Sound Symptom Remarks
Picture Symptom Remarks
Receiver with Hdmi Control
Receiver Set Up for Audio and Video Switching over
Appendix E Troubleshooting
Trademark and License Information
Mitsubishi TV Software
GNU General Public License
No Warranty
This Limited Warranty does not Cover
To Obtain Warranty Service
Warranty
Index
Index
Page
System Reset
MDEAservice@mdea.com