6. Electrical work

Function table

Select unit number 00

Mode

Settings


Mode no.

Setting no.

Initial setting

setting

Power failure automatic recovery

Not available


01

1


Available

*1

2


Indoor temperature detecting

Indoor unit operating average


1


Set by indoor unit’s remote controller


02

2


Remote controller’s internal sensor


3


LOSSNAY connectivity

Not Supported


1


Supported (indoor unit is not equipped with outdoor-air intake)

03

2


Supported (indoor unit is equipped with outdoor-air intake)


3


Power voltage

230 V


04

1


208 V


2


Auto mode (only for PUHZ)

Energy saving cycle automatically enabled


05

1


Energy saving cycle automatically disabled


2


Select unit numbers 01 to 03 or all units (AL [wired remote controller]/07 [wireless remote controller])


Mode

Settings


Mode no.

Setting no.

Initial setting

setting

Filter sign

100Hr


1


2500Hr


07

2


No filter sign indicator


3


Fan speed

Standard (PLA)/Silent (PCA)


1


High ceiling 1 (PLA)/Standard (PCA)


08

2


High ceiling 2 (PLA)/High ceiling (PCA)


3


No. of air outlets

4 directions


1


3 directions


09

2


2 directions


3


Installed options (high-performance filter)

Not supported


10

1


Supported


2


Up/down vane setting

No vanes


1


Equipped with vanes (vanes angle setup 1)


11

2


Equipped with vanes (vanes angle setup 2)


3


Energy saving air flow

Disabled


12

1


(Heating mode)

Enabled


2


*1 When the power supply returns, the air conditioner will start 3 minutes later.

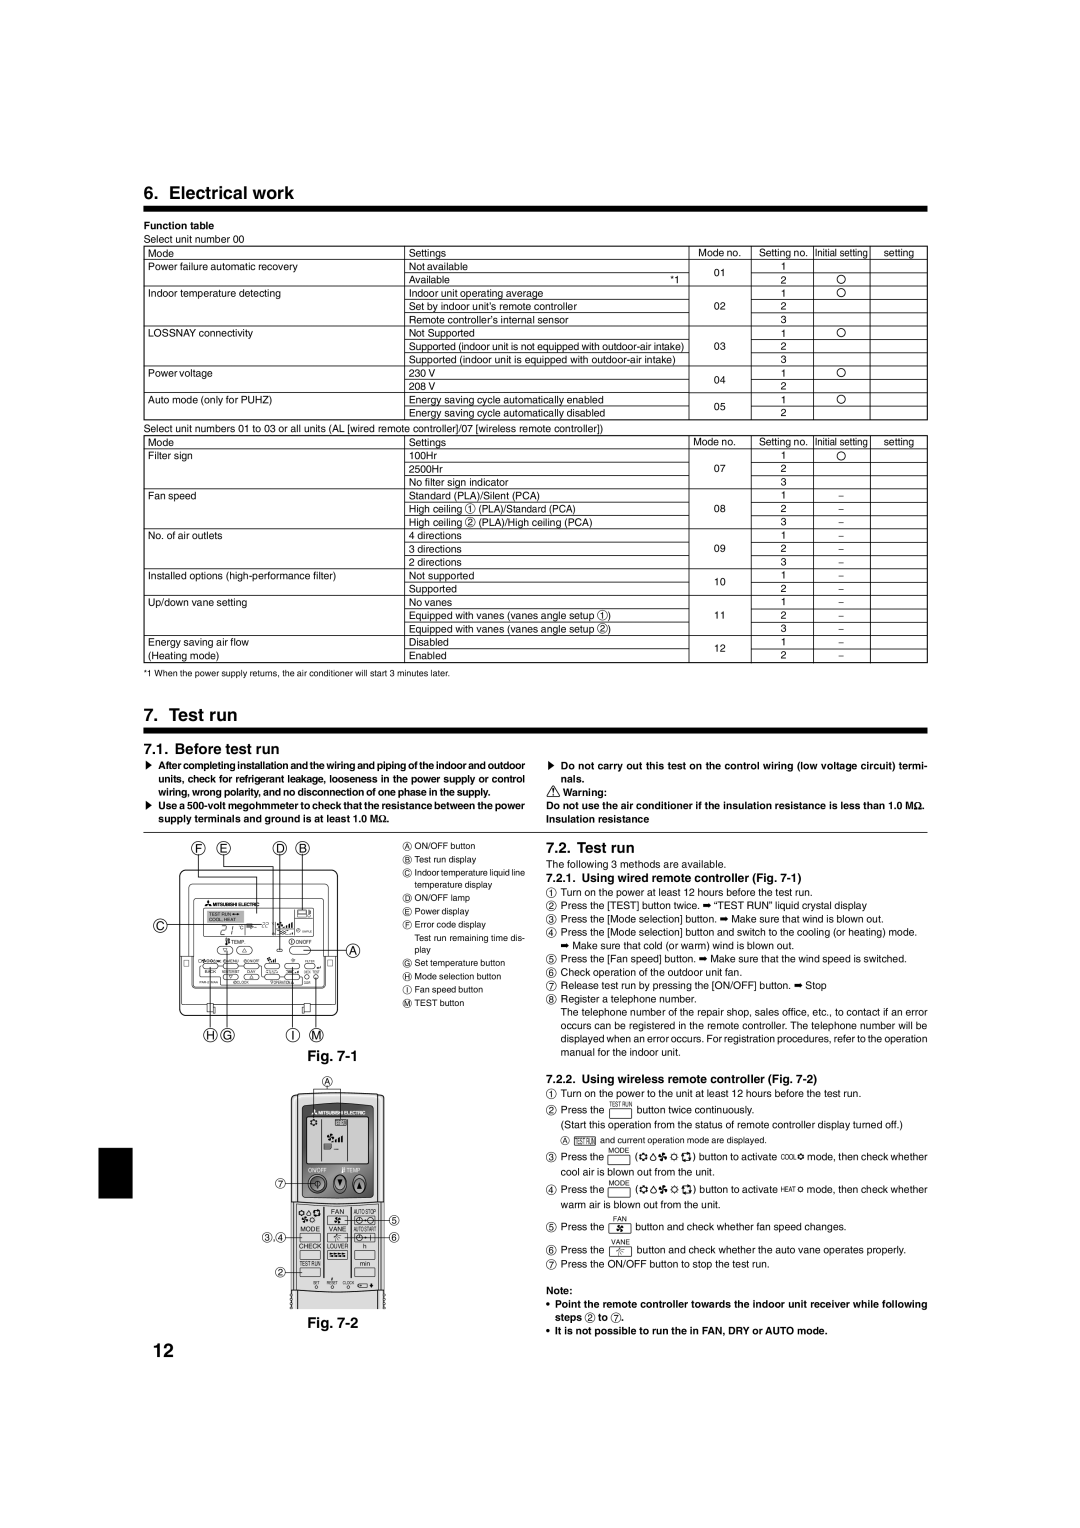
7. Test run

7.1. Before test run

sAfter completing installation and the wiring and piping of the indoor and outdoor units, check for refrigerant leakage, looseness in the power supply or control wiring, wrong polarity, and no disconnection of one phase in the supply.

sUse a 500-volt megohmmeter to check that the resistance between the power supply terminals and ground is at least 1.0 M.

sDo not carry out this test on the control wiring (low voltage circuit) termi- nals.

Warning:

Do not use the air conditioner if the insulation resistance is less than 1.0 M.

Insulation resistance


F E


D B


A ON/OFF button


B Test run display


C Indoor temperature liquid line


temperature display


D ON/OFF lamp


TEST RUN


E Power display

C

COOL, HEAT


˚C

SIMPLE


F Error code display


˚C


TEMP.


ON/OFF


Test run remaining time dis-


A

play


MENU

ON/OFF


FILTER

G Set temperature button


BACK

MONITOR/SET

DAY


CHECK

TEST

H Mode selection button


PAR-21MAA

CLOCK

OPERATION

CLEAR


I Fan speed button


M TEST button


HG


I M


Fig. 7-1


A

TEST RUN

ON/OFF

TEMP

7


FAN

AUTO STOP


5

MODE VANE

AUTO START

3,4 6

CHECK

LOUVER

h

TEST RUN


min

2


SET

RESET CLOCK


Fig. 7-2

7.2. Test run

The following 3 methods are available.

7.2.1.Using wired remote controller (Fig. 7-1)

1 Turn on the power at least 12 hours before the test run.

2 Press the [TEST] button twice. “TEST RUN” liquid crystal display

3 Press the [Mode selection] button. Make sure that wind is blown out.

4 Press the [Mode selection] button and switch to the cooling (or heating) mode. Make sure that cold (or warm) wind is blown out.

5 Press the [Fan speed] button. Make sure that the wind speed is switched.

6 Check operation of the outdoor unit fan.

7 Release test run by pressing the [ON/OFF] button. Stop 8 Register a telephone number.

The telephone number of the repair shop, sales office, etc., to contact if an error occurs can be registered in the remote controller. The telephone number will be displayed when an error occurs. For registration procedures, refer to the operation manual for the indoor unit.

7.2.2.Using wireless remote controller (Fig. 7-2)

1Turn on the power to the unit at least 12 hours before the test run.

2Press the TEST RUN button twice continuously.

(Start this operation from the status of remote controller display turned off.)

A TEST RUN and current operation mode are displayed.

3Press the MODE button to activate COOL mode, then check whether cool air is blown out from the unit.

4Press the MODE button to activate HEAT mode, then check whether

warm air is blown out from the unit.

FAN

5Press the button and check whether fan speed changes.

VANE

6Press the button and check whether the auto vane operates properly.

7 Press the ON/OFF button to stop the test run.

Note:

Point the remote controller towards the indoor unit receiver while following steps 2 to 7.

It is not possible to run the in FAN, DRY or AUTO mode.

12

Page 12
Image 12
Mitsubishi Electronics PKA-A-GA installation manual Test run, Before test run, Using wired remote controller Fig

PKA-A-GA specifications

Mitsubishi Electronics has long been a key player in the realm of air conditioning and climate control technologies, offering a range of innovative solutions that cater to both residential and commercial needs. Among their impressive lineup, the Mitsubishi PKA-A-GA stands out as a noteworthy model known for its advanced features, efficiency, and reliability.

The Mitsubishi PKA-A-GA is a wall-mounted air conditioning unit specifically designed for easy installation and optimal performance. One of its main features is the sleek and modern design, which allows it to blend seamlessly with various interior settings. Its compact form factor saves space while maximizing cooling efficiency.

This model utilizes cutting-edge inverter technology, which significantly enhances energy efficiency. By adjusting the compressor speed according to the cooling demand, the PKA-A-GA maintains a consistent temperature while reducing energy consumption. This not only lowers utility bills but also contributes to a more sustainable operation, making the unit eco-friendly.

A remarkable characteristic of the PKA-A-GA is its advanced air filtration system. Equipped with a high-performance filter, the unit effectively removes allergens, dust, and other particulates from the indoor air, ensuring a cleaner and healthier environment. Additionally, the unit features a self-cleaning function, which helps maintain the filter's efficiency by reducing the buildup of dust and other particles.

Another compelling aspect of the Mitsubishi PKA-A-GA is its whisper-quiet operation. The unit is designed to minimize noise, making it ideal for bedrooms, offices, and other spaces where tranquility is essential. This is particularly beneficial for users who require a calm atmosphere for work or relaxation.

Furthermore, the PKA-A-GA is compatible with smart controls, allowing users to operate and monitor their air conditioning system remotely via smartphones or tablets. This feature adds convenience and lets users optimize their energy consumption even when they're away from home.

Lastly, the durability of the Mitsubishi PKA-A-GA is noteworthy. Built with high-quality materials and robust components, this air conditioning unit is designed to withstand the rigors of daily use while providing reliable performance over the years.

Overall, the Mitsubishi PKA-A-GA is an exceptional air conditioning solution, blending efficiency, smart technology, and user-friendly features into a compact design. Whether for residential or commercial applications, it promises to deliver comfort and satisfaction in an ever-evolving climate.