Menu operation
IMAGE
CONTRAST
BRIGHTNESS
sRGB
COLOR MATRIX *1
COLOR TEMP.
± | 30 |
± | 30 |
ON, OFF | |
VIDEO | |
COMPUTER | |
USER ![]()
![]()
OFF |
STANDARD |
HIGH |
LOW |
USER |
RED
YELLOW
GREEN
CYAN
BLUE
MAGENTA
SATURATION
CONTRAST R
CONTRAST B
BRIGHTNESS R
BRIGHTNESS B
± | 30 |
± | 30 |
± | 30 |
± | 30 |
± | 30 |
± | 30 |
± | 5 |
± | 30 |
± | 30 |
± | 30 |
± | 30 |
ENGLISH
INSTALLATION
COLOR
TINT *2
SHARPNESS
IRIS
± | 10 |
± | 10 |
± | 10 |
1, 2, 3, OFF | |
(Displays only when the source is selected to VIDEO) ![]() (Displays only when the source is selected to VIDEO)
(Displays only when the source is selected to VIDEO)
FEATURE
KEYSTONE
AUTO POWER ON
AUTO POWER OFF
SPLASH SCREEN
BACK COLOR
LAMP MODE
IMAGE REVERSE
MENU POSITION
EXPAND MODE
AUDIO MODE
VIDEO SIGNAL
ANAMORPHIC
LANGUAGE
RESET ALL
ON, OFF
OFF, 5, 10, 15, 30, 60 min
ON, OFF
BLUE, BLACK
STANDARD, LOW
OFF, MIRROR, INVERT, MIRROR INVERT
1=Upper left, 2=Lower right | (The item can not be selected when | ||
1 - 2 |
| the source is selected to COMPUTER) | |
|
|
| |
COMPUTER, VIDEO, COMPUTER VIDEO, MUTE
AUTO, NTSC, PAL, SECAM, 4.43NTSC,
ON, OFF
![]()
![]()
![]() , English, Español, Deutsch, Français, Italiano,
, English, Español, Deutsch, Français, Italiano, ![]()
OK ![]()
![]()
SIGNAL |
| MEMORY CALL |
| AUTO, USER1, USER2 |
|
|
|
|
|
| |||||
|
|
|
|
|
|
|
| ||||||||
|
| HORIZ.POSITION |
| 0 - 999 | *3 |
|
|
|
|
|
|
|
| ||
|
|
|
|
|
|
|
|
| |||||||
|
| VERT.POSITION |
| 0 - 999 | *3 |
|
|
|
|
|
|
|
| ||
|
|
|
|
|
|
|
|
| |||||||
|
| FINE SYNC. | *4 |
| 0 - 39 | *3 |
|
|
|
|
|
|
|
| |
|
|
|
|
|
|
|
|
|
|
| |||||
|
| TRACKING | *4 |
| 0 - 9999 |
|
|
|
|
|
|
|
| ||
|
|
|
|
|
|
|
|
| |||||||
|
| COMPUTER INPUT*4 |
| RGB, YCBCR / YPBPR |
|
|
|
| |||||||
|
|
|
|
|
|
|
|
|
| ||||||
|
| HOLD | *4 |
| AUTO |
|
|
|
|
|
|
|
|
|
|
|
|
|
|
|
|
|
|
|
|
|
|
| |||
|
|
|
|
| ON |
|
|
|
| BEGIN |
|
|
|
| |
|
|
|
|
| OFF |
|
|
|
| END |
|
| 1 - 99 | *3 | |
|
|
|
|
|
|
|
|
|
| ||||||
|
|
|
|
|
|
|
|
|
|
|
|
|
| ||
|
| USER |
|
|
|
|
| CLAMP POSITION *4 |
|
| 0 - +63 | ||||
|
|
|
|
|
|
|
|
| CLAMP WIDTH *4 |
|
| 1 - 63 | *3 | ||
|
| MEMORIZE |
|
| USER1, USER2 |
|
|
|
| ||||||
|
|
|
|
|
|
| HORIZ. PIXELS *4 |
|
| 0 - 9999 | *3 | ||||
|
| DELETE |
|
| USER1, USER2 |
|
|
|
|
| |||||
|
|
|
|
|
|
|
| VERT LINES *4 |
|
| 0 - 9999 | *3 | |||
|
| DEFAULT |
|
|
|
|
|
|
|
|
| ||||
|
|
|
|
|
|
|
|
| VERT. SYNC |
|
| AUTO, ON, OFF |
| ||
* 1: The item can not be selected when the sRGB is set to ON. |
|
|
|
|
|
|
| ||||||||
|
|
|
| SHUTTER (U) |
|
| 0 - 299 |
|
| ||||||
|
|
|
|
|
|
| |||||||||
* 2: The item can not be selected with certain signals. |
|
|
|
| SHUTTER (L) |
|
| 0 - 299 |
|
| |||||
|
|
|
|
|
|
| |||||||||
* 3: Setting range is different with certain signals. |
|
|
| SHUTTER(LS) |
|
| 0 - 398 |
|
| ||||||
|
|
|
|
| |||||||||||
* 4: The item cannot be selected when the source is selected |
|
|
| SHUTTER(RS) | 0 - 398 |
|
| ||||||||
|
|
|
| ||||||||||||
|
|
|
|
|
|
|
|
|
| ||||||
to VIDEO or |
|
|
|
|
|
|
|
|
|
|
|
|
| ||
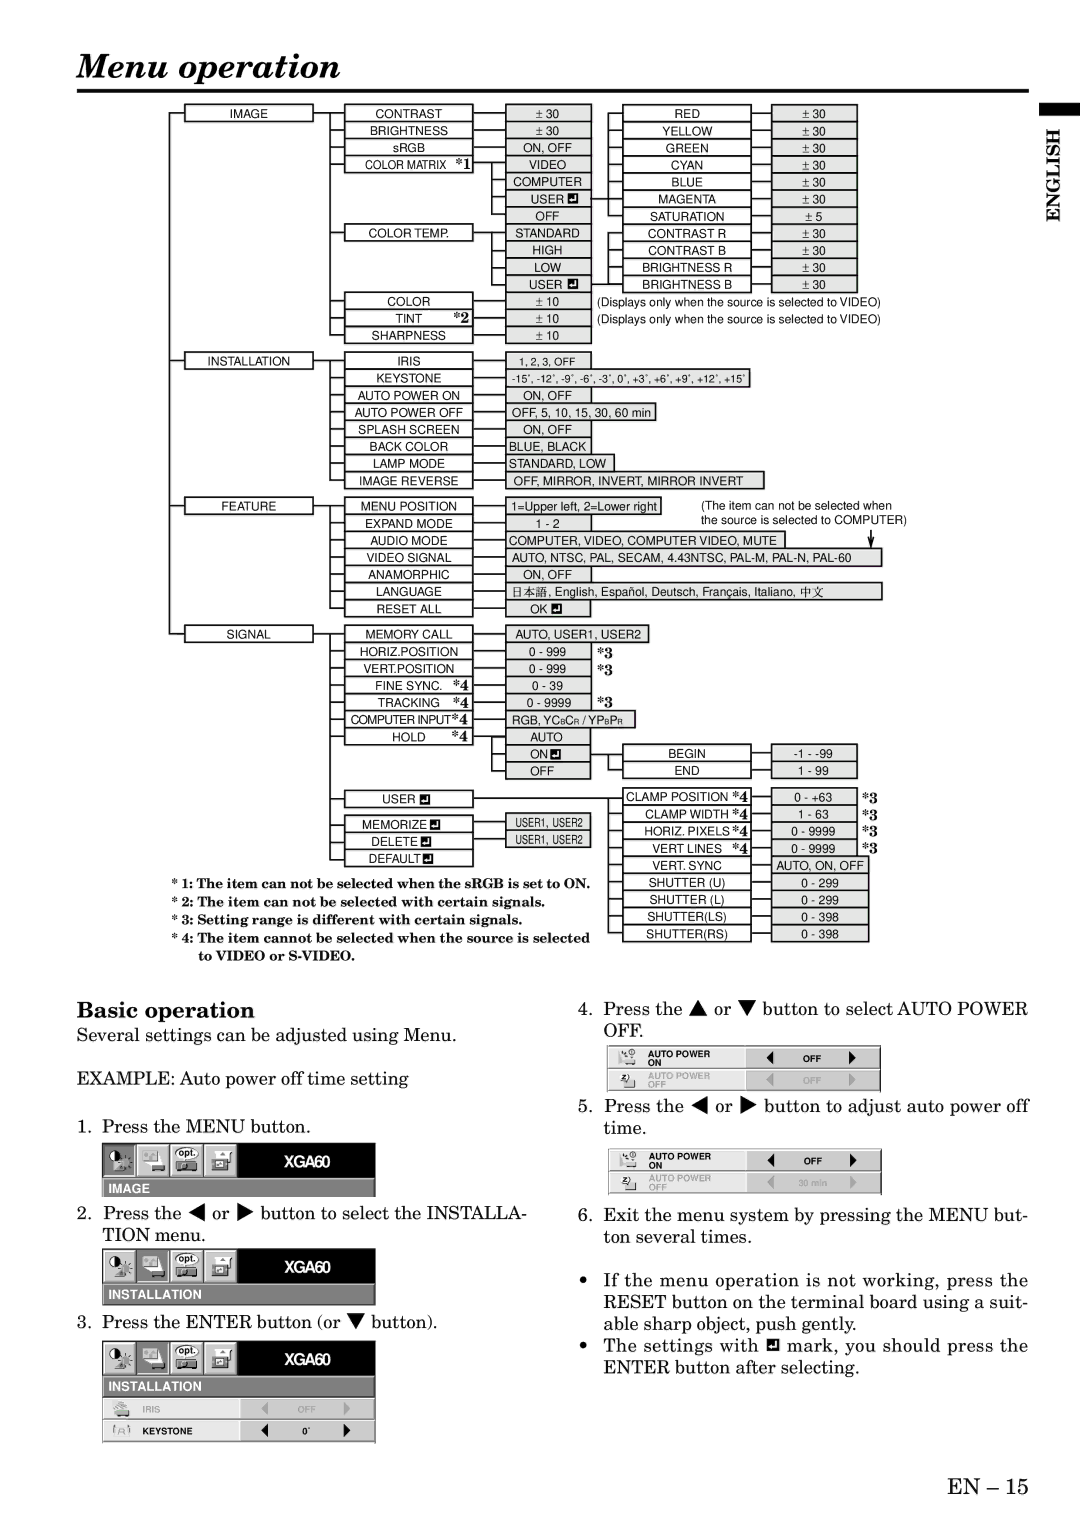
Basic operation | 4. Press the { or } button to select AUTO POWER | |||||
Several settings can be adjusted using Menu. | OFF. |
|
| |||
|
|
|
| AUTO POWER | OFF |
|
|
|
|
| ON |
| |
EXAMPLE: Auto power off time setting |
|
|
| OFF | OFF |
|
|
|
|
| AUTO POWER |
|
|
|
|
|
|
|
|
|
|
|
|
|
|
|
|
1. Press the MENU button. | 5. Press the $ or % button to adjust auto power off | ||||||||||||||||||||
| time. |
|
|
| |||||||||||||||||
|
|
|
|
|
|
|
|
|
|
|
|
|
|
|
|
|
|
|
|
|
|
|
|
|
|
|
| opt. |
|
|
|
|
|
|
|
|
|
|
|
|
|
|
|
|
|
|
|
|
|
|
|
| XGA60 |
|
|
|
|
|
| AUTO POWER |
|
| OFF |
| |
|
|
|
|
|
|
|
|
|
|
|
|
|
|
|
| ON |
|
|
| ||
|
|
|
|
|
|
|
|
|
|
|
|
|
|
|
|
| AUTO POWER |
|
| 30 min |
|
| IMAGE |
|
|
|
|
|
|
| OFF |
|
|
| |||||||||
|
|
|
|
|
|
|
|
|
|
|
|
|
|
|
|
|
|
|
|
|
|
2. | Press the $ or % button to select the INSTALLA- | 6. | Exit the menu system by pressing the MENU but- | ||||||||||||||||||
| TION menu. |
|
|
|
| ton several times. |
|
|
| ||||||||||||
|
|
|
|
|
| opt. |
|
|
| XGA60 |
|
|
|
|
|
|
|
|
|
|
|
|
|
|
|
|
|
|
|
|
|
|
|
| • | If the menu operation is not working, press the | |||||||
|
|
|
|
|
|
|
|
|
|
|
|
| |||||||||
| INSTALLATION |
|
|
| |||||||||||||||||
|
|
|
|
| RESET button on the terminal board using a suit- | ||||||||||||||||
3. | Press the ENTER button (or } button). |
| |||||||||||||||||||
| able sharp object, push gently. | ||||||||||||||||||||
|
|
|
|
|
|
|
|
|
|
|
|
| • | The settings with |
| mark, you should press the | |||||
|
|
|
|
|
| opt. |
|
|
| XGA60 |
|
|
| ||||||||
|
|
|
| ||||||||||||||||||
|
|
|
|
|
|
|
|
|
|
|
|
| ENTER button after selecting. | ||||||||
|
|
|
|
|
|
|
|
|
|
|
|
|
| ||||||||
| INSTALLATION |
|
|
|
|
|
|
|
|
|
|
|
| ||||||||
|
|
|
| IRIS | OFF |
|
|
|
|
|
|
|
|
|
|
| |||||
|
|
|
| KEYSTONE | 0˚ |
|
|
|
|
|
|
|
|
|
|
| |||||
|
|
|
|
|
|
|
|
|
|
|
|
|
|
|
|
|
|
|
|
|
|
EN – 15