To operate projector power ON


INPUT SELECT

COMPUTER 1 IN

AUDIO 1 IN

RS-232C

USB


REMOTE


VIDEO 1 IN VIDEO 2 IN


DIGITAL


ANALOG


MAIN

COMPUTER 2 IN

AUDIO 2 IN

S-VIDEO


VIDEO


O

I


AC IN

COMPUTER OUT

AUDIO OUT

L


AUDIO

R

2

,11


3

,9,10

LAMP

TEMP

4,6

ZOOM/


5

,7

FOCUS


VOLUME


8

COMPUTER KEYSTONE VIDEO

8


MENU

ENTER

3

,9,10


ENGLISH


8


KEYSTONE


COMPUTER

ZOOM/

4,6

AUTO POSITION


VIDEO FOCUS

POSITION

VOLUME


AUTO


button


5

,7

MENU

LASER


RIGHT CLICK

ENTER

EXPAND P in P

STILL


AUTO

MUTE


POSITION


MUTE button

AUTO POSITION


button


MUTE

MUTE button

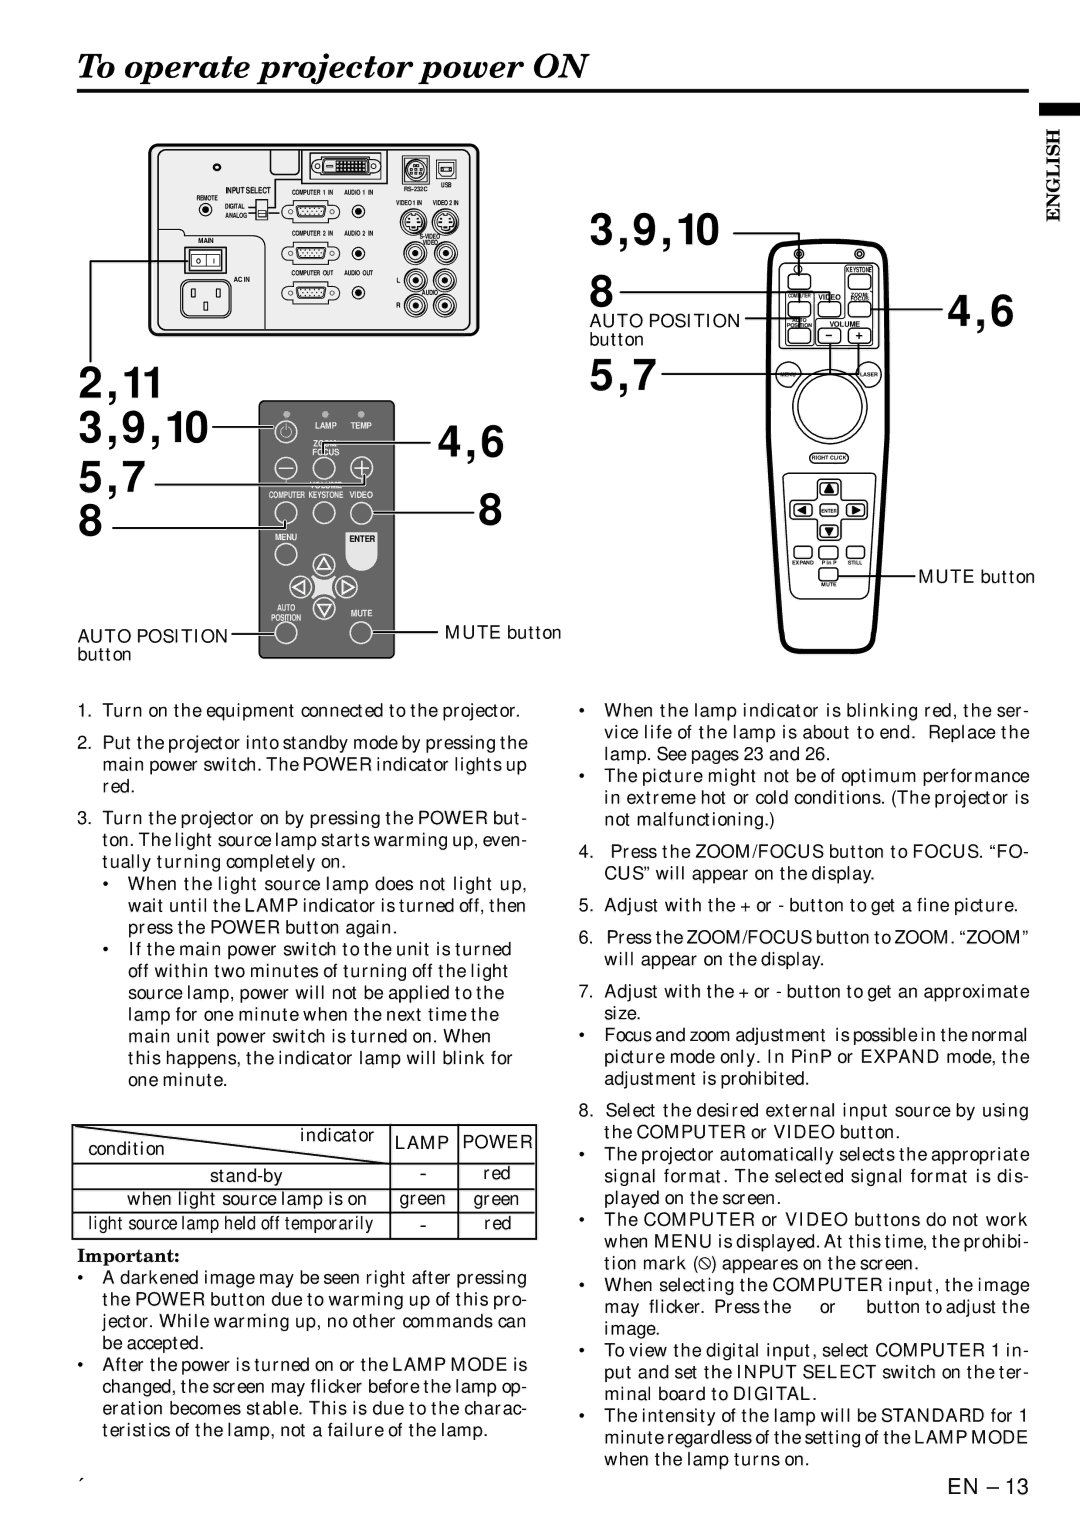
1.Turn on the equipment connected to the projector.

2.Put the projector into standby mode by pressing the main power switch. The POWER indicator lights up red.

3.Turn the projector on by pressing the POWER but- ton. The light source lamp starts warming up, even- tually turning completely on.

When the light source lamp does not light up, wait until the LAMP indicator is turned off, then press the POWER button again.

If the main power switch to the unit is turned off within two minutes of turning off the light source lamp, power will not be applied to the lamp for one minute when the next time the main unit power switch is turned on. When this happens, the indicator lamp will blink for one minute.

indicator

LAMP

POWER

condition


stand-by

-

red

when light source lamp is on

green

green

light source lamp held off temporarily

-

red

Important:

A darkened image may be seen right after pressing the POWER button due to warming up of this pro- jector. While warming up, no other commands can be accepted.

After the power is turned on or the LAMP MODE is changed, the screen may flicker before the lamp op- eration becomes stable. This is due to the charac- teristics of the lamp, not a failure of the lamp.

When the lamp indicator is blinking red, the ser- vice life of the lamp is about to end. Replace the lamp. See pages 23 and 26.

The picture might not be of optimum performance in extreme hot or cold conditions. (The projector is not malfunctioning.)

4.Press the ZOOM/FOCUS button to FOCUS. “FO- CUS” will appear on the display.

5.Adjust with the + or - button to get a fine picture.

6.Press the ZOOM/FOCUS button to ZOOM. “ZOOM” will appear on the display.

7.Adjust with the + or - button to get an approximate size.

Focus and zoom adjustment is possible in the normal picture mode only. In PinP or EXPAND mode, the adjustment is prohibited.

8.Select the desired external input source by using the COMPUTER or VIDEO button.

The projector automatically selects the appropriate signal format. The selected signal format is dis- played on the screen.

The COMPUTER or VIDEO buttons do not work when MENU is displayed. At this time, the prohibi- tion mark ( ) appeares on the screen.

When selecting the COMPUTER input, the image may flicker. Press the $ or % button to adjust the image.

To view the digital input, select COMPUTER 1 in- put and set the INPUT SELECT switch on the ter- minal board to DIGITAL.

The intensity of the lamp will be STANDARD for 1 minute regardless of the setting of the LAMP MODE when the lamp turns on.

´

EN – 13

Page 13
Image 13
Mitsubishi Electronics X500U user manual To operate projector power on, Auto Position, Button

X500U specifications

The Mitsubishi Electronics X500U is a cutting-edge projector designed to cater to a wide range of professional and educational environments. This compact device is renowned for its impressive image quality, advanced technologies, and versatile features that make it an ideal choice for presentations, lectures, and multimedia experiences.

One of the main features of the X500U is its high brightness capacity, capable of delivering up to 5000 lumens. This ensures that images remain vibrant and clear even in well-lit rooms, making it well-suited for various settings. The projector utilizes a full HD resolution of 1920 x 1080, providing crystal-clear images with stunning detail. This resolution is particularly beneficial for displaying intricate graphs, charts, and videos, providing a rich viewing experience for any audience.

The X500U incorporates advanced DLP (Digital Light Processing) technology, which enhances color accuracy and contrast. With a high dynamic contrast ratio, the projector produces deep blacks and bright whites, ensuring that every detail is captured, even in the darkest scenes. This technology minimizes the potential for color degradation over time, ensuring that the projector maintains its performance over extended usage.

Another significant feature is the X500U's connectivity options. It includes multiple HDMI ports, USB slots, and VGA inputs, allowing seamless integration with a variety of devices such as laptops, Blu-ray players, and mobile devices. This versatility ensures that users can easily switch between different input sources without hassle.

The projector also boasts a range of user-friendly features, such as a quick-start option, which allows users to begin presenting almost immediately. Furthermore, with its built-in speaker system, the X500U provides adequate audio output for smaller rooms, eliminating the need for external speakers in certain situations.

In terms of portability, the X500U is designed to be lightweight and compact. This means it can be easily transported between locations, making it an excellent choice for traveling professionals and educators.

Lastly, the X500U is equipped with an eco-friendly mode that extends lamp life significantly, often reaching up to 15,000 hours. This feature not only reduces maintenance costs but also minimizes environmental impact, aligning with modern sustainability goals.

In conclusion, the Mitsubishi Electronics X500U is a versatile and robust projector, packed with features that enhance the viewing experience while providing convenience and efficiency for users across various applications.