CHIIMNEY INSTALLATION

CHIMNEY CAP INSTALLATION (CONTINUED)

CAUTION

Be careful to avoid electrical shock


hazard when contacting wires to


metal chimney components.

Top of

Standard Roofing Flashing

Shingles

1.

Extend the regular chimney sections until the top of the chimney is


4" below the total flue height desired.


2.

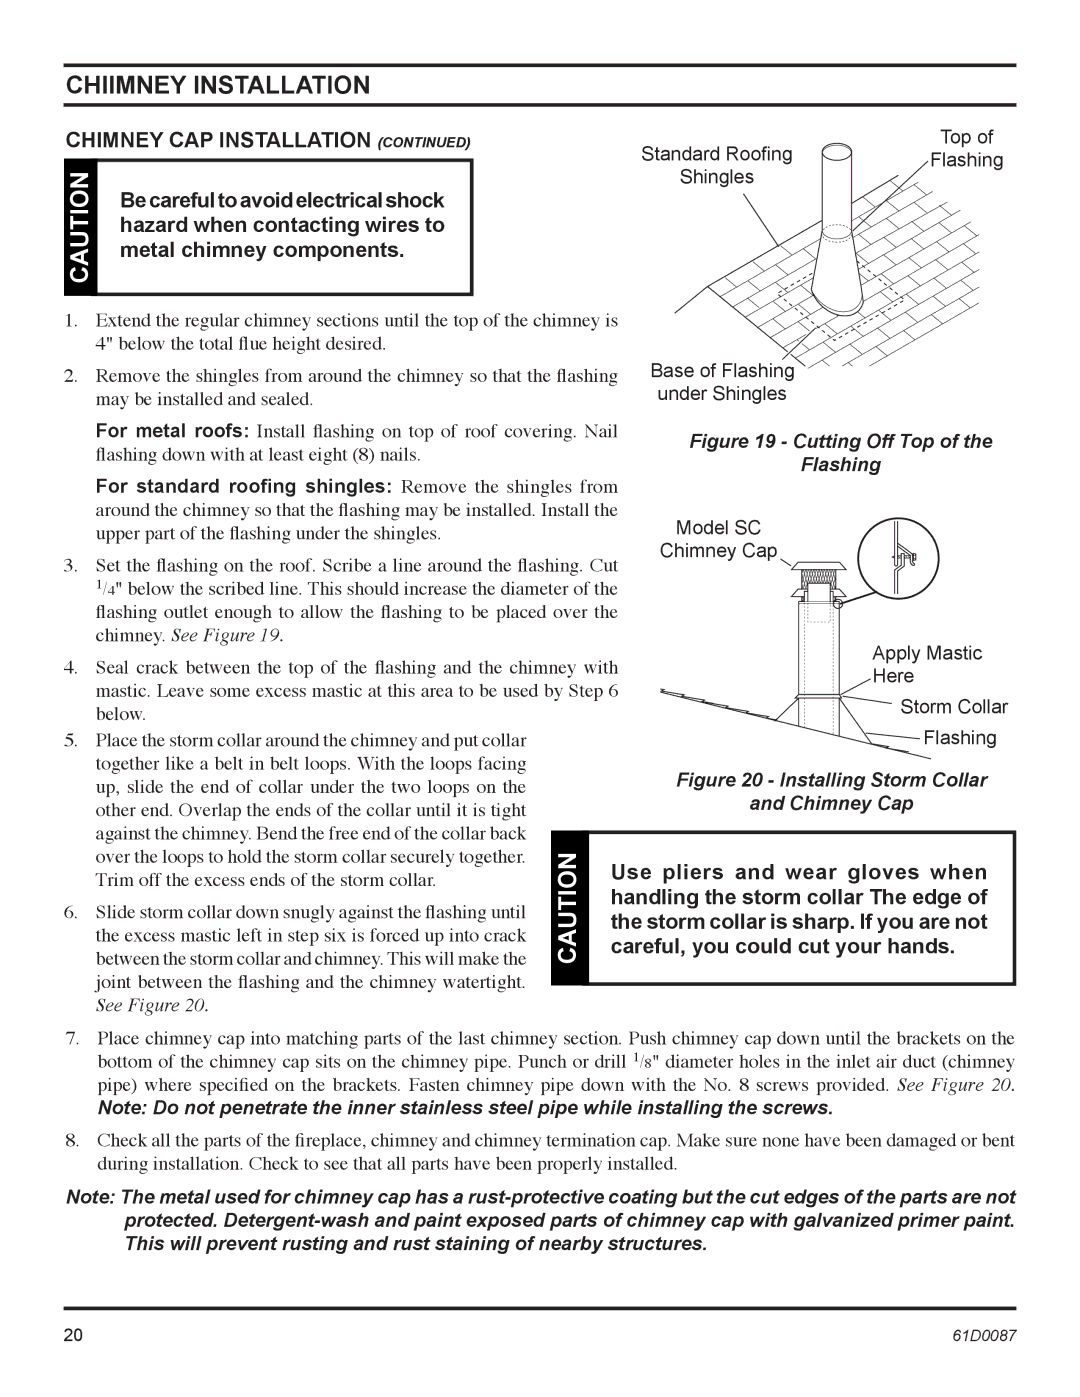
Remove the shingles from around the chimney so that the flashing

Base of Flashing


may be installed and sealed.

under Shingles

For metal roofs: Install flashing on top of roof covering. Nail

Figure 19 - Cutting Off Top of the

flashing down with at least eight (8) nails.

Flashing


For standard roofing shingles: Remove the shingles from around the chimney so that the flashing may be installed. Install the

upper part of the flashing under the shingles.Model SC Chimney Cap

3. Set the flashing on the roof. Scribe a line around the flashing. Cut 1/4" below the scribed line. This should increase the diameter of the flashing outlet enough to allow the flashing to be placed over the chimney. See Figure 19.

4. Seal crack between the top of the flashing and the chimney with


Apply Mastic


Here

mastic. Leave some excess mastic at this area to be used by Step 6


Storm Collar


below.


Flashing

5. Place the storm collar around the chimney and put collar


together like a belt in belt loops. With the loops facing


Figure 20 - Installing Storm Collar

up, slide the end of collar under the two loops on the


other end. Overlap the ends of the collar until it is tight


and Chimney Cap

against the chimney. Bend the free end of the collar back


over the loops to hold the storm collar securely together.

CAUTION

Use pliers and wear gloves when

between the storm collar and chimney. This will make the

Trim off the excess ends of the storm collar.


handling the storm collar The edge of

6. Slide storm collar down snugly against the flashing until


the storm collar is sharp. If you are not

the excess mastic left in step six is forced up into crack


careful, you could cut your hands.


joint between the flashing and the chimney watertight.


See Figure 20.


7.Place chimney cap into matching parts of the last chimney section. Push chimney cap down until the brackets on the bottom of the chimney cap sits on the chimney pipe. Punch or drill 1/8" diameter holes in the inlet air duct (chimney pipe) where specified on the brackets. Fasten chimney pipe down with the No. 8 screws provided. See Figure 20.

Note: Do not penetrate the inner stainless steel pipe while installing the screws.

8.Check all the parts of the fireplace, chimney and chimney termination cap. Make sure none have been damaged or bent during installation. Check to see that all parts have been properly installed.

Note: The metal used for chimney cap has a rust-protective coating but the cut edges of the parts are not protected. Detergent-wash and paint exposed parts of chimney cap with galvanized primer paint. This will prevent rusting and rust staining of nearby structures.

20

61D0087

Page 20
Image 20
Monessen Hearth BWBC400MHB, BWBC500MHB manual Use pliers and wear gloves when, Handling the storm collar The edge

BWBC500MHB, BWBC400MHB specifications

The Monessen Hearth BWBC500MHB and BWBC400MHB are two sophisticated gas-burning fireplaces designed to combine aesthetic appeal with efficiency and functionality. Known for their innovative technologies and remarkable features, these models cater to various needs, making them ideal for any modern home.

One of the standout features of both models is their impressive heating capabilities. The BWBC500MHB delivers a heat output of up to 38,000 BTUs, making it suitable for larger spaces. In contrast, the BWBC400MHB provides up to 30,000 BTUs, catering well to smaller areas without compromising warmth. These fireplaces are engineered to heat your space effectively while maintaining a visually appealing ambience.

Aesthetically, both models showcase a clean and contemporary design, featuring a large viewing area. This expansive glass front offers an unobstructed view of the mesmerizing flames, allowing you to enjoy the flickering fire from various angles in the room. Further enhancing the visual allure, Monessen provides optional decorative media such as glass beads or ceramic logs, enabling you to customize the look of your fireplace to match your interior décor.

The Monessen Hearth models utilize advanced technology to maximize efficiency and ease of use. Each unit incorporates an electronic ignition system that ensures a reliable start-up. This feature eliminates the need for matchsticks, providing convenience for users. Additionally, both fireplaces come standard with a remote control option, allowing users to adjust flame height and heat settings without having to leave the comfort of their seat.

Another critical aspect of these models is their versatility in venting options. Both the BWBC500MHB and BWBC400MHB can be vented vertically or horizontally, making them adaptable to various installation configurations and building requirements. This flexibility allows homeowners to integrate these elegant units seamlessly into their existing architecture.

Moreover, they are designed with energy efficiency in mind. Their sealed combustion system draws air from outside the home, maximizing heat retention and minimizing energy loss. This feature not only contributes to reduced heating costs but also enhances overall indoor air quality.

In summary, the Monessen Hearth BWBC500MHB and BWBC400MHB are exceptional gas-burning fireplaces that bring warmth, style, and comfort to any living space. With their advanced features, customizable design options, and efficient technologies, these models set a high standard in the world of modern fireplaces, ensuring that homeowners can enjoy the beauty and warmth of a fire any time of year.