Installing
Caution: Never pull, carry, or hold the ultrasonic insert by the cable as this may sever internal connections.
1.From outside the hull, push the housing into the mounting hole using a twisting motion to squeeze out excess sealant (see Figure 3). Align the arrow on the lip of the housing pointing forward toward the bow. If the sensor is not installed on the centerline, angle the housing slightly toward the centerline to align it with the water flow.
2.From inside the hull, slide the washer onto the housing. Aluminum hull less than 6mm (1/4")
3.Screw the hull nut in place being sure the notch on the upper rim of the housing and the corresponding arrow on the lip are still positioned forward toward the bow (see Figures 3 and 5). (If your plastic housing has wrenching flats, do not clamp tightly, possibly causing the housing to fracture.)
Plastic hull
Wood
4.Remove any excess sealant on the outside of the hull to ensure smooth water flow over the ultrasonic insert.
Warning: The
5.After the sealant cures, inspect the
Important: For the sensor to work properly, the bottom of the insert must be flush with the bottom of the housing.
6.Slide the ultrasonic insert into the housing with the arrow on the top pointing forward toward the bow. Seat it into place with a pushing twisting motion until the key fits into the notch. The arrow on the tip of the insert, the notch in the housing, and the arrow on the lip will be aligned. Be careful not to rotate the housing and disturb the sealant. Screw the cap nut in place and hand- tighten only. Do not
Warning: Always attach the safety wire to prevent the insert from backing out in the unlikely event that the cap nut fails or is screwed on incorrectly.
7.Attach the safety wire.
Plastic
Metal
8.To wire the ultrasonic sensor, follow the instructions, “Wiring” on page 5.
|
| |
pour in |
| |
larger than the |
| |
casting | hole through the |
|
epoxy | hull’s outer skin | inner skin |
|
| core |
hull thickness
solid or hollow cylinder | outer skin |
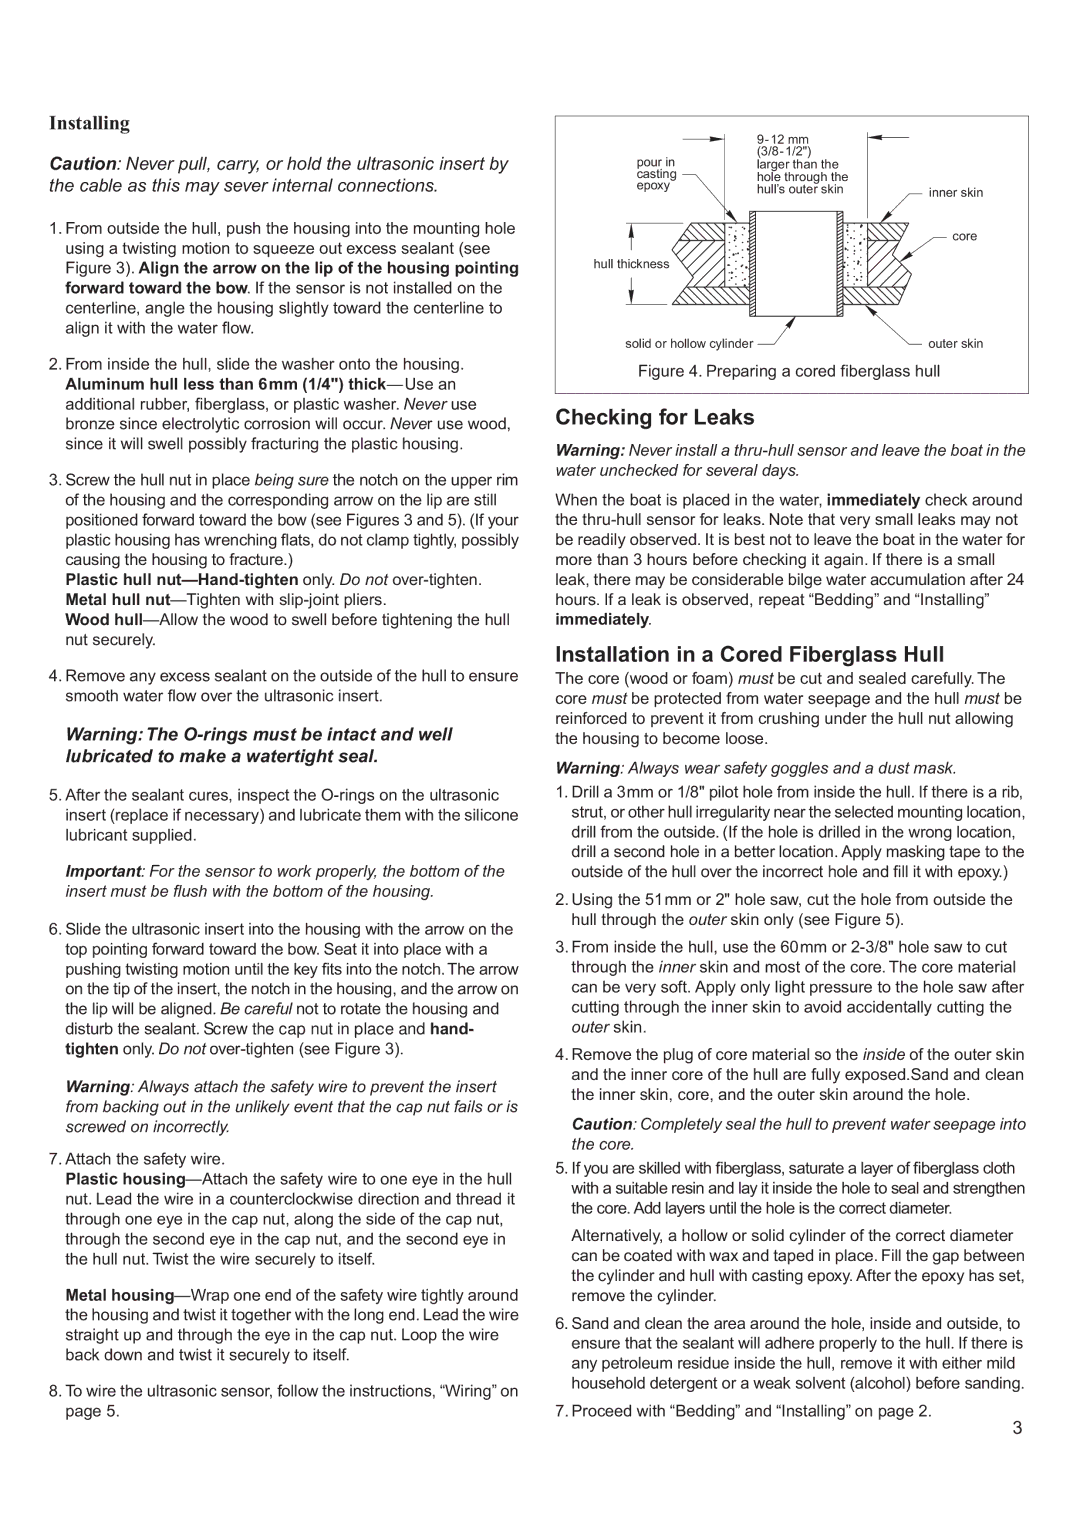
Figure 4. Preparing a cored fiberglass hull
Checking for Leaks
Warning: Never install a
When the boat is placed in the water, immediately check around the
Installation in a Cored Fiberglass Hull
The core (wood or foam) must be cut and sealed carefully. The core must be protected from water seepage and the hull must be reinforced to prevent it from crushing under the hull nut allowing the housing to become loose.
Warning: Always wear safety goggles and a dust mask.
1.Drill a 3mm or 1/8" pilot hole from inside the hull. If there is a rib, strut, or other hull irregularity near the selected mounting location, drill from the outside. (If the hole is drilled in the wrong location, drill a second hole in a better location. Apply masking tape to the outside of the hull over the incorrect hole and fill it with epoxy.)
2.Using the 51mm or 2" hole saw, cut the hole from outside the hull through the outer skin only (see Figure 5).
3.From inside the hull, use the 60mm or
4.Remove the plug of core material so the inside of the outer skin and the inner core of the hull are fully exposed.Sand and clean the inner skin, core, and the outer skin around the hole.
Caution: Completely seal the hull to prevent water seepage into the core.
5.If you are skilled with fiberglass, saturate a layer of fiberglass cloth with a suitable resin and lay it inside the hole to seal and strengthen the core. Add layers until the hole is the correct diameter.
Alternatively, a hollow or solid cylinder of the correct diameter can be coated with wax and taped in place. Fill the gap between the cylinder and hull with casting epoxy. After the epoxy has set, remove the cylinder.
6.Sand and clean the area around the hole, inside and outside, to ensure that the sealant will adhere properly to the hull. If there is any petroleum residue inside the hull, remove it with either mild household detergent or a weak solvent (alcohol) before sanding.
7.Proceed with “Bedding” and “Installing” on page 2.
3
