Digital Camera
Trademark Information
Symbols and Conventions
For Your Safety
Do not look at the sun through the view- finder
Iii
Page
Comply with copyright notices
Table of Contents
Movies
More on Playback
Shooting Menu
Playback Menu 113
Setup Menu 130
Use Only Nikon Brand Electronic Accessories
Technical Notes 143
Introduction
Attaching the Camera Strap
Lens Cap
Before Taking Important Pictures
Battery-chamber cover latch Tripod socket
Parts of the Camera
Lens ring removed
Connector
DC-IN
Following indicators are displayed during shooting1
Shooting Display Monitor/Electronic Viewfinder
Button
Flash mode for optional
105
100
107
Control Panel1
Aperture2
Exposure compensation
Monitor
Shutter-Release Button
Press all
To lock focus Way down to Exposure Shoot
Mode Dial
Multi Selector
Multi selector is used to navigate through the camera menus
Charging the Battery
Charge the battery
MH-56 Battery Charger
First Steps
Inserting the Battery
Inserting Batteries
When the Battery Is Not in Use
Alternative Power Sources
Removing the Battery-Chamber Cover
EN-EL7 Batteries
Inserting Memory Cards
Close the memory card slot cover
Terminals
Ofinsertion Direction Front
Eject Button
Removing Memory Cards
Auto Power Off Standby Mode
Turning the Camera On
Ready the monitor Turn the camera on
Turning the Camera Off
Basic Setup
Clock Battery
Italiano Italian, Nederlands Dutch
Display map of world time zones Select home time zone
Time Zone menu displayed. ‡ Display Date menu
Edit Day order of Day, Month, Year may differ in some areas
Highlight D M Y
Rotate the Mode Dial to
Battery Indicator
Basic Photography
Shooting
Frame the Picture
When Lighting Is Poor
Built-in Speedlight
Digital Zoom
Viewfinder Focus
Focus and Shoot
Focus
Press the shutter-release button halfway to set fo
Take the picture
Low Battery
Area mode
During Recording
Number of Exposures Remaining
Getting Good Results with Autofocus
AF/AE Lock
AE/AF-L Button
Playback Mode
Deleting Unwanted Pictures Full-Screen Review
Quick Review
Playback Tips
Quick Playback Zoom
End zoom and return to playback
Image File and Folder Names
Type
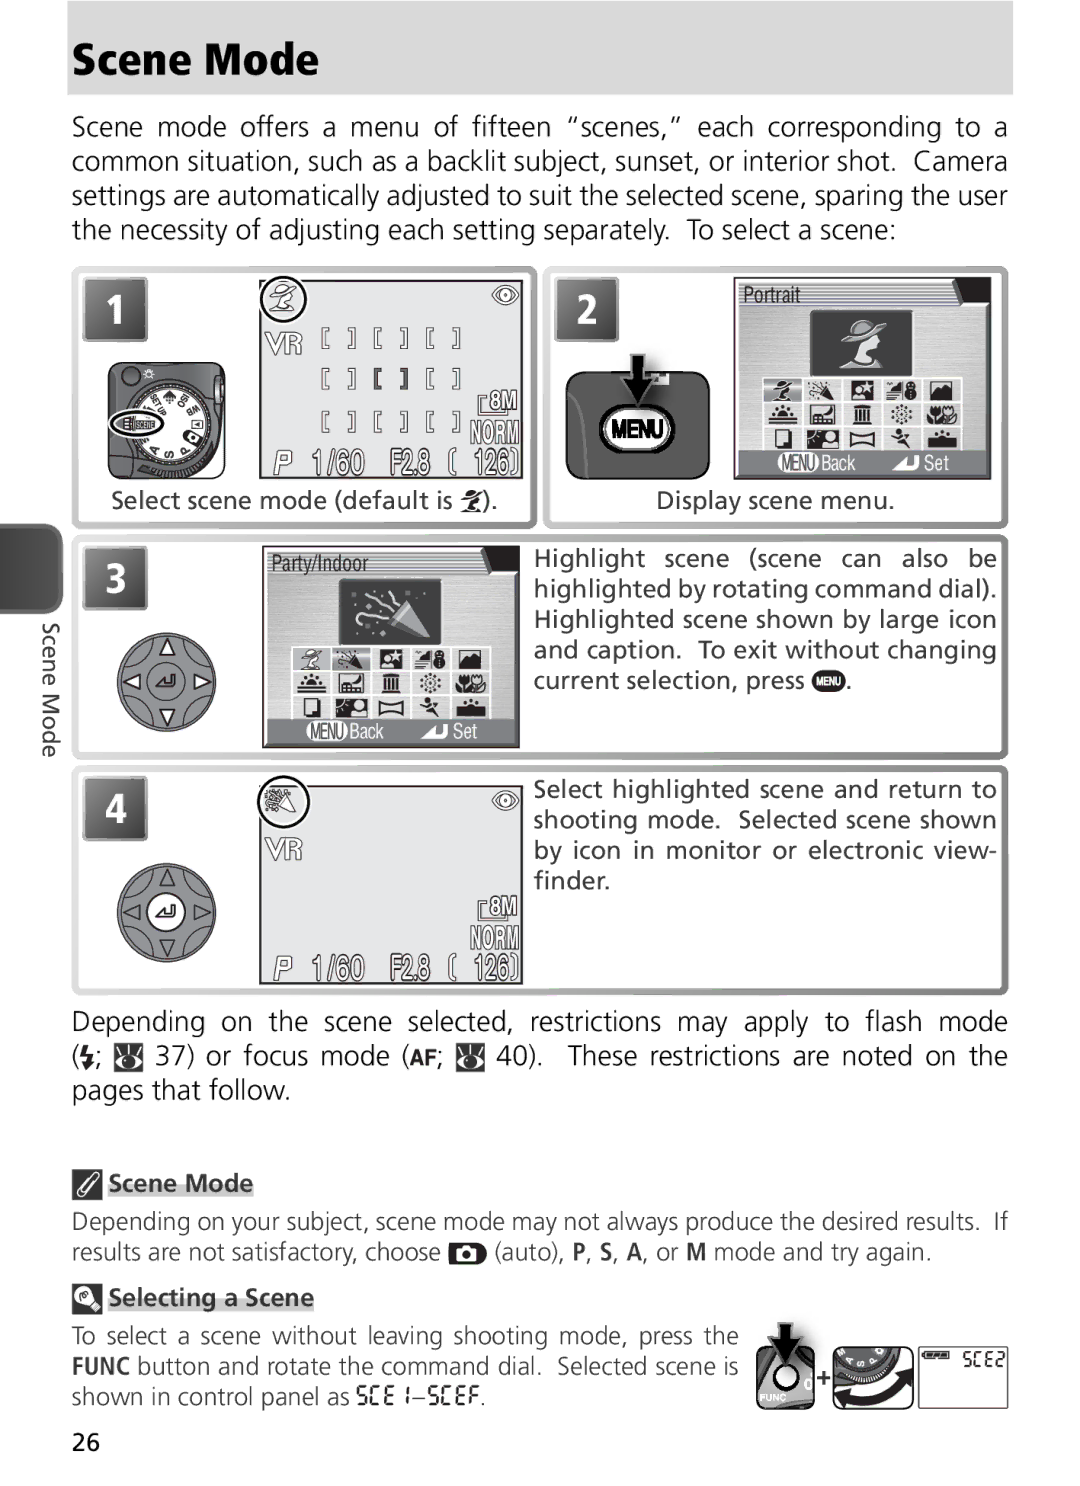
Scene Mode
Scene Mode
Selecting a Scene
Other modes can be selected † Auto mode can be selected
An ISO icon may be displayed when lighting is poor
Use for shots that provide natural balance between main
Auto
Use tripod
Other modes can be selected
Museum
† Other modes can be selected
† Macro close-up mode can be selected
Auto†
Panorama assist
Virtual-reality image
Taking Pictures for a Panorama
Fast shutter speeds freeze motion for dynamic sports shots
Panorama assist
Viewing Pictures Taken Using Panorama Assist
Use a Tripod
Image Mode
More on Photography
Image Quality
Image Size
Image size
Pixels
Viewing RAW NEF Images on a Computer
To choose image quality or size
Shooting Menu
Memory Card Capacity and Image Mode
File size
Flash Mode
Select a flash mode according to lighting conditions
When to use it
Mode
To choose a flash mode
Manual Pop-Up
Flash Range
Sensitivity ISO Equivalency
Using the Built-in Speedlight
Lens Hoods
Displayed to warn that pictures may be slightly mottled
Red-Eye Reduction
Focus Mode
To choose a focus mode
Mode How it works When to use it
Manual Focus
Self-Timer and Remote Control Photography
Using the Self-Timer
Using the ML-L3 Remote Control
Self-Timer
Using the ML-L3 Replacing the Battery
ML-L3 Remote Control
Keep out of Reach of Children
Cancelling Exposure Compensation
Exposure Compensation
Restrictions on Exposure Compensation
Choosing a Value for Exposure Compensation
Turn VR off when using a tripod
Vibration Reduction VR
Vibration Reduction
How it works When to use it
SA M Controlling Exposure P, S, A, and M Modes
Select mode P Frame picture, focus, and shoot
Programmed Auto
Flexible Program
Shutter-Priority Auto
Ultra HS
Aperture Restrictions
Aperture-Priority Auto
Aperture and Zoom
Faster Shutter Speeds
Manual
Understanding the Exposure Displays
Long Time Exposures
Sensitivity
Option
Exposure Mode
Using the Flash
White Balance
Option Description
Fine-Tuning White Balance
Choose value for fine tuning Make selection
Highlight option Make selection
Preset White Balance
Preset white balance can not be measured with the flash
Sets white balance to this value
Recorded
Rotate mode dial to P, S, A, M, or
Cancelling Manual Focus
To cancel manual focus, press the MF button
Manual Focus
Image Adjustment
Will be used
Movie Mode
Movies
To choose the type of movie that will be recorded
Highlight Movie options
Highlight mode To exit without changing mode, press button
Autofocus Mode
Selecting a Movie Mode
Func button and rotate the command dial
Recording Movies
End recording
TV, Small, Sepia, and Black-and-White Movies
Do not touch the built-in microphone during recording
Recording a Time-Lapse Movie
Highlight Set interval time
Highlight AE lock
Display AE Lock menu
Use a Reliable Power Source
When On is selected for AE lock, a yellow AE-L icon will be
Image Quality
AE Lock
Viewing Movies
Quick Review/Full-Screen Review
Direct Print
Movies can not be printed via direct USB connection
More on Playback
Viewing Pictures on the Camera
Full-Frame Playback
Display RAW-quality original Confirmation dialog displayed
Creating HI-Quality Copies
Viewing Multiple Pictures Thumbnail Playback
Photo Information
1 File Information
2 Shooting Information
3 Shooting Information
4 Shooting Information
5 Exposure Information
6 Focus Confirmation
Taking a Closer Look Playback Zoom
Press Description
Playback Zoom
Cropping Pictures
Cropped Copies
Quick Edit
Creating Small Copies Small Picture
Create small copy of current picture
Brightness and contrast
Enhancing Contrast D-Lighting
Lighting can be used to brighten dark or backlit subjects
Highlight D-Lighting Confirmation dialog displayed
Copies
Pressed. Recording ends after about 20 s or when But
Memo Can be
While Button is
Icon appears in file information display during playback
Choosing a Video Mode
Viewing Pictures on TV
Before Connecting the Camera
Viewing Pictures on a Computer
Operating system USB option
Connecting the USB Cable
UC-E6 USB cable
Disconnecting the Camera
Drag the untitled camera volume no Name into the Trash
Windows Millennium Edition Me
Windows 98 Second Edition SE
Printing Pictures
To print the pictures from the camera memory card
To print the time and date of recording on pictures
Date imprint Print selection Date
Printing Via Direct USB Connection
Before Printing
Pictures That Can Not Be Printed by Direct USB Connection
PictBridge
Printing Selected Pictures Print Selection
Printing
Highlight Print selection
Highlight Start print Start printing.†
Era off and disconnect USB cable, or
Press center of multi selector to return
To Step
Printing All Pictures Print All Images
Printing the Current Print Order Dpof Printing
To print one copy of each picture on the memory card
Highlight Print all images
Error Messages
Printing Dpof Print Orders on PictBridge Compatible Printers
Select P, S, A, or M mode Display shooting menu
Shooting Menu
Highlight Show all menus
Full shooting menu displayed
Full shooting menu contains the following options
Icon
Metering
Matrix
Metering
Continuous
Ultra HS4
Other Camera Settings
Focus, Exposure, and White Balance
Memory Buffer
Continuous
Interval Timer Photography
Make selection Return to shooting mode
Folders
Quick Review/Full Screen Review
Best Shot Selector BSS
Off
Restrictions on BSS
BSS
Image Adjustment
Options in the image adjustment menu control contrast
Image Adjustment
Selected for Saturation control
Saturation Control
Conditions
Moderate
Minimum Puter
User Setting
Other settings
User Setting
Shooting menu options
Image Sharpening
Ies from shot to shot
High
Retouched on a computer
Using a Flash
Lens
Use Autofocus
Lens
Exposure Options
AE Lock
While AE lock is in effect, an AE-Lautoexposure lock icon
Bulb/Time
Pressed again
AF Area Mode
Manual Focus Area Selection in Scene Mode
Focus Options
Manual
Auto-Focus Mode
Focus Confirmation
Taken
Off No indication of focus appears in shooting display 101
Zoom Options
Digital Tele
Fixed Aperture
Controls whether aperture varies with zoom position
VR Mode
VR Mode
Active
Vibration is exaggerated. Panning not supported
Accessory Shoe
Speedlight Options
Pop Up
Flash Exp. Comp
Flash Mode Indicators for Optional Speedlights
Speedlight Cntrl
SB-800 and SB-600 Speedlights
106
When white balance bracketing is in effect
Auto Bracketing
Restrictions on Auto Bracketing
Auto Bracketing
Autoexposure Bracketing
Number of shots
Bracketing order
Continuous Shooting Autoexposure Bracketing
Noise Reduction
Required to save pictures to memory card more than doubles
Noise reduction off camera functions normally
Restrictions on Noise Reduction
Reset
Basic settings Default
Applies to both banks Fine-tuning reset to
Menu options Default
My Menu
Highlight My menu Display custom menu
CF Card Format
Exit without formatting memory card
While formatting is in progress. Do not turn the cam
Playback Menu
Playback menu contains the following options
To display the playback menu
Delete
Deleting Selected Pictures
Delete menu contains the following options
Highlight Selected images
Deleting All Pictures
Highlight Erase all images
Before Deletion
Protected Pictures
Folders
Folder Options
Folder options menu contains the following op- tions
Creating New Folders
Folder Options
Panorama Assist/Ultra HS/Intvl Timer Shooting
Deleting Folders
Highlight Delete Folder Nikon can not be deleted
Hidden and Protected Pictures
Selecting a Folder for Storage and Playback Folders
Selecting a Folder for Storage
Highlight Folders Display folder list
119
Slide Show
To view a slide show
Start slide show
Choose how long each picture is displayed
Changing the Display Interval
Auto Off
Frame Interval
121
Protect
Complete operation
Hide Image
ALL Images are Hidden
Print Set
To create a print order or modify the existing print order
Create or modify print order as described below
But no pictures will be deleted
Print Set
Date
125
Auto Transfer
Marking Selected Pictures for Transfer
Select pictures for transfer
Mark all pictures for transfer
Marking All Pictures for Transfer
Highlight All images
Restrictions on Auto Transfer
127
Move Image
To move pictures to another folder on the memory card
Select source folder
Display list of destination folders
Small Pic
Highlight destination folder
Info.txt
File Names
Setup Menu
Setup menu contains the following options
Setup menu is displayed when the mode dial is rotated to
Language
Date
Choosing Home and Travel Destination Time Zones
Chinese, and Korean
To switch between home and travel destination time zones
Time Zones
132
Monitor Options
Release Speed
Priority given to quality of preview image
Review Options
Brightness
Hue
Brightness and Hue
Start-up Display
Welcome Screen
Monitor turns on at startup. Viewfinder
Viewfinder turns on at startup
Seq. Numbers
After transfer to computer
Inserted, or memory card formatted
Shutter Sound
Shutter sound controls the beep made by the cam- era speaker
Using an AC Adapter
Auto Off
By pressing
Buttons, or by pressing the shutter-release
Image quality
Image size
Sensitivity
AE/AF-Lbutton locks both focus and exposure
Shot Confirmation
Info.txt
Sensitivity ISO equivalency
Video Mode
Reset All
Restore settings to default values
Default values
Date Imprint
Firmware Version
Date Imprint
That the camera clock is set to the correct time and date
Optional Accessories
Use Only Nikon-Approved Flash Accessories
Technical Notes
Converters, Lens Hoods, and Filters
Approved Memory Cards
Memory Cards
Caring for Your Camera
Handle the lens and all moving parts with care
Cleaning
Lens/Electronic Viewfinder
Monitor
Body
Storage
Batteries
147
Error Messages
Problem Solution
Err appears in control panel
Desired mode
Mode Pressing Button
Memory Card has
Camera has run out Insert new memory card
Error
Retailer or Nikon service repre
finger or other object
Required for additional release button halfway
Troubleshooting
Battery is exhausted
Indicators are hidden. Press Button until indicators are
Blank
Record picture at current image quality and size settings
Flash indicator blinks flash is charging
Not formatted for use in camera
Flash is off
For Continuous
Speedlight cntrl is set to Internal off
To Auto
Specifications
Self-timer
Accessory shoe
Monitor
Exposure Metering
MH-56 Battery Charger
EN-EL7 Rechargeable Li-ion Battery
Index
AE lock CF card format
158
Mail, 34 Exif 2.2
User setting
159
6MA04211
 1/60 F2.8
  126
126
 1/60 F2.8
  126
126
 Scene Mode
 Selecting a Scene