Cable Assembly
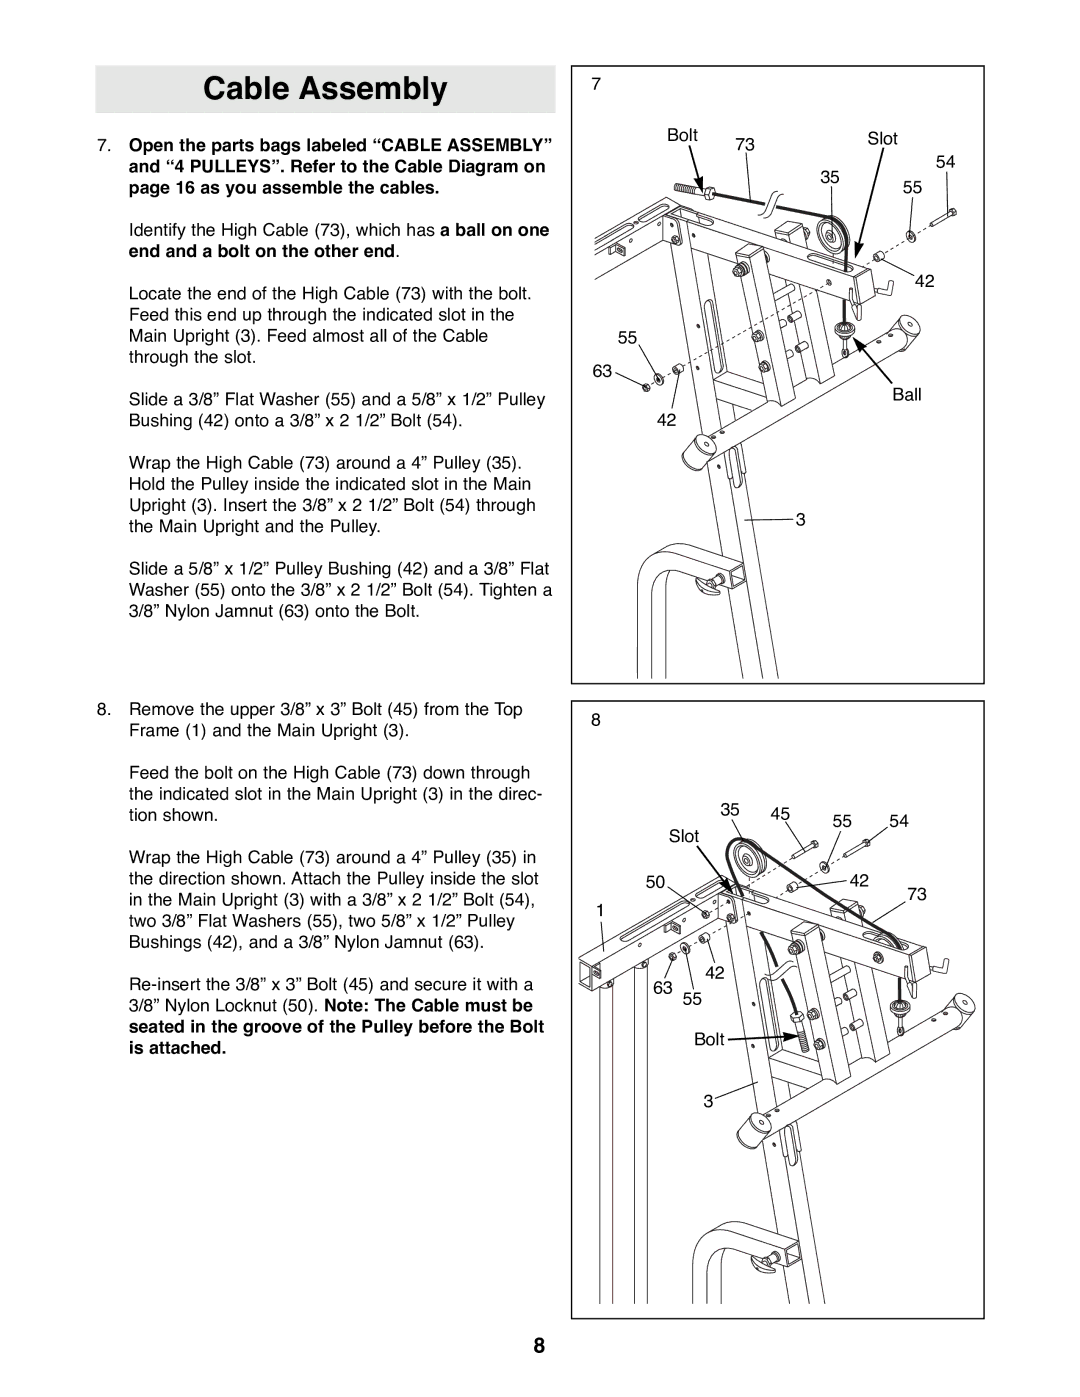
7.Open the parts bags labeled ÒCABLE ASSEMBLYÓ and Ò4 PULLEYSÓ. Refer to the Cable Diagram on page 16 as you assemble the cables.
Identify the High Cable (73), which has a ball on one end and a bolt on the other end.
Locate the end of the High Cable (73) with the bolt. Feed this end up through the indicated slot in the Main Upright (3). Feed almost all of the Cable through the slot.
Slide a 3/8Ó Flat Washer (55) and a 5/8Ó x 1/2Ó Pulley Bushing (42) onto a 3/8Ó x 2 1/2Ó Bolt (54).
Wrap the High Cable (73) around a 4Ó Pulley (35). Hold the Pulley inside the indicated slot in the Main Upright (3). Insert the 3/8Ó x 2 1/2Ó Bolt (54) through the Main Upright and the Pulley.
Slide a 5/8Ó x 1/2Ó Pulley Bushing (42) and a 3/8Ó Flat Washer (55) onto the 3/8Ó x 2 1/2Ó Bolt (54). Tighten a 3/8Ó Nylon Jamnut (63) onto the Bolt.
8.Remove the upper 3/8Ó x 3Ó Bolt (45) from the Top Frame (1) and the Main Upright (3).
Feed the bolt on the High Cable (73) down through the indicated slot in the Main Upright (3) in the direc- tion shown.
Wrap the High Cable (73) around a 4Ó Pulley (35) in the direction shown. Attach the Pulley inside the slot in the Main Upright (3) with a 3/8Ó x 2 1/2Ó Bolt (54), two 3/8Ó Flat Washers (55), two 5/8Ó x 1/2Ó Pulley Bushings (42), and a 3/8Ó Nylon Jamnut (63).
7 |
|
|
|
|
|
Bolt | 73 |
|
| Slot | |
|
|
|
| 54 | |
|
|
|
| 35 | |
|
|
|
| 55 | |
|
|
|
|
| |
|
|
|
|
| 42 |
55 |
|
|
|
|
|
63 |
|
|
|
|
|
|
|
|
|
| Ball |
42 |
|
|
|
|
|
|
|
|
| 3 |
|
8 |
|
|
|
|
|
|
| 35 | 45 | 55 | 54 |
Slot |
|
| |||
|
|
|
| ||
50 |
|
|
| 42 | |
1 |
|
|
|
| 73 |
|
|
|
|
| |
63 |
| 42 |
|
|
|
55 |
|
|
|
| |
Bolt ![]()
3
8