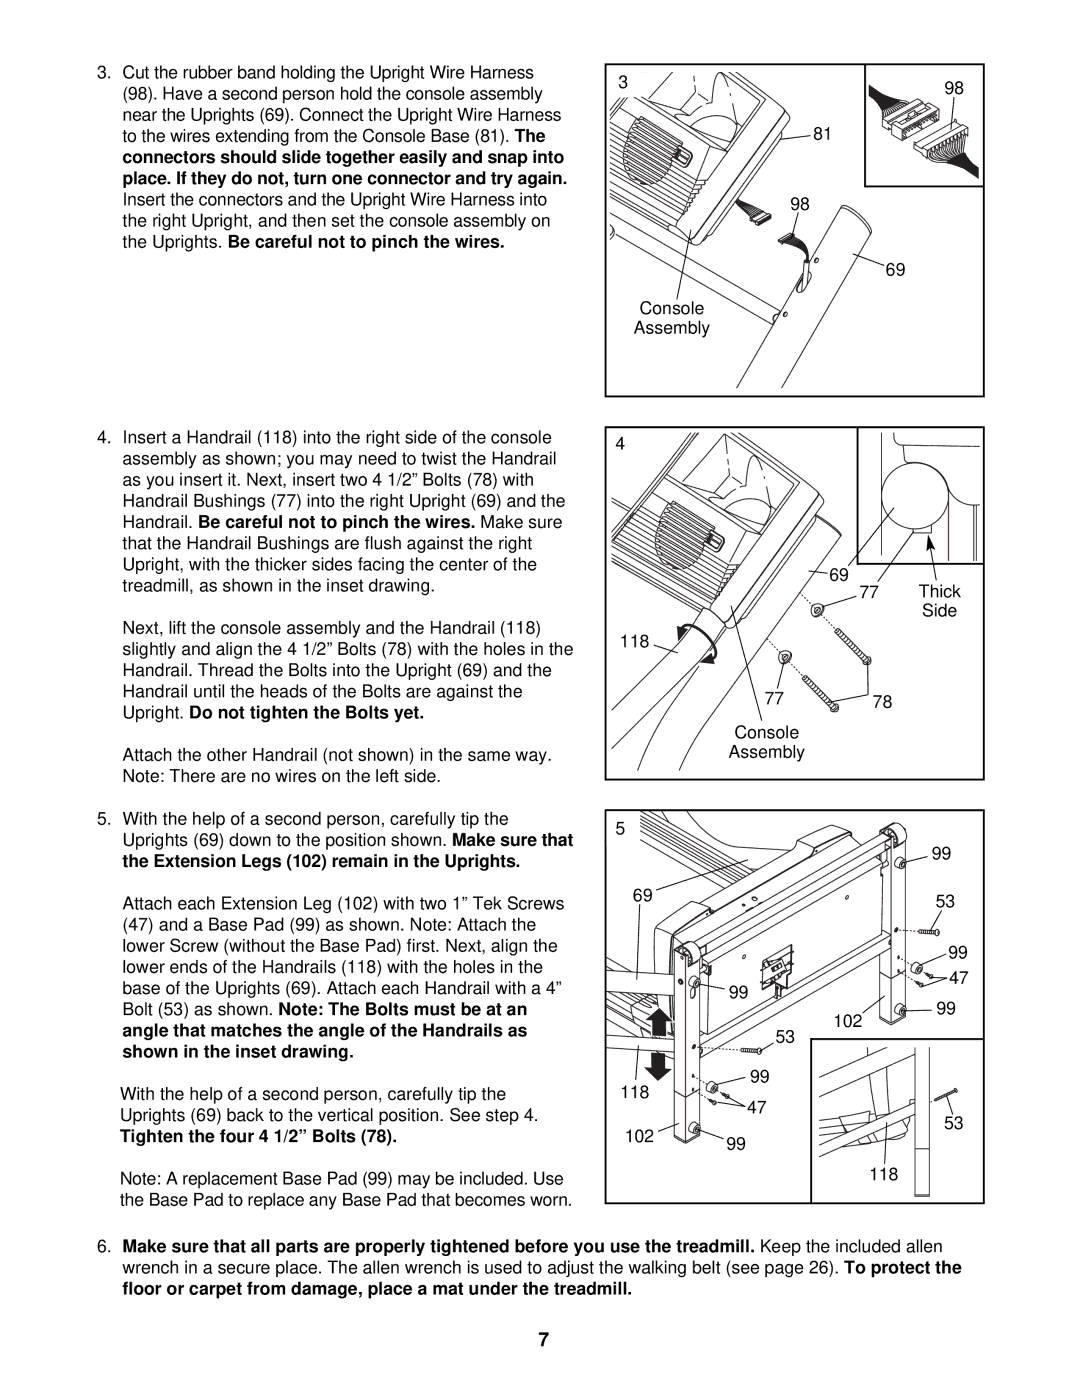
3. Cut the rubber band holding the Upright Wire Harness


3


98

(98). Have a second person hold the console assembly


near the Uprights (69). Connect the Upright Wire Harness


81


to the wires extending from the Console Base (81).

The


connectors should slide together easily and snap into


place. If they do not, turn one connector and try again.


Insert the connectors and the Upright Wire Harness into


98


the right Upright, and then set the

console assembly on


the Uprights.

Be careful not to pinch the wires.


69


Console


Assembly


4. Insert a Handrail (118) into the right side of the console


4


assembly as shown; you may need to twist the Handrail


as you insert it. Next, insert two 4 1/2” Bolts (78) with


Handrail Bushings (77) into the right Upright (69) and the


Handrail.


Be careful not to pinch the wires.


Make sure


that the Handrail Bushings are flush against the right


Upright, with the thicker sides facing the center of the


69


treadmill, as shown in the inset drawing.


Thick


77


Next, lift the console assembly and the Handrail (118)


Side


118


slightly and align the 4 1/2” Bolts (78) with the holes in the


Handrail. Thread the Bolts into the Upright (69) and the


Handrail until the heads of the Bolts are against the


77

78


Upright.

Do not tighten the Bolts yet.


Console


Attach the other Handrail (not shown) in the same way.


Assembly


Note: There are no wires on the left side.


5. With the help of a second person, carefully tip the


5


Uprights (69) down to the position shown.


Make sure that


99

the Extension Legs (102) remain in the Uprights.


Attach each Extension Leg (102) with two 1” Tek Screws


69


53


(47) and a Base Pad (99) as shown. Note: Attach the


lower Screw (without the Base Pad) first. Next, align the


99

lower ends of the Handrails (118) with the holes in the


47

base of the Uprights (69). Attach each Handrail with a 4”


99


99

Bolt (53) as shown.

Note: The Bolts must be at an


102

angle that matches the angle of the Handrails as


53


shown in the inset drawing.


With the help of a second person, carefully tip the


118

99


47


Uprights (69) back to the vertical position. See step 4.


53


Tighten the four 4 1/2” Bolts (78).


102


99


Note: A replacement Base Pad (99) may be included. Use


118


the Base Pad to replace any Base Pad that becomes worn.


6. Make sure

that all

parts are properly tightened before you use the treadmill.

Keep the included allen

wrench in

a secure

place. The allen wrench is used to adjust the walking belt (see page 26).

To protect the

floor or carpet from damage, place a mat under the treadmill.

7

Page 7
Image 7
NordicTrack NTL10940 user manual Parts are properly tightened before you use the treadmill

NTL10940 specifications

The NordicTrack NTL10940 is an advanced treadmill designed for those who seek a robust, feature-rich cardiovascular workout experience in the comfort of their own home. With a focus on blending cutting-edge technology with an engaging workout environment, the NTL10940 is a standout model in the competitive market of home fitness equipment.

One of the key features of the NordicTrack NTL10940 is its spacious running surface. Measuring 22 inches wide by 60 inches long, it provides ample room for all types of runners and walkers, allowing for a comfortable stride. The robust construction of the treadmill not only supports intensive workouts but also guarantees durability for long-term use.

The NTL10940 comes equipped with NordicTrack’s innovative FlexSelect cushioning system, which allows users to customize the level of impact absorption. This feature is particularly beneficial for reducing strain on joints during long runs or intense walking sessions, making it suitable for users of various fitness levels and preferences.

A standout element of the NTL10940 is its interactive touchscreen display, which measures 10 inches. This high-definition screen provides clear visuals and user-friendly navigation, making it easy to track workouts, customize settings, and access various workout programs. With an extensive library of iFit workouts, including personalized coaching and guided runs across scenic locations worldwide, users can enjoy a more dynamic training experience. iFit also allows for automatic adjustments to incline and speed, ensuring workouts remain challenging and engaging.

Moreover, the NTL10940 boasts impressive incline capabilities, allowing users to adjust the incline up to 15% for added intensity. This feature is perfect for simulating hill training, which can enhance strength and stamina.

Connectivity is another strong suit, with Bluetooth capabilities that allow syncing with heart rate monitors and other fitness devices. Coupled with built-in speakers, users can enjoy music or follow along with coaching via streaming services.

Overall, the NordicTrack NTL10940 is a comprehensive treadmill tailored for fitness enthusiasts seeking variety, durability, and technology in their workout routine. With its range of features, robust construction, and interactive capabilities, it stands out as an excellent choice for anyone looking to elevate their home fitness experience.