MOUNTING FAN HOUSING

NEW CONSTRUCTION

Using Hanger Bars

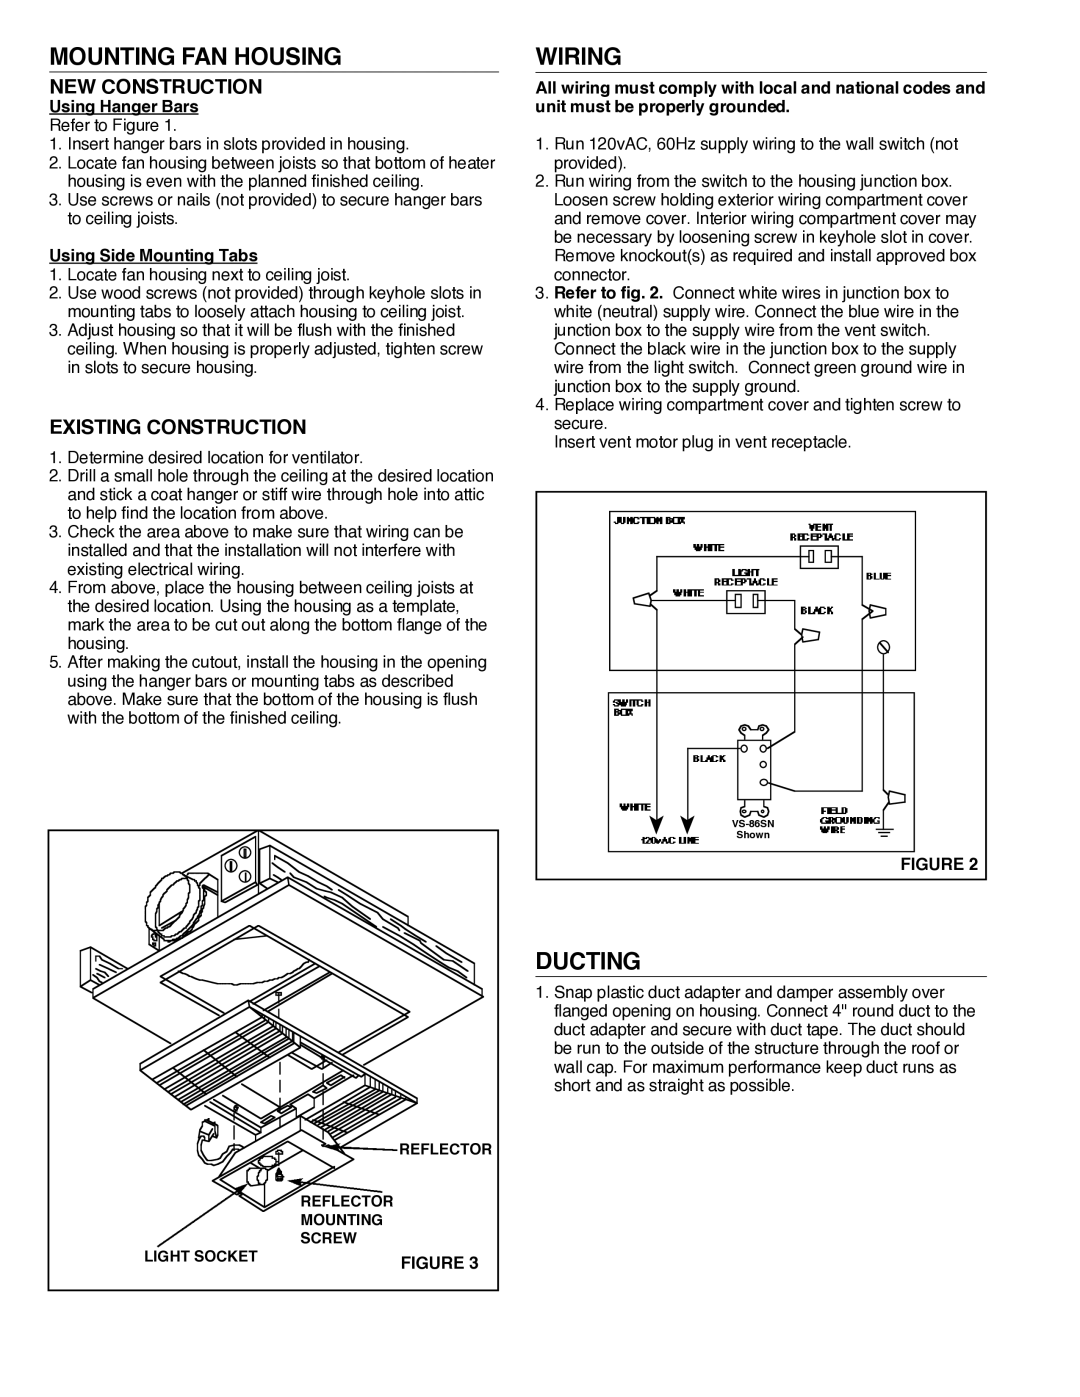
Refer to Figure 1.

1.Insert hanger bars in slots provided in housing.

2.Locate fan housing between joists so that bottom of heater housing is even with the planned finished ceiling.

3.Use screws or nails (not provided) to secure hanger bars to ceiling joists.

Using Side Mounting Tabs

1.Locate fan housing next to ceiling joist.

2.Use wood screws (not provided) through keyhole slots in mounting tabs to loosely attach housing to ceiling joist.

3.Adjust housing so that it will be flush with the finished ceiling. When housing is properly adjusted, tighten screw in slots to secure housing.

EXISTING CONSTRUCTION

1.Determine desired location for ventilator.

2.Drill a small hole through the ceiling at the desired location and stick a coat hanger or stiff wire through hole into attic to help find the location from above.

3.Check the area above to make sure that wiring can be installed and that the installation will not interfere with existing electrical wiring.

4.From above, place the housing between ceiling joists at the desired location. Using the housing as a template, mark the area to be cut out along the bottom flange of the housing .

5.After making the cutout, install the housing in the opening using the hanger bars or mounting tabs as described above. Make sure that the bottom of the housing is flush with the bottom of the finished ceiling.


REFLECTOR


REFLECTOR


MOUNTING

LIGHT SOCKET


SCREW


FIGURE 3

WIRING

All wiring must comply with local and national codes and unit must be properly grounded.

1.Run 120vAC, 60Hz supply wiring to the wall switch (not provided).

2.Run wiring from the switch to the housing junction box. Loosen screw holding exterior wiring compartment cover and remove cover. Interior wiring compartment cover may be necessary by loosening screw in keyhole slot in cover. Remove knockout(s) as required and install approved box connector .

3.Refer to fig. 2. Connect white wires in junction box to white (neutral) supply wire. Connect the blue wire in the junction box to the supply wire from the vent switch.

Connect the black wire in the junction box to the supply wire from the light switch. Connect green ground wire in junction box to the supply ground.

4.Replace wiring compartment cover and tighten screw to secure.

Insert vent motor plug in vent receptacle.

VS-86SN

Shown

FIGURE 2

DUCTING

1.Snap plastic duct adapter and damper assembly over flanged opening on housing. Connect 4" round duct to the duct adapter and secure with duct tape. The duct should be run to the outside of the structure through the roof or wall cap. For maximum performance keep duct runs as short and as straight as possible.

Page 2
Image 2
NuTone 668RP installation instructions Mounting FAN Housing, Wiring, Ducting, NEW Construction, Existing Construction

668RP specifications

The NuTone 668RP is a versatile and efficient ventilation fan designed to enhance indoor air quality in residential spaces. With its impressive blend of functionality and modern technology, this model stands out in the market for those seeking reliable and efficient solutions for home ventilation.

A key feature of the NuTone 668RP is its powerful yet quiet 70 CFM (Cubic Feet per Minute) airflow capacity. This ensures that rooms, especially those with high humidity like bathrooms, stay well-ventilated without producing excessive noise that can be disruptive. The fan operates at a sound level of only 2.5 sones, which makes it one of the quieter options available, allowing for comfortable conversations and a peaceful environment during operation.

The 668RP is equipped with a powerful 4-inch duct for optimal airflow, enhancing the efficiency of air exchange. This feature is particularly beneficial for homes with limited ventilation options, as it promotes the circulation of fresh air while effectively removing moisture and odors. With the ability to cover areas of up to 70 square feet, the NuTone 668RP is ideal for smaller bathrooms, laundry rooms, or utility closets.

One of the standout characteristics of this model is its attractive and sleek design. The fan comes with a white polymeric grille that seamlessly integrates into any ceiling décor, offering a clean look that is unobtrusive. Additionally, the durable construction of the fan ensures longevity, allowing homeowners to enjoy its benefits for years to come.

In terms of installation, the NuTone 668RP is designed for easy fit and compatibility with existing ventilation systems. It features a mounting bracket that simplifies the installation process, making it accessible even for those who may not be professional contractors.

Moreover, the NuTone 668RP adheres to the highest efficiency standards, contributing to energy savings which translates to lower utility bills. Homeowners can feel confident that this fan not only improves air quality but does so in an environmentally friendly manner.

In sum, the NuTone 668RP is an outstanding choice for anyone looking for a reliable, quiet, and efficient ventilation solution. Its blend of functional features, sophisticated design, and energy efficiency make it a valuable addition to any home, ensuring a healthier indoor environment.