DM-20 DM-10
Table of Contents
Using the Recorder as a Music Player
General Precautions
Safe and Proper Usage
Case
Batteries
AC Adapter
Recording time*3
Main Features
Main features of the Digital Voice Recorder
Main features of the Digital Music Player
Playback time*5
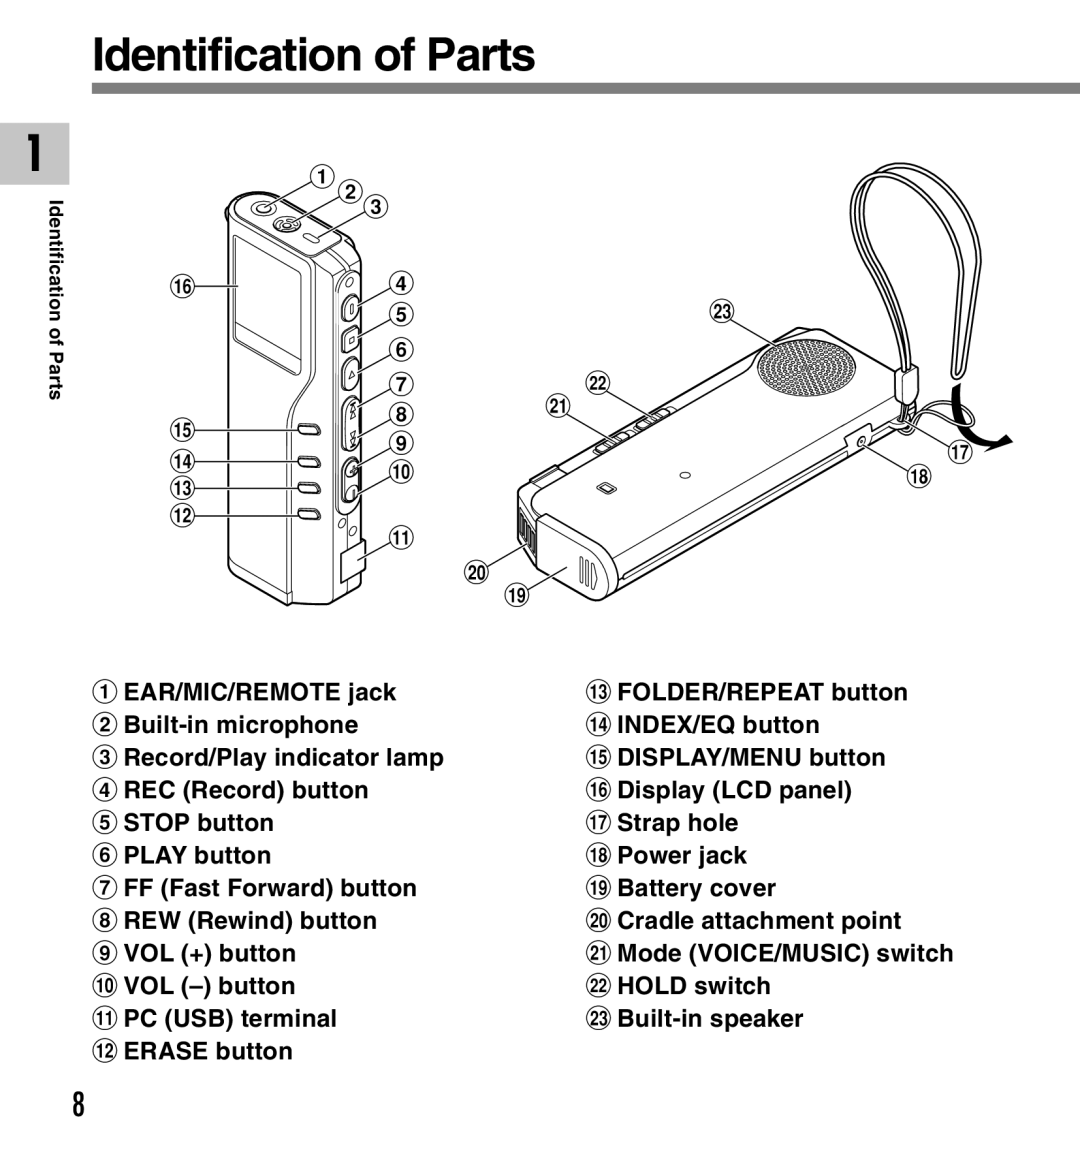
Identification of Parts
Remote Controller Microphone Display LCD Panel
Inserting Batteries
Using the mode switch, choose between Voice or Music option
Using the AC Adapter
Switching Between Voice Recorder Music Player
Setting Time/Date TIME&DATE
Set the hour
Set the minute
Set the year
Changing the Time/Date
Operating Environment
RAM
Installing Software
Be sure to confirm the following before installation
Installing Software
Installation Language Selection dialog box opens
Installing Windows Media Player
Install Acrobat Reader
Installing the Device Driver
Customize the Installation Option
Select where to install DSS Player for Mac
Completing setup
Uninstalling Software
Click Change/Remove
Uninstalling Software
Delete the Executable File
Delete the Driver File
Delete the Help File
Recording
Press the Folder button to choose a folder
Press the REC button to start recording
Press the Stop button to stop
Recording functions
Recording
Pause Recording
Pause
5the setup screen
Press and hold the Menu button for
Second or longer
Press the FF or REW button until
Adjust the start/stop actuation level
Using the Variable Control Voice Actuator Vcva
Stereo microphone ME50S optional
Recording with External Microphone
Connect to the jack on the recorder
Listening While Audio Is Recorded Recording Monitor
Make sure that the recorder has stopped
Recording Modes REC Mode
4the setup screen
3Press the FF or REW button to choose from HQ, SP and LP
Press the Stop button to close
Microphone Sensitivity MIC Sense
Press and hold the Menu button for 1 second or longer
Recording From Another Audio Device
3Press and hold the Menu button for 1 second or longer
Recording From Another Audio Device
Mode
3The record/play indicator lamp glows Green
Playing
Press the Play button to start Playback
Can choose between 0 to
Operation
How to Cancel
Playing
Playback through earphone
Setup screen
Continuous Playback ALL Play
Choose between on and OFF
Menu
2BACK Space flashes on
4choose from OFF, 1 SEC Skip
2 SEC Skip
6menu
Repeat Playback
Press the Stop button. Repeat Playback is cancelled
Noise Cancel Function
Choose a noise cancel level
Is playing
Press the Menu button again to
Setting an Index Mark
Index Marks
Locating an Index Mark
Clearing an Index Mark
When you have finished setting
Assigning File Comments Comment
Input the character
6file comments, press and hold
Press the Display button
LCD Display Information Voice mode
While in stop or playback mode
LCD Display Information Voice mode
While in record mode
While recording in Vcva mode
Menu List Voice mode
Press and hold the Menu button for 1 second or longer
Using DSS Player Software
Precautions on using the recorder connected to a PC
Search by Key word
Using Online Help
Search by Contents
Connecting to Your PC
Connecting to your PC using the USB cable
Disconnecting from Your PC
Click On the task bar
Screen. Click Safely Remove USB Mass Storage Device-Drive
It will read Stop USB Disk-Drive for
Place the recorder on the cradle
Connecting to your PC using the cradle
Connecting to Your PC
Remove the recorder from the cradle
Running DSS Player
Right click
Icon in the System Tray in the lower right-hand corner
Player to reinstate again Manual start
Running DSS Player
Window Names DSS Player
Play Control Bar
Dictation Folder Window
Device Manager Window
Download Voice Files from the Recorder
Download Selected Files
Select the folder
Select the voice file
Download Voice Files from the Recorder
Download complete
File name
Play a Voice File
Play the voice file
Upload the voice file
Upload Voice Files to the Recorder
Select the folder to upload
Upload complete
Send Voice Files with E-mail
Changing User ID
Enter the user ID in the Transfer User ID Window
Click Transfer
Changing a Folder Name
Editing File Comments
Changing a folder name in the Voice Folder window
Changing a folder name in the Device window
Editing a Template
Copyright and copyright protection feature DRM
Using the Recorder as a Music Player
Using Windows Media Player
Using Windows Media Player
Windows Media Audio License and Distribution Agreement
Window Names Windows Media Player
Copying Music from CD
Select the destination folder
Click the Copy button of Quick Access box
Transferring Music File to the Recorder
Music Playback
Playback Functions
Various Playback Features
Function Explanation Display indicator
Music Playback
Equalizer
4Press the Play button to register your setting
WOW Effect will be displayed on
Screen P.76
SRS 3D
Setting
Increasing the WOW effect WOW Effect
Press the FF or REW button to select
Bass effect level
5 setting
Select the frequency band
Level of your choice
Changing the User Equalizer User EQ
Select the equalizer level
While in Stop mode
While in Playback mode
LCD Display Information Music mode
User equalizer/WOW
File format/bit rate
Changing Playback Order of Music File
Menu List Music mode
Erasing
Erasing One File at a Time
Erase All Files from a Folder
Erasing
Press the Erase button for Seconds or longer
ALL ERASE? flashes on the display for
Erasing
Locking Files Lock
Press the FF or REW button to choose between on and OFF
Alarm Playback Function Alarm
Alarm sounds
4ALARM flashes on the display
1choose a folder
Alarm Playback Function Alarm
To enable alarm sound only
LCD Contrast Adjustment Contrast
Contrast flashes on
Press the FF or REW button to set
Contrast level
On Backlight is enabled
OFF Backlight is disabled
Backlight Backlight
Backlight flashes on
On System sounds are enabled
OFF System sounds are disabled
System Sounds Beep
Beep flashes on the display
Press the FF or REW button to choose characters
Current character being entered a
Recorder buttons that are used to input characters
Assigning Folder Names Folder Name
Button Push Action
Use the two following methods to quickly find characters
Available characters
Type of Characters Action
File MOVE? appears on the display
Moving Files Across Folders
3Press the FF or REW button to choose a destination folder
Hold
Running state when Hold is set
Remember to reset the Hold switch when using the recorder
Formatting the Recorder Format
Format flashes on the display
6Press the FF or REW button again to choose Start
Seconds
Never format the recorder from a PC
Using the Recorder as a Reader/Writer
Start Windows Connecting the recorder to your PC
Open the Explorer or Finder window
Copy the data
Alarm Message List
Message Meaning Explanation
Alarm Message List
Troubleshooting
Symptom Probable cause Action
Specifications
Ni-MH Rechargeable Battery life Approx hours
Input power requirement
External dimensions
Weight
Technical Assistance And Support
100


 123