|
| WOOD STUD INSTALLATION | |
|
|
|
|
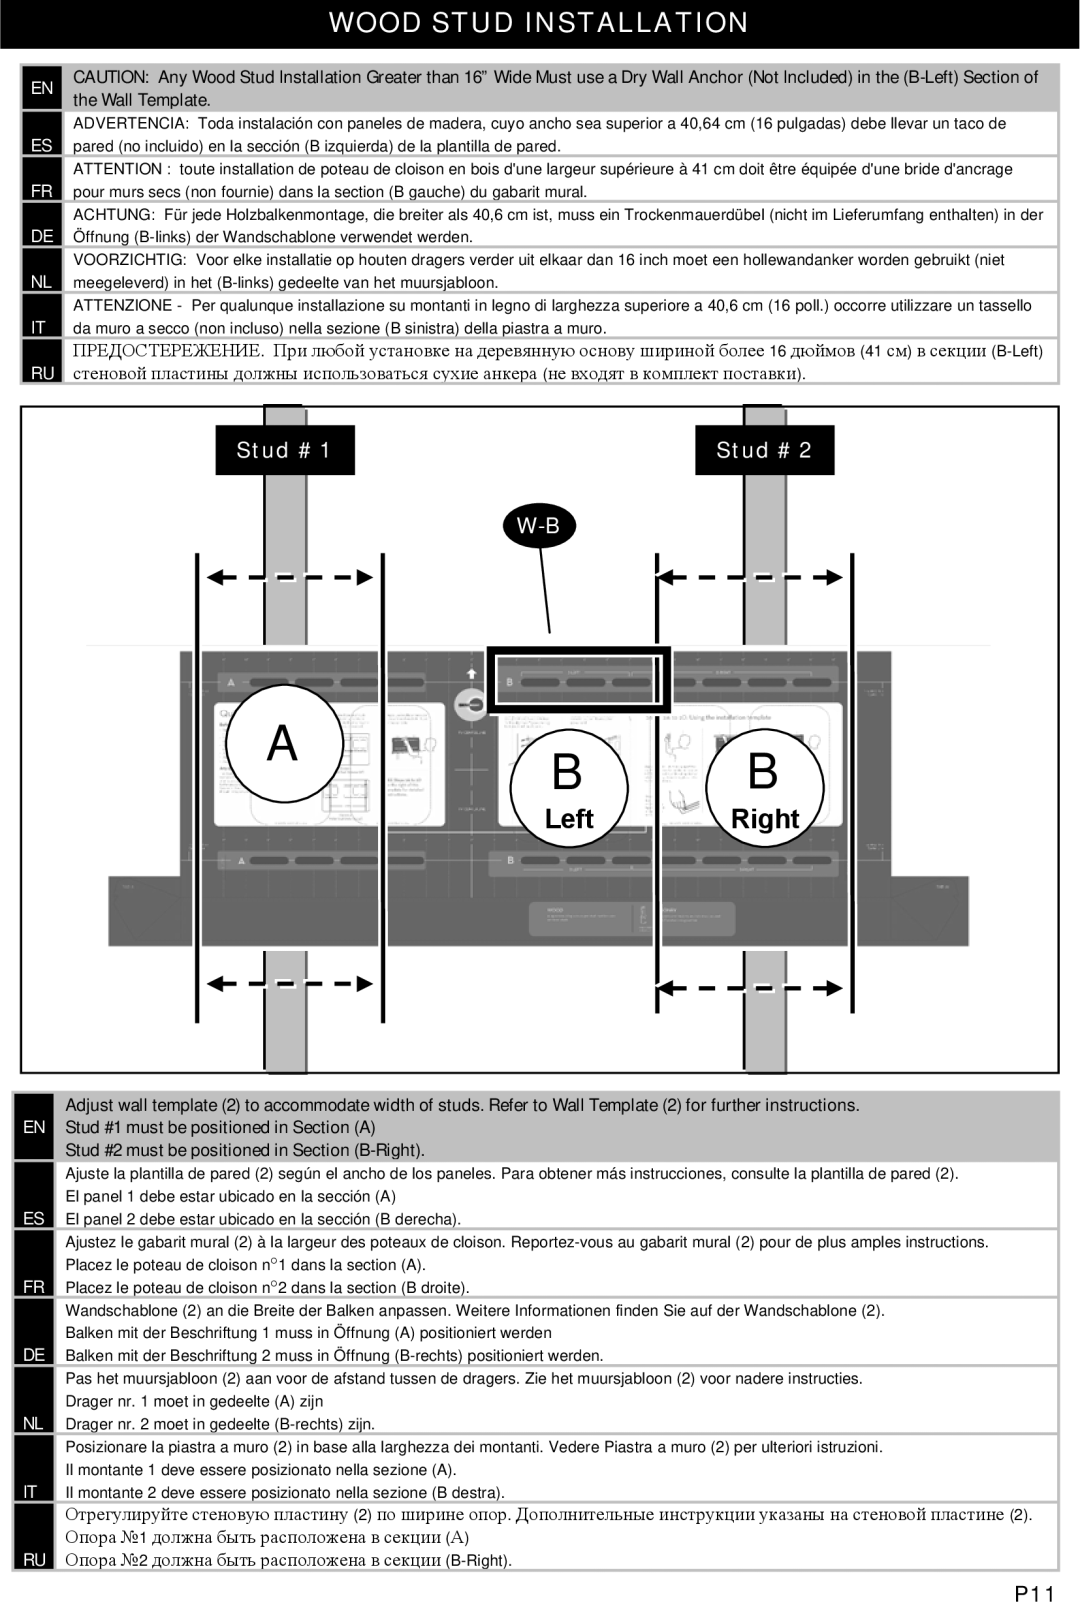
| EN | CAUTION: Any Wood Stud Installation Greater than 16” Wide Must use a Dry Wall Anchor (Not Included) in the |
|
| the Wall Template. |
| |
|
|
| |
| ES | ADVERTENCIA: Toda instalación con paneles de madera, cuyo ancho sea superior a 40,64 cm (16 pulgadas) debe llevar un taco de |
|
| pared (no incluido) en la sección (B izquierda) de la plantilla de pared. |
| |
| FR | ATTENTION : toute installation de poteau de cloison en bois d'une largeur supérieure à 41 cm doit être équipée d'une bride d'ancrage |
|
| pour murs secs (non fournie) dans la section (B gauche) du gabarit mural. |
| |
| DE | ACHTUNG: Für jede Holzbalkenmontage, die breiter als 40,6 cm ist, muss ein Trockenmauerdübel (nicht im Lieferumfang enthalten) in der |
|
| Öffnung |
| |
| NL | VOORZICHTIG: Voor elke installatie op houten dragers verder uit elkaar dan 16 inch moet een hollewandanker worden gebruikt (niet |
|
| meegeleverd) in het |
| |
| IT | ATTENZIONE - Per qualunque installazione su montanti in legno di larghezza superiore a 40,6 cm (16 poll.) occorre utilizzare un tassello |
|
| da muro a secco (non incluso) nella sezione (B sinistra) della piastra a muro. |
| |
| RU | ПРЕДОСТЕРЕЖЕНИЕ. При любой установке на деревянную основу шириной более 16 дюймов (41 см) в секции |
|
| стеновой пластины должны использоваться сухие анкера (не входят в комплект поставки). |
| |
Stud # 1 |
| Stud # 2 |
|
| |
A | B | B |
| ||
| Left | Right |
| Adjust wall template (2) to accommodate width of studs. Refer to Wall Template (2) for further instructions. |
EN | Stud #1 must be positioned in Section (A) |
| Stud #2 must be positioned in Section |
| Ajuste la plantilla de pared (2) según el ancho de los paneles. Para obtener más instrucciones, consulte la plantilla de pared (2). |
ES | El panel 1 debe estar ubicado en la sección (A) |
El panel 2 debe estar ubicado en la sección (B derecha). | |
| Ajustez le gabarit mural (2) à la largeur des poteaux de cloison. |
FR | Placez le poteau de cloison n°1 dans la section (A). |
Placez le poteau de cloison n°2 dans la section (B droite). | |
| Wandschablone (2) an die Breite der Balken anpassen. Weitere Informationen finden Sie auf der Wandschablone (2). |
DE | Balken mit der Beschriftung 1 muss in Öffnung (A) positioniert werden |
Balken mit der Beschriftung 2 muss in Öffnung | |
| Pas het muursjabloon (2) aan voor de afstand tussen de dragers. Zie het muursjabloon (2) voor nadere instructies. |
NL | Drager nr. 1 moet in gedeelte (A) zijn |
Drager nr. 2 moet in gedeelte | |
| Posizionare la piastra a muro (2) in base alla larghezza dei montanti. Vedere Piastra a muro (2) per ulteriori istruzioni. |
IT | Il montante 1 deve essere posizionato nella sezione (A). |
Il montante 2 deve essere posizionato nella sezione (B destra). | |
| Отрегулируйте стеновую пластину (2) по ширине опор. Дополнительные инструкции указаны на стеновой пластине (2). |
RU | Опора №1 должна быть расположена в секции (А) |
Опора №2 должна быть расположена в секции |
P11
