How to Use the Power Source
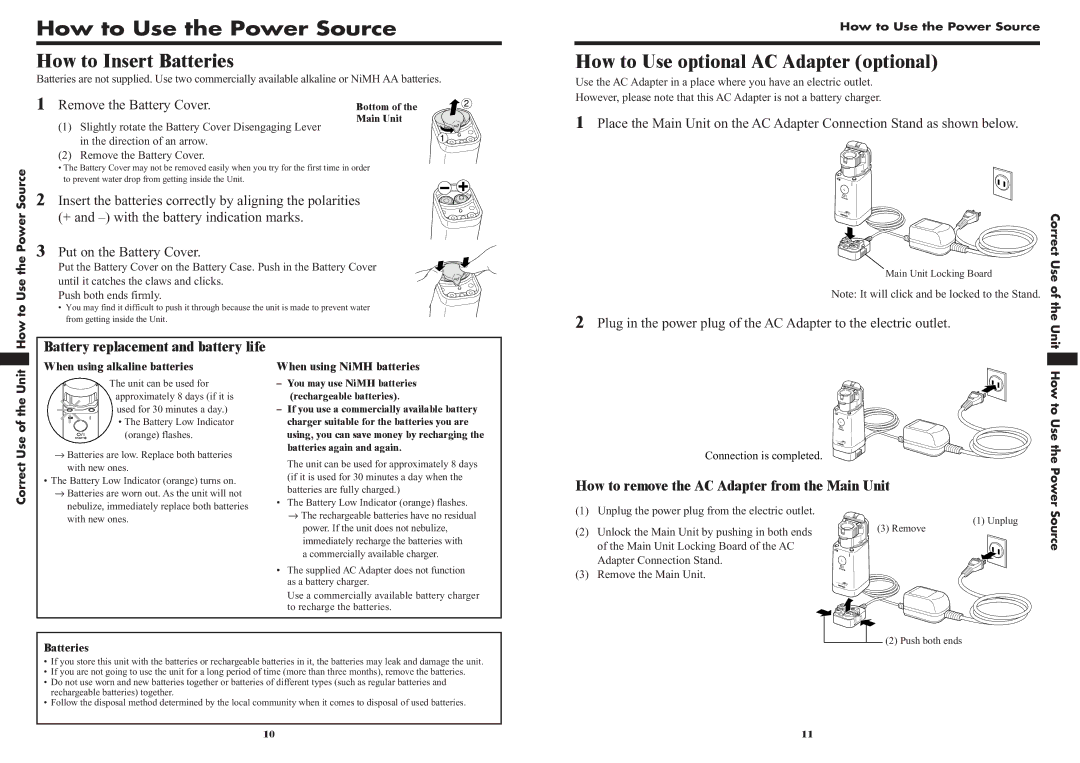
How to Insert Batteries
Batteries are not supplied. Use two commercially available alkaline or NiMH AA batteries.
| 1 Remove the Battery Cover. | Bottom of the | 2 | ||
|
|
| Main Unit |
| |
|
| (1) Slightly rotate the Battery Cover Disengaging Lever |
| ||
|
| in the direction of an arrow. | 1 |
| |
|
| (2) Remove the Battery Cover. |
|
| |
Source |
| • The Battery Cover may not be removed easily when you try for the first time in order |
| ||
| to prevent water drop from getting inside the Unit. |
|
| ||
2 | Insert the batteries correctly by aligning the polarities |
| |||
Power |
| (+ and |
| ||
3 Put on the Battery Cover. |
|
| |||
the |
|
| |||
| Put the Battery Cover on the Battery Case. Push in the Battery Cover |
| |||
|
|
| |||
Use |
| until it catches the claws and clicks. |
|
| |
| Push both ends firmly. |
|
| ||
to |
| • You may find it difficult to push it through because the unit is made to prevent water |
| ||
| from getting inside the Unit. |
|
| ||
How |
|
|
| ||
Battery replacement and battery life |
|
| |||
|
|
| |||
Unit | When using alkaline batteries | When using NiMH batteries |
| ||
| The unit can be used for | – You may use NiMH batteries |
| ||
|
|
| |||
the |
| approximately 8 days (if it is | (rechargeable batteries). |
| |
| used for 30 minutes a day.) | – If you use a commercially available battery | |||
|
| ||||
of |
| • The Battery Low Indicator | charger suitable for the batteries you are | ||
| (orange) flashes. | using, you can save money by recharging the | |||
Use |
| ||||
→ | Batteries are low. Replace both batteries | batteries again and again. |
| ||
The unit can be used for approximately 8 days | |||||
Correct |
| with new ones. | |||
| (if it is used for 30 minutes a day when the |
| |||
|
|
| |||
| • The Battery Low Indicator (orange) turns on. |
| |||
| batteries are fully charged.) |
| |||
| → | Batteries are worn out. As the unit will not |
| ||
|
| nebulize, immediately replace both batteries | • The Battery Low Indicator (orange) flashes. | ||
|
| → The rechargeable batteries have no residual | |||
|
| with new ones. | |||
|
| power. If the unit does not nebulize, |
| ||
|
|
|
| ||
|
|
| immediately recharge the batteries with |
| |
|
|
| a commercially available charger. |
| |
|
|
| • The supplied AC Adapter does not function | ||
|
|
| as a battery charger. |
| |
|
|
| Use a commercially available battery charger | ||
|
|
| to recharge the batteries. |
| |
Batteries
•If you store this unit with the batteries or rechargeable batteries in it, the batteries may leak and damage the unit.
•If you are not going to use the unit for a long period of time (more than three months), remove the batteries.
•Do not use worn and new batteries together or batteries of different types (such as regular batteries and rechargeable batteries) together.
•Follow the disposal method determined by the local community when it comes to disposal of used batteries.
How to Use the Power Source
How to Use optional AC Adapter (optional)
Use the AC Adapter in a place where you have an electric outlet.
However, please note that this AC Adapter is not a battery charger.
1Place the Main Unit on the AC Adapter Connection Stand as shown below.
| Correct | |
Main Unit Locking Board | Use of | |
Note: It will click and be locked to the Stand. | ||
2 Plug in the power plug of the AC Adapter to the electric outlet. | the | |
Unit | ||
| ||
| How to Use | |
Connection is completed. | the | |
How to remove the AC Adapter from the Main Unit | Power | |
| ||
(1) Unplug the power plug from the electric outlet. | Source | |
of the Main Unit Locking Board of the AC | ||
(1) Unplug |
|
(2) | Unlock the Main Unit by pushing in both ends | (3) Remove |
| ||
| Adapter Connection Stand. |
|
(3) | Remove the Main Unit. |
|
![]() (2) Push both ends
(2) Push both ends
10 | 11 |
