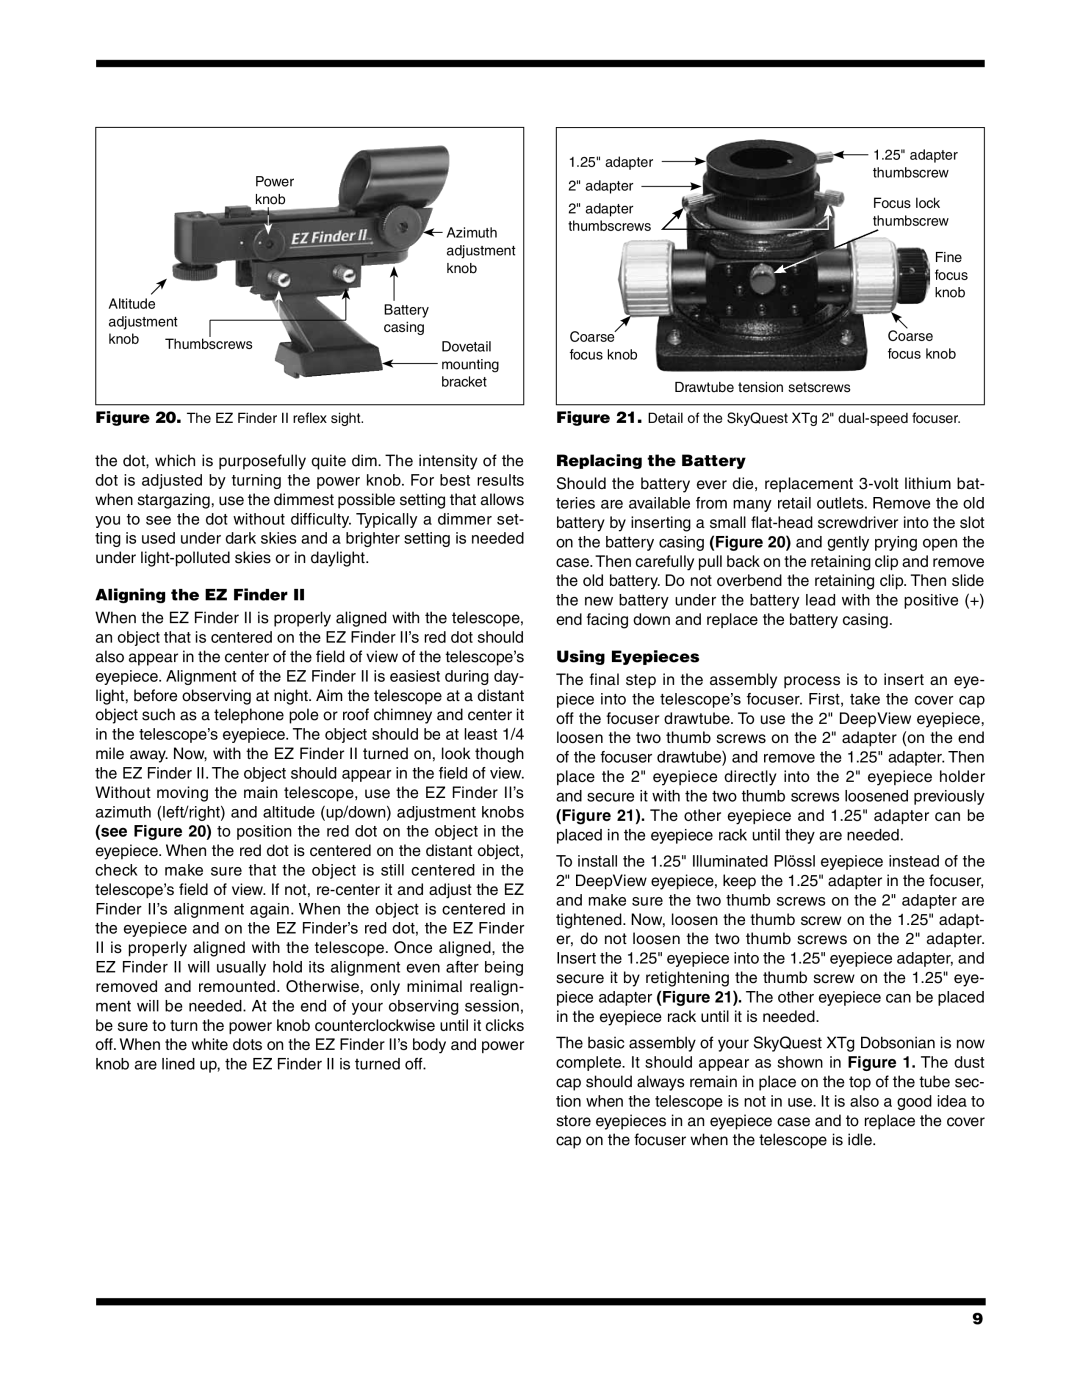
Power knob

Azimuth adjustment knob

Altitude


Battery

adjustment


casing


knob


Thumbscrews


Dovetail


mounting bracket

Figure 20. The EZ Finder II reflex sight.

the dot, which is purposefully quite dim. The intensity of the dot is adjusted by turning the power knob. For best results when stargazing, use the dimmest possible setting that allows you to see the dot without difficulty. Typically a dimmer set- ting is used under dark skies and a brighter setting is needed under light-polluted skies or in daylight.

Aligning the EZ Finder II

When the EZ Finder II is properly aligned with the telescope, an object that is centered on the EZ Finder II’s red dot should also appear in the center of the field of view of the telescope’s eyepiece. Alignment of the EZ Finder II is easiest during day- light, before observing at night. Aim the telescope at a distant object such as a telephone pole or roof chimney and center it in the telescope’s eyepiece. The object should be at least 1/4 mile away. Now, with the EZ Finder II turned on, look though the EZ Finder II. The object should appear in the field of view. Without moving the main telescope, use the EZ Finder II’s azimuth (left/right) and altitude (up/down) adjustment knobs (see Figure 20) to position the red dot on the object in the eyepiece. When the red dot is centered on the distant object, check to make sure that the object is still centered in the telescope’s field of view. If not, re-center it and adjust the EZ Finder II’s alignment again. When the object is centered in the eyepiece and on the EZ Finder’s red dot, the EZ Finder

IIis properly aligned with the telescope. Once aligned, the EZ Finder II will usually hold its alignment even after being removed and remounted. Otherwise, only minimal realign- ment will be needed. At the end of your observing session, be sure to turn the power knob counterclockwise until it clicks off. When the white dots on the EZ Finder II’s body and power knob are lined up, the EZ Finder II is turned off.

1.25" adapter


1.25" adapter


thumbscrew

2" adapter


Focus lock


2" adapter


thumbscrew

thumbscrews


Fine


focus


knob

Coarse


Coarse

focus knob


focus knob

Drawtube tension setscrews

Figure 21. Detail of the SkyQuest XTg 2" dual-speed focuser.

Replacing the Battery

Should the battery ever die, replacement 3-volt lithium bat- teries are available from many retail outlets. Remove the old battery by inserting a small flat-head screwdriver into the slot on the battery casing (Figure 20) and gently prying open the case. Then carefully pull back on the retaining clip and remove the old battery. Do not overbend the retaining clip. Then slide the new battery under the battery lead with the positive (+) end facing down and replace the battery casing.

Using Eyepieces

The final step in the assembly process is to insert an eye- piece into the telescope’s focuser. First, take the cover cap off the focuser drawtube. To use the 2" DeepView eyepiece, loosen the two thumb screws on the 2" adapter (on the end of the focuser drawtube) and remove the 1.25" adapter. Then place the 2" eyepiece directly into the 2" eyepiece holder and secure it with the two thumb screws loosened previously (Figure 21). The other eyepiece and 1.25" adapter can be placed in the eyepiece rack until they are needed.

To install the 1.25" Illuminated Plössl eyepiece instead of the 2" DeepView eyepiece, keep the 1.25" adapter in the focuser, and make sure the two thumb screws on the 2" adapter are tightened. Now, loosen the thumb screw on the 1.25" adapt- er, do not loosen the two thumb screws on the 2" adapter. Insert the 1.25" eyepiece into the 1.25" eyepiece adapter, and secure it by retightening the thumb screw on the 1.25" eye- piece adapter (Figure 21). The other eyepiece can be placed in the eyepiece rack until it is needed.

The basic assembly of your SkyQuest XTg Dobsonian is now complete. It should appear as shown in Figure 1. The dust cap should always remain in place on the top of the tube sec- tion when the telescope is not in use. It is also a good idea to store eyepieces in an eyepiece case and to replace the cover cap on the focuser when the telescope is idle.

9

Page 9
Image 9
Orion 10135XT12g, 10135 XT10g, #10134 XT8g, 10134 XTBg Aligning the EZ Finder, Replacing the Battery, Using Eyepieces

10135 XT10g, 10134 XTBg, 10135XT12g, #10134 XT8g specifications

The Orion #10134 XT8g, #10135 XT12g, #10134 XTBg, and #10135 XT10g are exceptional choices in the realm of computerized telescopes, catering to both novice stargazers and seasoned astronomers. These models are designed for easy use while delivering stellar performance and high-quality optics.

At the heart of these telescopes is the high-quality optics that Orion is renowned for. Each model features a primary mirror made from durable glass, enhanced with a parabolic shape to minimize optical distortions and improve light gathering capabilities. The XT8g and XT10g utilize an 8-inch and 10-inch mirror, respectively, while the XT12g boasts a large 12-inch aperture, providing users with deeper views of celestial phenomena. The larger the aperture, the more light the telescope can collect, revealing fainter objects in the night sky.

In terms of technology, the "g" designation signifies that these telescopes are equipped with Orion’s innovative GoTo system. This advanced motorized mount enables users to easily locate and track celestial objects with the push of a button, making the stargazing experience more enjoyable and accessible. The system includes a database of thousands of celestial objects, allowing users to explore the universe with ease.

The XTg models also come with an intuitive hand controller that features a user-friendly interface for navigating the night sky. Additionally, the telescopes can be controlled via a smartphone or tablet, providing flexibility for tech-savvy users who prefer modern conveniences.

Durability and stability are crucial in any telescope, and the XT series does not disappoint. Each model is constructed on a robust and stable base, designed to minimize vibrations and provide a steady view, even at higher magnifications. This stability ensures that amateur astronomers can enjoy detailed views, from the craters of the moon to the rings of Saturn and beyond.

Each telescope comes with a cradle-style altazimuth mount for easier adjustments and tracking capabilities. The included eyepieces allow for various magnifications, enhancing the viewing experience and enabling observers to appreciate the beauty of the cosmos.

In summary, the Orion XT series, including the #10134 XT8g, #10135 XT12g, #10134 XTBg, and #10135 XT10g, stands out for their exceptional optics, innovative GoTo technology, robust build quality, and user-friendly operation. These telescopes are ideal for anyone wishing to explore the wonders of the night sky, making them a worthy investment for years of astronomical discovery.