a.

b.

c.

d.

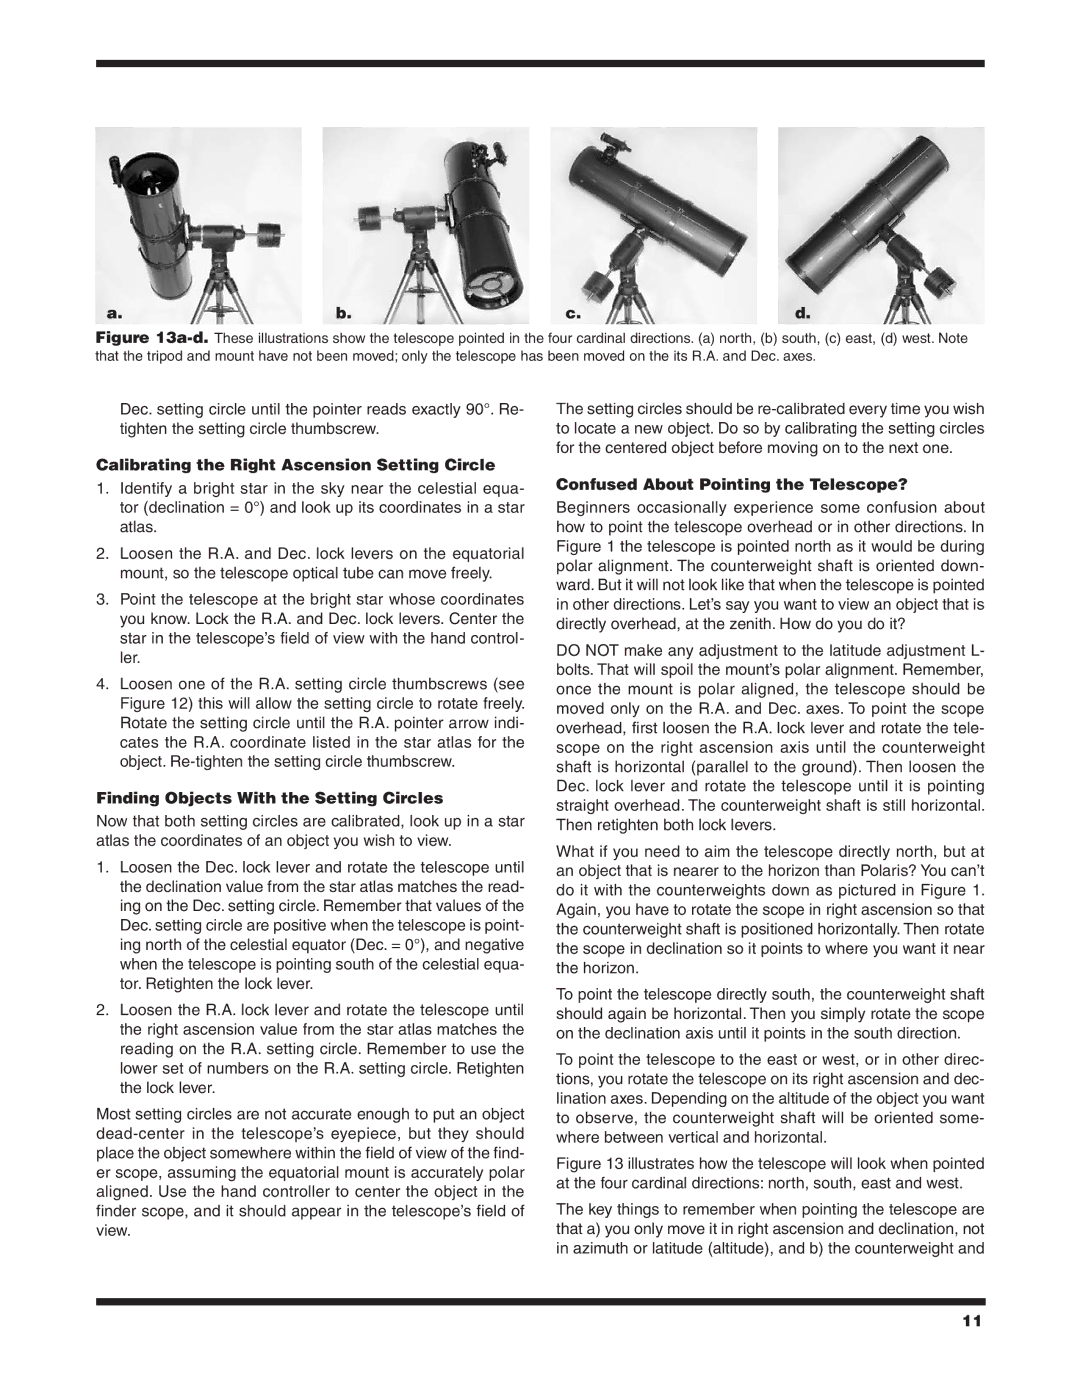
Figure 13a-d.These illustrations show the telescope pointed in the four cardinal directions. (a) north, (b) south, (c) east, (d) west. Note that the tripod and mount have not been moved; only the telescope has been moved on the its R.A. and Dec. axes.

Dec. setting circle until the pointer reads exactly 90°. Re- tighten the setting circle thumbscrew.

Calibrating the Right Ascension Setting Circle

1.Identify a bright star in the sky near the celestial equator (declination = 0°) and look up its coordinates in a star atlas.

2.Loosen the R.A. and Dec. lock levers on the equatorial mount, so the telescope optical tube can move freely.

3.Point the telescope at the bright star whose coordinates you know. Lock the R.A. and Dec. lock levers. Center the star in the telescope’s field of view with the hand controller.

4.Loosen one of the R.A. setting circle thumbscrews (see Figure 12) this will allow the setting circle to rotate freely. Rotate the setting circle until the R.A. pointer arrow indicates the R.A. coordinate listed in the star atlas for the object. Re-tighten the setting circle thumbscrew.

Finding Objects With the Setting Circles

Now that both setting circles are calibrated, look up in a star atlas the coordinates of an object you wish to view.

1.Loosen the Dec. lock lever and rotate the telescope until the declination value from the star atlas matches the reading on the Dec. setting circle. Remember that values of the Dec. setting circle are positive when the telescope is pointing north of the celestial equator (Dec. = 0°), and negative when the telescope is pointing south of the celestial equator. Retighten the lock lever.

2.Loosen the R.A. lock lever and rotate the telescope until the right ascension value from the star atlas matches the reading on the R.A. setting circle. Remember to use the lower set of numbers on the R.A. setting circle. Retighten the lock lever.

Most setting circles are not accurate enough to put an object dead-center in the telescope’s eyepiece, but they should place the object somewhere within the field of view of the finder scope, assuming the equatorial mount is accurately polar aligned. Use the hand controller to center the object in the finder scope, and it should appear in the telescope’s field of view.

The setting circles should be re-calibrated every time you wish to locate a new object. Do so by calibrating the setting circles for the centered object before moving on to the next one.

Confused About Pointing the Telescope?

Beginners occasionally experience some confusion about how to point the telescope overhead or in other directions. In Figure 1 the telescope is pointed north as it would be during polar alignment. The counterweight shaft is oriented downward. But it will not look like that when the telescope is pointed in other directions. Let’s say you want to view an object that is directly overhead, at the zenith. How do you do it?

DO NOT make any adjustment to the latitude adjustment L- bolts. That will spoil the mount’s polar alignment. Remember, once the mount is polar aligned, the telescope should be moved only on the R.A. and Dec. axes. To point the scope overhead, first loosen the R.A. lock lever and rotate the telescope on the right ascension axis until the counterweight shaft is horizontal (parallel to the ground). Then loosen the Dec. lock lever and rotate the telescope until it is pointing straight overhead. The counterweight shaft is still horizontal. Then retighten both lock levers.

What if you need to aim the telescope directly north, but at an object that is nearer to the horizon than Polaris? You can’t do it with the counterweights down as pictured in Figure 1. Again, you have to rotate the scope in right ascension so that the counterweight shaft is positioned horizontally. Then rotate the scope in declination so it points to where you want it near the horizon.

To point the telescope directly south, the counterweight shaft should again be horizontal. Then you simply rotate the scope on the declination axis until it points in the south direction.

To point the telescope to the east or west, or in other directions, you rotate the telescope on its right ascension and declination axes. Depending on the altitude of the object you want to observe, the counterweight shaft will be oriented somewhere between vertical and horizontal.

Figure 13 illustrates how the telescope will look when pointed at the four cardinal directions: north, south, east and west.

The key things to remember when pointing the telescope are that a) you only move it in right ascension and declination, not in azimuth or latitude (altitude), and b) the counterweight and

11

Page 11
Image 11
Orion 9874 instruction manual Calibrating the Right Ascension Setting Circle, Finding Objects With the Setting Circles

9874 specifications

Orion 9874 is a state-of-the-art device that has gained attention in the tech community for its outstanding features and robust performance. This cutting-edge gadget is designed to meet the needs of both casual users and professionals, making it a versatile addition to any tech enthusiast’s arsenal.

One of the main features of the Orion 9874 is its sleek and modern design, which combines aesthetics with functionality. The device boasts a vibrant, high-resolution display that offers stunning visuals, making it perfect for watching videos, playing games, or browsing the web. The touchscreen interface is highly responsive, ensuring a smooth and intuitive user experience.

The Orion 9874 is powered by advanced processing technology, featuring a multi-core processor that delivers exceptional speed and efficiency. This powerful chipset enables seamless multitasking, allowing users to run multiple applications without experiencing lag. Whether you are editing videos, engaging in graphic design, or simply browsing the internet, the Orion 9874 can handle it all with ease.

In terms of connectivity, the device is equipped with the latest wireless technologies, including Wi-Fi 6 and Bluetooth 5.0. These features ensure fast internet speeds and reliable connections with other devices. The inclusion of multiple USB ports and HDMI output also provides users with various options for expanding functionality and connecting to external displays and peripherals.

Security is a priority for Orion, and the 9874 incorporates advanced security measures. It includes biometric authentication options such as facial recognition and fingerprint sensors, ensuring that your data remains safe and secure. Additionally, the device comes with robust encryption features that protect sensitive information from unauthorized access.

Battery life is another standout aspect of the Orion 9874. With an energy-efficient design, this device can last throughout the day on a single charge, making it ideal for users who are often on the go. Fast-charging capabilities also allow users to quickly recharge the battery, minimizing downtime.

In conclusion, the Orion 9874 is a remarkable device that combines elegance with high-end performance. With its stunning display, powerful processor, advanced connectivity options, and strong security features, it is a perfect choice for anyone needing a reliable and efficient gadget. Whether for work or play, the Orion 9874 is designed to enhance your digital experience in every way possible.