Orion 9874 Using the Polar Axis Finder Scope, Alignment of the Polar Axis Finder Scope

Models: 9874

1 20
Download 20 pages 4.68 Kb
Page 8
Image 8


Little Dipper


(in Ursa Minor)

Big Dipper

N.C.P.


(in Ursa Major)


Polaris


Pointer


Cassiopeia

Stars


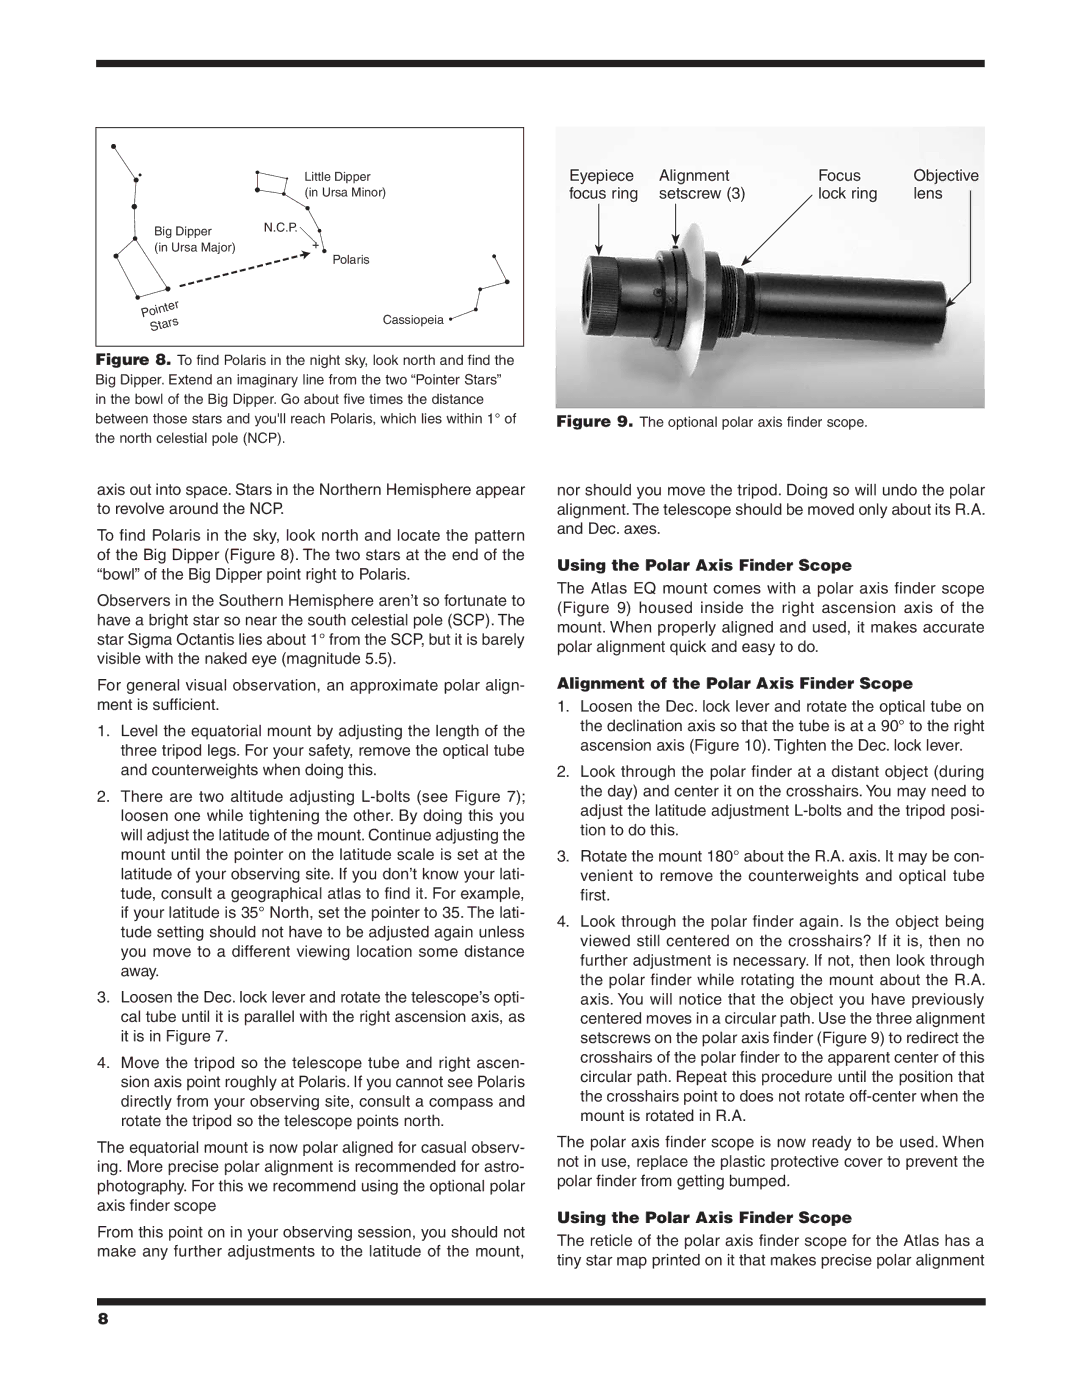
Figure 8. To find Polaris in the night sky, look north and find the Big Dipper. Extend an imaginary line from the two “Pointer Stars” in the bowl of the Big Dipper. Go about five times the distance between those stars and you'll reach Polaris, which lies within 1° of the north celestial pole (NCP).

axis out into space. Stars in the Northern Hemisphere appear to revolve around the NCP.

To find Polaris in the sky, look north and locate the pattern of the Big Dipper (Figure 8). The two stars at the end of the “bowl” of the Big Dipper point right to Polaris.

Observers in the Southern Hemisphere aren’t so fortunate to have a bright star so near the south celestial pole (SCP). The star Sigma Octantis lies about 1° from the SCP, but it is barely visible with the naked eye (magnitude 5.5).

For general visual observation, an approximate polar alignment is sufficient.

1.Level the equatorial mount by adjusting the length of the three tripod legs. For your safety, remove the optical tube and counterweights when doing this.

2.There are two altitude adjusting L-bolts (see Figure 7); loosen one while tightening the other. By doing this you will adjust the latitude of the mount. Continue adjusting the mount until the pointer on the latitude scale is set at the latitude of your observing site. If you don’t know your latitude, consult a geographical atlas to find it. For example, if your latitude is 35° North, set the pointer to 35. The latitude setting should not have to be adjusted again unless you move to a different viewing location some distance away.

3.Loosen the Dec. lock lever and rotate the telescope’s optical tube until it is parallel with the right ascension axis, as it is in Figure 7.

4.Move the tripod so the telescope tube and right ascension axis point roughly at Polaris. If you cannot see Polaris directly from your observing site, consult a compass and rotate the tripod so the telescope points north.

The equatorial mount is now polar aligned for casual observing. More precise polar alignment is recommended for astro­ photography. For this we recommend using the optional polar axis finder scope

From this point on in your observing session, you should not make any further adjustments to the latitude of the mount,

Eyepiece

Alignment

Focus

Objective

focus ring

setscrew (3)

lock ring

lens


Figure 9. The optional polar axis finder scope.

nor should you move the tripod. Doing so will undo the polar alignment. The telescope should be moved only about its R.A. and Dec. axes.

Using the Polar Axis Finder Scope

The Atlas EQ mount comes with a polar axis finder scope (Figure 9) housed inside the right ascension axis of the mount. When properly aligned and used, it makes accurate polar alignment quick and easy to do.

Alignment of the Polar Axis Finder Scope

1.Loosen the Dec. lock lever and rotate the optical tube on the declination axis so that the tube is at a 90° to the right ascension axis (Figure 10). Tighten the Dec. lock lever.

2.Look through the polar finder at a distant object (during the day) and center it on the crosshairs. You may need to adjust the latitude adjustment L-bolts and the tripod position to do this.

3.Rotate the mount 180° about the R.A. axis. It may be convenient to remove the counterweights and optical tube first.

4.Look through the polar finder again. Is the object being viewed still centered on the crosshairs? If it is, then no further adjustment is necessary. If not, then look through the polar finder while rotating the mount about the R.A. axis. You will notice that the object you have previously centered moves in a circular path. Use the three alignment setscrews on the polar axis finder (Figure 9) to redirect the crosshairs of the polar finder to the apparent center of this circular path. Repeat this procedure until the position that the crosshairs point to does not rotate off-center when the mount is rotated in R.A.

The polar axis finder scope is now ready to be used. When not in use, replace the plastic protective cover to prevent the polar finder from getting bumped.

Using the Polar Axis Finder Scope

The reticle of the polar axis finder scope for the Atlas has a tiny star map printed on it that makes precise polar alignment

8

Page 8
Image 8
Orion 9874 instruction manual Using the Polar Axis Finder Scope, Alignment of the Polar Axis Finder Scope

9874 specifications

Orion 9874 is a state-of-the-art device that has gained attention in the tech community for its outstanding features and robust performance. This cutting-edge gadget is designed to meet the needs of both casual users and professionals, making it a versatile addition to any tech enthusiast’s arsenal.

One of the main features of the Orion 9874 is its sleek and modern design, which combines aesthetics with functionality. The device boasts a vibrant, high-resolution display that offers stunning visuals, making it perfect for watching videos, playing games, or browsing the web. The touchscreen interface is highly responsive, ensuring a smooth and intuitive user experience.

The Orion 9874 is powered by advanced processing technology, featuring a multi-core processor that delivers exceptional speed and efficiency. This powerful chipset enables seamless multitasking, allowing users to run multiple applications without experiencing lag. Whether you are editing videos, engaging in graphic design, or simply browsing the internet, the Orion 9874 can handle it all with ease.

In terms of connectivity, the device is equipped with the latest wireless technologies, including Wi-Fi 6 and Bluetooth 5.0. These features ensure fast internet speeds and reliable connections with other devices. The inclusion of multiple USB ports and HDMI output also provides users with various options for expanding functionality and connecting to external displays and peripherals.

Security is a priority for Orion, and the 9874 incorporates advanced security measures. It includes biometric authentication options such as facial recognition and fingerprint sensors, ensuring that your data remains safe and secure. Additionally, the device comes with robust encryption features that protect sensitive information from unauthorized access.

Battery life is another standout aspect of the Orion 9874. With an energy-efficient design, this device can last throughout the day on a single charge, making it ideal for users who are often on the go. Fast-charging capabilities also allow users to quickly recharge the battery, minimizing downtime.

In conclusion, the Orion 9874 is a remarkable device that combines elegance with high-end performance. With its stunning display, powerful processor, advanced connectivity options, and strong security features, it is a perfect choice for anyone needing a reliable and efficient gadget. Whether for work or play, the Orion 9874 is designed to enhance your digital experience in every way possible.