Parts and their functions (continued)

Rear panel


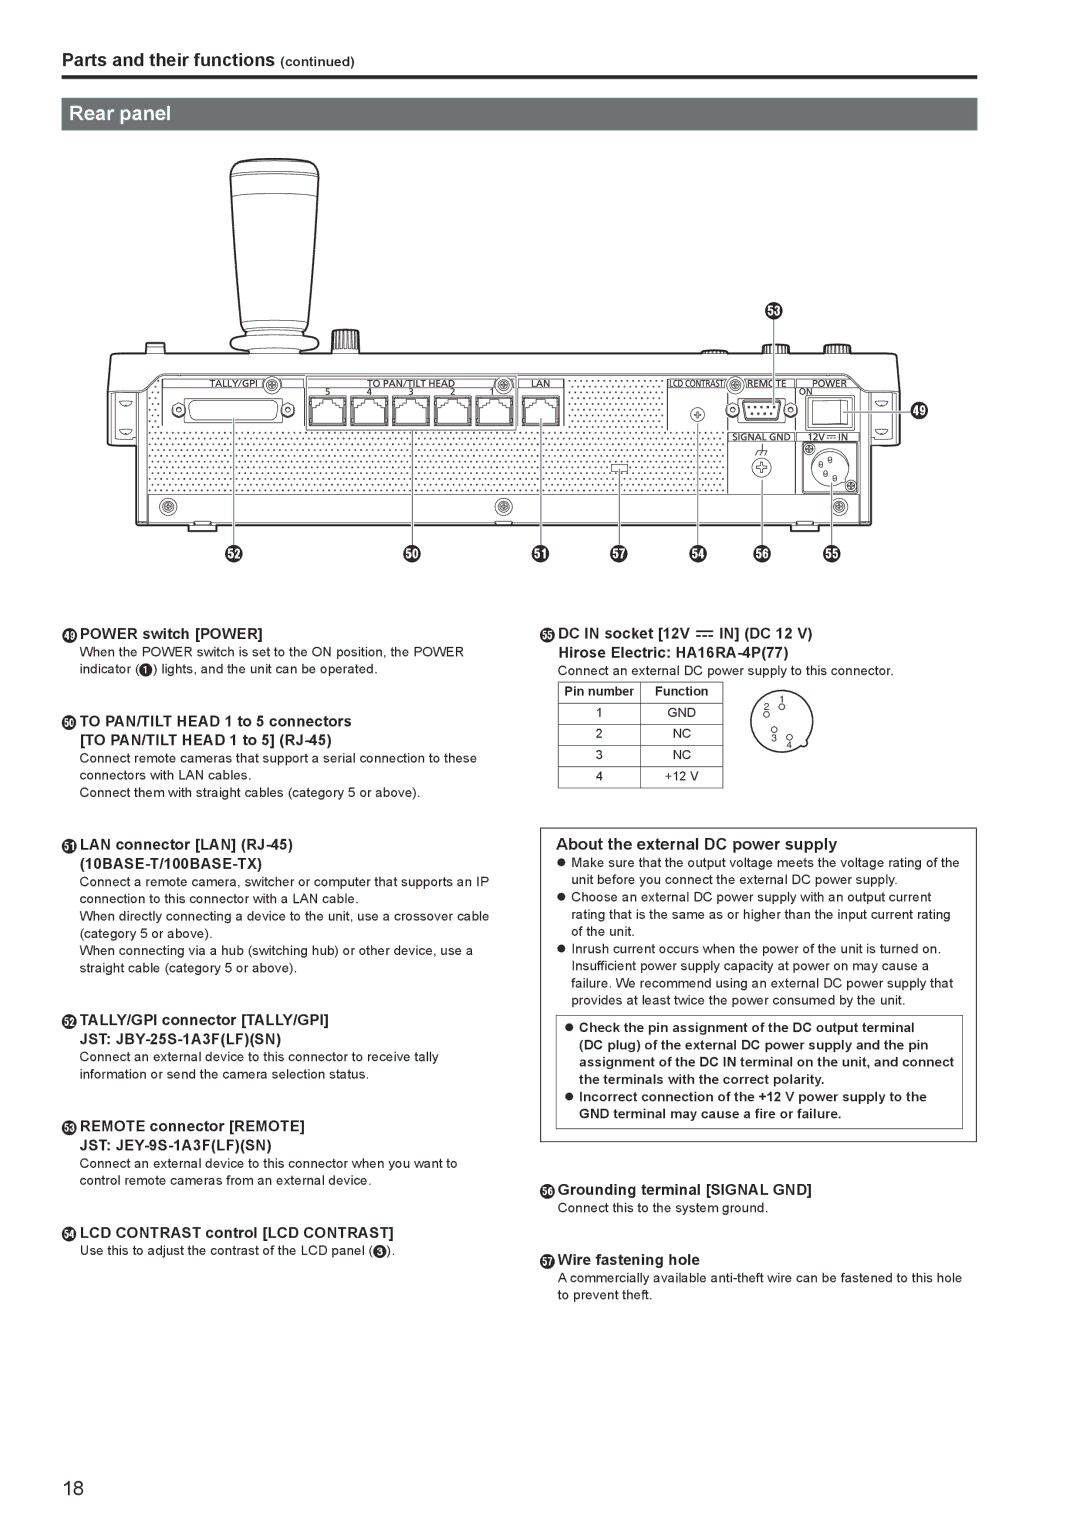
POWER switch [POWER]

When the POWER switch is set to the ON position, the POWER indicator () lights, and the unit can be operated.

TO PAN/TILT HEAD 1 to 5 connectors [TO PAN/TILT HEAD 1 to 5] (RJ-45)

Connect remote cameras that support a serial connection to these connectors with LAN cables.

Connect them with straight cables (category 5 or above).

DC IN socket [12V IN] (DC 12 V) Hirose Electric: HA16RA-4P(77)

Connect an external DC power supply to this connector.

Pin number

Function


1

1

GND

2


2

NC


3 4

3

NC


4

+12 V


LAN connector [LAN] (RJ-45) (10BASE-T/100BASE-TX)

Connect a remote camera, switcher or computer that supports an IP connection to this connector with a LAN cable.

When directly connecting a device to the unit, use a crossover cable (category 5 or above).

When connecting via a hub (switching hub) or other device, use a straight cable (category 5 or above).

TALLY/GPI connector [TALLY/GPI] JST: JBY-25S-1A3F(LF)(SN)

Connect an external device to this connector to receive tally information or send the camera selection status.

REMOTE connector [REMOTE] JST: JEY-9S-1A3F(LF)(SN)

Connect an external device to this connector when you want to control remote cameras from an external device.

LCD CONTRAST control [LCD CONTRAST]

Use this to adjust the contrast of the LCD panel ().

About the external DC power supply

zzMake sure that the output voltage meets the voltage rating of the unit before you connect the external DC power supply.

zzChoose an external DC power supply with an output current rating that is the same as or higher than the input current rating of the unit.

zzInrush current occurs when the power of the unit is turned on. Insufficient power supply capacity at power on may cause a failure. We recommend using an external DC power supply that provides at least twice the power consumed by the unit.

zzCheck the pin assignment of the DC output terminal (DC plug) of the external DC power supply and the pin assignment of the DC IN terminal on the unit, and connect the terminals with the correct polarity.

zzIncorrect connection of the +12 V power supply to the GND terminal may cause a fire or failure.

Grounding terminal [SIGNAL GND]

Connect this to the system ground.

Wire fastening hole

A commercially available anti-theft wire can be fastened to this hole to prevent theft.

18

Page 18
Image 18
Panasonic AW-RP120G operating instructions Rear panel, About the external DC power supply

AW-RP120G specifications

The Panasonic AW-RP120G is a sophisticated remote camera controller designed for broadcasting and production environments that require precise control over multiple pan-tilt-zoom (PTZ) cameras. This versatile controller offers an extensive range of features, making it a reliable choice for professionals in the field.

One of the key highlights of the AW-RP120G is its user-friendly interface. It incorporates a large, LCD touchscreen display that provides real-time information and control options for both novice and experienced operators. The layout is intuitive, enabling quick access to various settings without the need for complex configurations. This allows operators to focus on their production rather than getting mired in technical details.

The AW-RP120G is equipped with the capability to control up to 200 PTZ cameras simultaneously, which caters to large-scale productions. This flexibility is crucial in various settings, from live events to studio broadcasts, where multiple camera angles and shots are necessary. The controller utilizes IP connectivity and supports the Panasonic’s proprietary protocol, ensuring seamless operation across a networked environment.

Another standout characteristic of the AW-RP120G is its advanced preset management system. Users can store and recall up to 100 preset camera positions, eliminating the need to manually adjust each PTZ camera during a live performance. This feature significantly enhances workflow efficiency and allows for smooth transitions between camera angles.

The device further incorporates advanced technologies, such as PoE (Power over Ethernet) compatibility, which simplifies installation by allowing power and data to be transmitted over a single cable. This reduces clutter and streamlines setup processes, particularly in complex environments.

In terms of design, the AW-RP120G is compact and portable, making it easy to integrate into various production setups. It is built with durability in mind, ensuring that it can withstand the rigors of frequent use in demanding environments.

Overall, the Panasonic AW-RP120G is a state-of-the-art remote controller that combines functionality, efficiency, and reliability. With its advanced features, it is an essential tool for any professional looking to elevate their camera operation capabilities in broadcasting and live event production. This makes it a valuable investment for those looking to enhance their production quality while streamlining their workflow.