AIR CONDITIONER INSTALLATION |
| ||||
INSTALACIÓN DEL ACONDICIONADOR DE AIRE | |||||
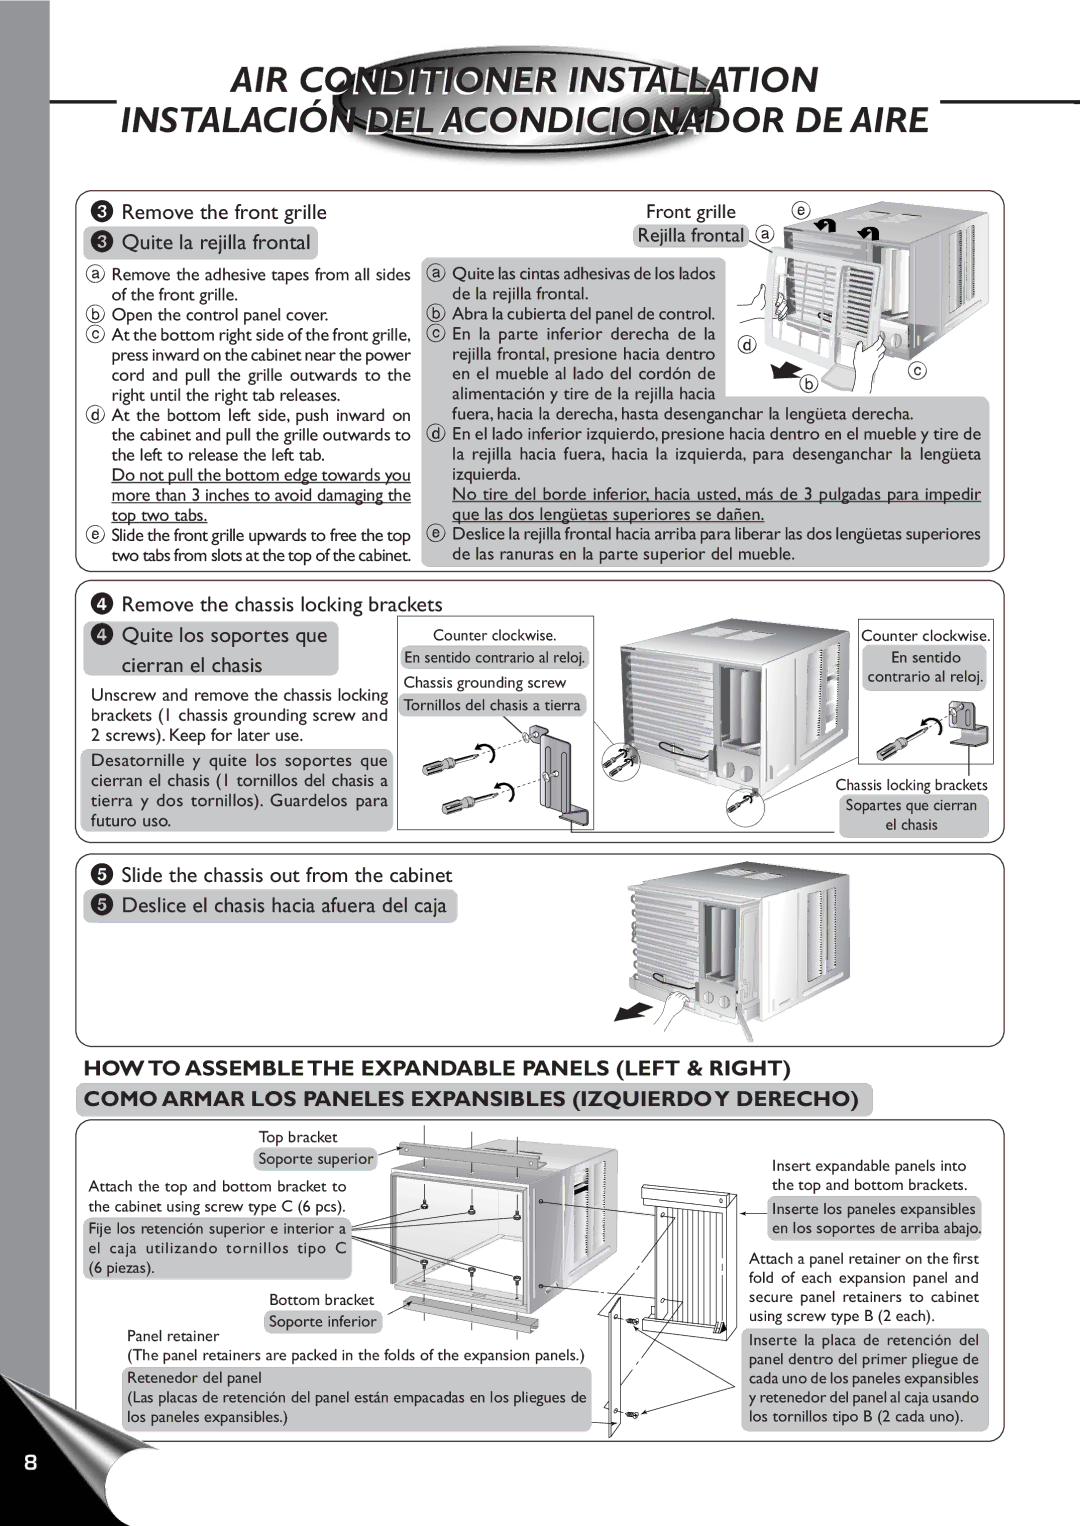
3Remove the front grille | Front grille |
| a | e |
|
Quite la rejilla frontal | Rejilla frontal |
|
|
| |
| d | b | c | ||
aRemove the adhesive tapes from all sides | aQuite las cintas adhesivas de los lados | ||||
bof the front grille. | bde la rejilla frontal. | ||||
cOpen the control panel cover. | cAbra la cubierta del panel de control. | ||||
At the bottom right side of the front grille, | En la parte inferior derecha de la | ||||
press inward on the cabinet near the power | rejilla frontal, presione hacia dentro | ||||
cord and pull the grille outwards to the | en el mueble al lado del cordón de |
|
| ||
dright until the right tab releases. | alimentación y tire de la rejilla hacia |
|
|
| |
At the bottom left side, push inward on | dfuera, hacia la derecha, hasta desenganchar la lengüeta derecha. | ||||
the cabinet and pull the grille outwards to | En el lado inferior izquierdo, presione hacia dentro en el mueble y tire de | ||||
the left to release the left tab. | la rejilla hacia fuera, hacia la izquierda, para desenganchar la lengüeta | ||||
Do not pull the bottom edge towards you | izquierda. |
|
|
|
|
more than 3 inches to avoid damaging the | No tire del borde inferior, hacia usted, más de 3 pulgadas para impedir | ||||
etop two tabs. | eque las dos lengüetas superiores se dañen. |
|
| ||
Slide the front grille upwards to free the top | Deslice la rejilla frontal hacia arriba para liberar las dos lengüetas superiores | ||||
two tabs from slots at the top of the cabinet. | de las ranuras en la parte superior del mueble. |
| |||
4Remove the chassis locking brackets
Quite los soportes que
cierran el chasis
Unscrew and remove the chassis locking brackets (1 chassis grounding screw and 2 screws). Keep for later use.
Desatornille y quite los soportes que cierran el chasis (1 tornillos del chasis a tierra y dos tornillos). Guardelos para futuro uso.
Counter clockwise.
En sentido contrario al reloj.
Chassis grounding screw
Tornillos del chasis a tierra
Counter clockwise. |
En sentido |
contrario al reloj. |
Chassis locking brackets
Sopartes que cierran
el chasis
5Slide the chassis out from the cabinet Deslice el chasis hacia afuera del caja
HOW TO ASSEMBLE THE EXPANDABLE PANELS (LEFT & RIGHT)
COMO ARMAR LOS PANELES EXPANSIBLES (IZQUIERDOY DERECHO)
Top bracket
Soporte superior
Attach the top and bottom bracket to the cabinet using screw type C (6 pcs). Fije los retención superior e interior a el caja utilizando tornillos tipo C (6 piezas).
Bottom bracket
Soporte inferior Panel retainer
(The panel retainers are packed in the folds of the expansion panels.) Retenedor del panel
(Las placas de retención del panel están empacadas en los pliegues de los paneles expansibles.)![]()
Insert expandable panels into the top and bottom brackets.
Inserte los paneles expansibles en los soportes de arriba abajo.
Attach a panel retainer on the first fold of each expansion panel and secure panel retainers to cabinet using screw type B (2 each).
Inserte la placa de retención del panel dentro del primer pliegue de cada uno de los paneles expansibles y retenedor del panel al caja usando los tornillos tipo B (2 cada uno).
8