DVD Video Recorder
Following Applies only in the U.S.A
Following Applies only in the U.S.A. and Canada
RQLS0233 Inside of product
Accessories
Useful features
About descriptions in these Operating
Instructions
Contents
Helpful Hints
Antes de uso
Reproducción
Grabación
Control reference guide
Remote control
VHS and DVD button
Off Timer
Batteries
Use
Main unit
Unit’s display
When the unit is not to be used for a long time
Connection
Before moving the unit, ensure the disc tray is empty
Do not connect the unit through a video cassette Recorder
Connecting a TV and VCR
Component Video OUT terminal
Video OUT terminal
75 ≠ coaxial cable
If the antenna connector doesn’t match
Connecting a cable TV box/satellite receiver
Other antenna connections to the unit
Other antenna connections from the unit to the TV
Connecting amplifier or system component
DVD output and DVD/VHS output
Connection to a stereo amplifier analog connection
Dolby Digital l
Plug-in Auto Tuning
Output
DVD
Functions
If Plug-in Auto Tuning fails
Adding and deleting channels
Return
ADD/DLT
Channel settings
Guide channel settings for VCR Plusi system
Guide Channel Channel setting
To return to the previous screen
Preset Channel Captions
Channel captions
Manual Channel Captions
TV, Í DVD Functions Return
Set up to match your TV and remote control
When the following indicator appears on the unit’s display
Selecting TV type
TV operation
Discs
Discs you can use
More about DVD-RAM and DVD-R
Protection of cartridge disc
Discs that cannot be played
Maintenance
Disc handling
Inserting discs
Press , OPEN/CLOSE on the main unit to Open the tray
Press , OPEN/CLOSE on the main unit to close the tray
Non-cartridge disc
Starting play from where you stopped it Resume Function
When a menu screen appears on the TV
Playing discs
Quick View Play t1.3
Frame-by-frame viewing
Skipping
Direct Play
Fast forward and rewind-SEARCH
Create chapters
Erasing a title that is being played
Changing audio during play
Using the tree screen to find a group
Using menus to play MP3 discs
TV/VIDEO
Playing while you are recording
Watching the TV while recording
Chasing play
Simultaneous recording and play
REC Mode
Recording TV programs
Playing/Recording VHS while recording
Functions Return
Selecting audio to record
Flexible Recording mode FR
Recording modes and approximate recording times
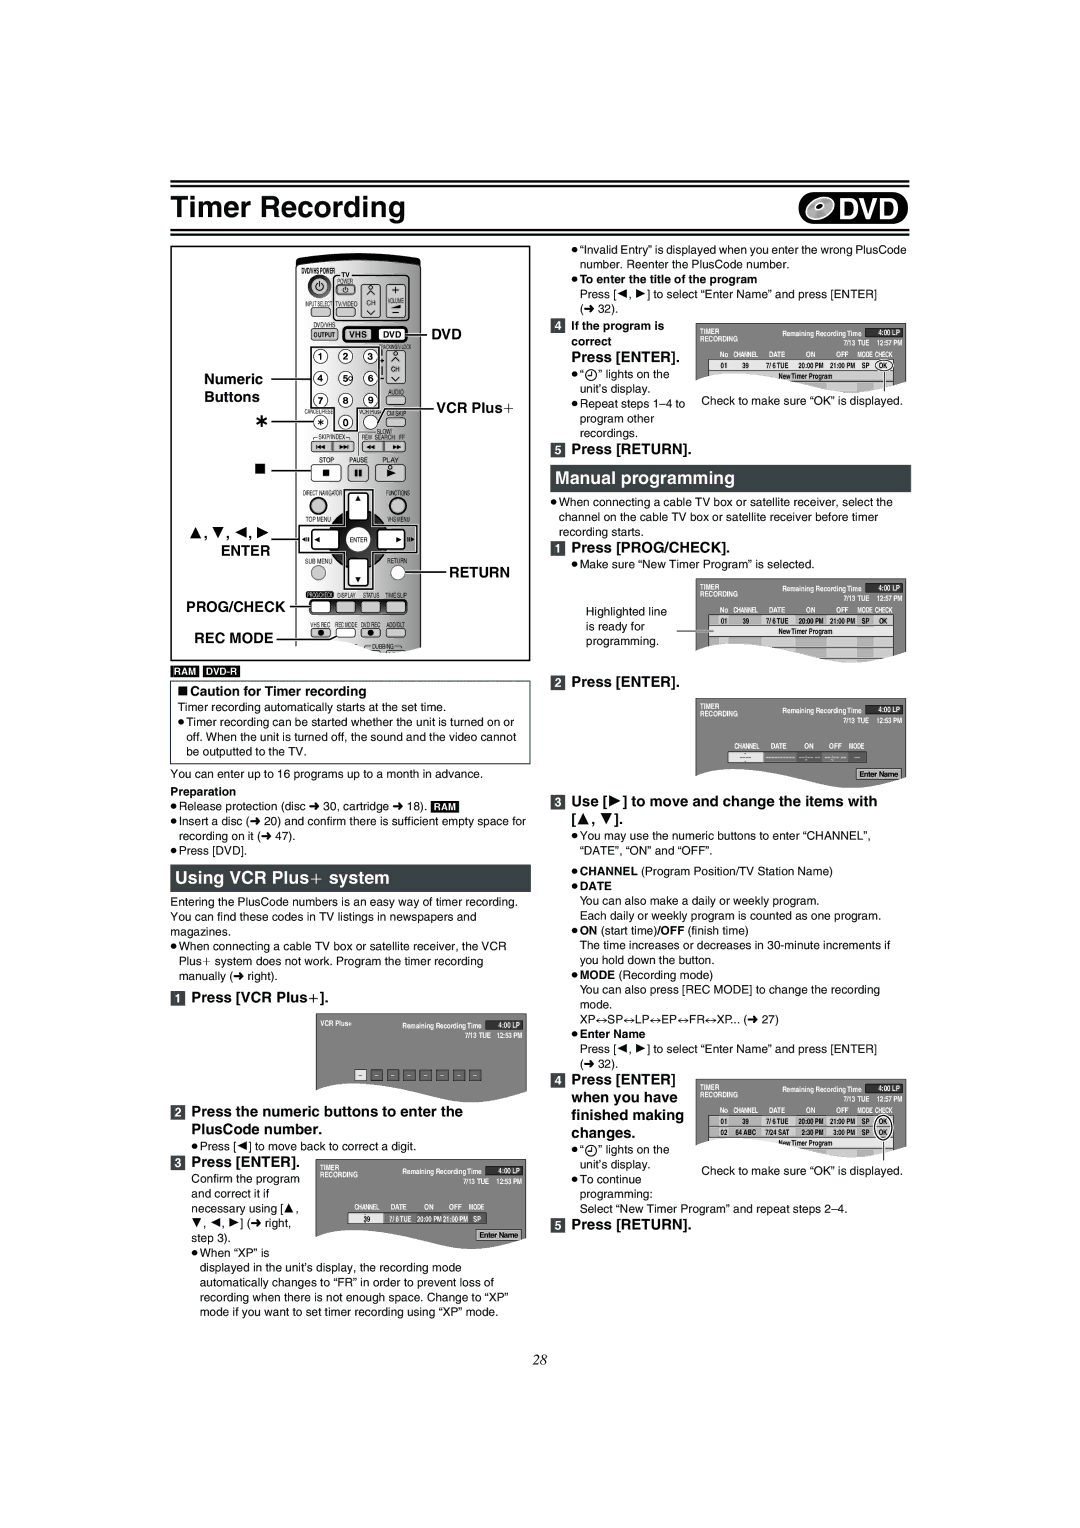
Manual programming
Using VCR Plus system
PROG/CHECK
Press CANCEL/RESET, ¢ to delete
Check, change or delete programs
Press 3, 4 to select the program
Or press Enter to change
Disc Name
Disc Protection
Format disc
Select First play
Finalize
≥DVD-R and CD-R/RW cannot be formatted
Direct Navigator
Entering text
SUB Menu
Using the Direct Navigator
Selecting recorded titles to play
Direct Navigator
Erase
Edit
Enter SUB Menu
Chapter View
Using play list
Creating play lists
Enter SUB Menu DVD Erase
DVD Functions Return
Using play list to edit play lists/chapters
Playing play lists
Press SUB MENU, then use 3
To select the operation and press
Press FUNCTIONS. l Select Play List with 3
Press 3, 4, 2, 1 to select
Play list
Use 3, 4 to select the desired item and press Enter
Use 3, 4, 2, 1 to select a desired chapter
Add Chapter
Erase Chapter
Press Enter at the point you Want to divide
Using Display menus
Common procedures
Disc menu
Display
Transfer When Progressive is set to on
Play menu
Video menu
Audio menu
Changing the unit’s settings
Entering a password Ratings
≥Do not forget your password
DVD/VHS
Summary of settings
Hybrid VBR Resolution l 63, VBR RAM
Still Mode
Video Y/C Separation
Line-in NR
Display
Clock Settings
Auto Clock Setting
Time Zone Adjust
Manual Clock Setting
Functions window
Status displays
Changing the information displayed
Display examples
Maintenance
Inserting video cassette
Video cassette information
Video cassettes
Playing a video cassette
Slow
Fast-forward / Rewind
Jet Rewind
Adjusting the playback picture
Vertical locking adjustment
VHS Quasi Playback Sqpb
Repeat Playback
Playing/Recording DVD while recording
Press REC Mode to select the tape speed
Press ¥, VHS REC to start recording
Press Enter when you have finished making changes
≥Make sure NEW Timer Program is selected
VCR Plus
If the program is correct
Auto SP/EP mode
Direct Navigator
To save Direct Navigator data
Selecting programs to play
VHS Menu
To Check the Recorded Programming Data Time Stamp Function
VHS Index Search System Viss
Set the category
Press or
To exit the settings screen
VHS Menu OSD l
Direct Navigator l
JET Search l
Various on-screen display indications
Changing audio
Auto Bilingual Choice Function
Press Status
Transfer Dubbing from VHS
One Touch Transfer Dubbing VHS l DVD
DVD REC
Press and hold DVD, Dubbing for 3 seconds or more
Manual Transfer Dubbing
Press VHS and press 1, Play
Transfer Dubbing from DVD
One Touch Transfer Dubbing DVD l VHS
VHS REC
VHS DVD
Press DVD and press 1, Play
Press REC Mode to select the recording mode Press , Pause
About DC channel
Recording from an external device
Press CH, W, X or Input Select to select the input channel
Input Select
CH, W DVD REC
Glossary
Set up
Frequently asked questions
Disc
Error messages
Common
On the unit’s display
On the TV
Troubleshooting guide
Power
Displays
Operation
Picture
DVD Sound
DVD Picture
DVD Play
DVD Recording, timer recording
VHS Recording, timer recording
DVD Edit
VHS Picture
Product information
Product Service
User memo
Limited Warranty only for U.S.A
For hearing or speech impaired TTY users, TTY
Limited Warranty only for Canada
Warranty Service
If YOU Ship the Product to a Servicentre
Panasonic Canada Inc
Specifications
Laser Specification
Index
Common
Conexión a un televisor o a un VCR
Terminal Component Video OUT
Terminal S-VIDEO OUT
75 ≠ cable coaxial
Sintonización automática por enchufe
Ajustes del canal de guía para el sistema VCR Plus+
Selección del tipo de televisor
Introducción de discos
Reproducción de los discos
Vista rápida Reproducción t1.3
Continuación de la reproducción Función Resume
Salto CM
Visión cuadro por cuadro
Salto
Reproducción directa
Reproducción durante la grabación
Grabación de programas televisivos
Reproducción seguida
Grabación y reproducción simultáneas
Controle, cambie o borre el programa
Uso del sistema VCR Plus+
Programación manual
Precauciones al usar la grabación temporizada en DVD y VHS
Introducción de un cassette de vídeo
Cassette de vídeo
Reproducción de un cassette de vídeo
Avance rápido / Rebobinado
Pulse Recmode para seleccionar la velocidad De la cinta
VHS Menu Return
Pulse ¥, VHS REC para iniciar la grabación
Modo SP/EP automático
Segundo programa 60 min
Cinta de vídeo 30 min. en SP 15 min 45min
En EP
Ambler Drive
Electric Corporation of America Puerto Rico, Inc. PSC
F0304Fa2044