If you have any questions contact
Region number supported by this unit
Example
FCC Note
Inside of product
Table of contents
About descriptions in these operating instructions
Table of contents
Convenient functions
Copying
HDD and discs you can use for recording and play
Table of contents/HDD, disc and card information
HDD, disc and card information
DVD Video Recording format
RVR format
Discs that cannot be played
HDD, disc and card information
Recording modes and approximate recording times l
Information
Play-only discs 12 cm 5z/8 cm 3z
Cards you can use on this unit
HDD, disc and card
Still pictures JPEG, TIFF¢2
DivX
MP3
Structure of MP3 folders
Important notes for recording
HDD Hard disk drive handling care
Video cassette information
Unit care
Disc and card handling
Handling/Video cassette information
Inserting/Removing the SD card
Inserting a disc
Inserting a video cassette
Batteries Use
Accessories
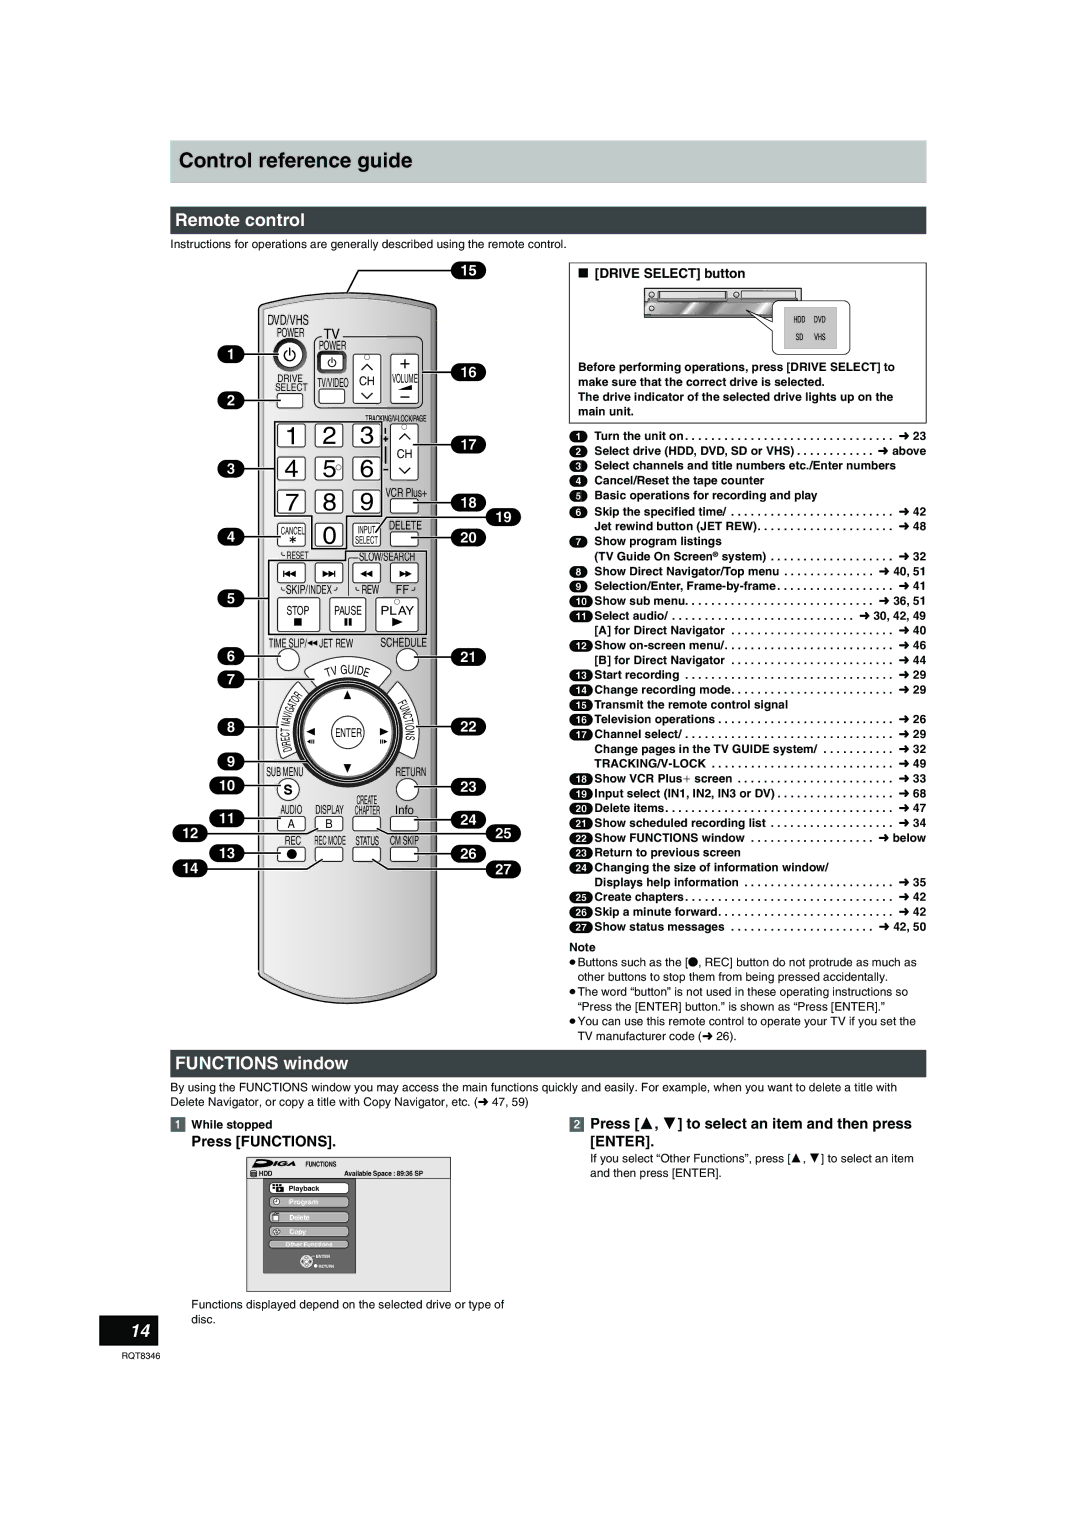
Remote control
Functions window
Remote control
Control reference guide
Press Functions
Unit’s display
Off Timer
Main unit
Control reference guide
Connection with a television
When the unit is not to be used for a long time
Connection
Connection with a television and video cassette recorder
Connection
Why should I connect the IR Blaster?
Setting the IR Blaster
Connection
Connection with a television l 16, a
This unit 75 ≠ coaxial cable included RF modulator
If the antenna connector doesn’t match
DVD output and DVD/VHS output
Connecting an amplifier or system component
To enjoy even higher picture quality
Power on link
Connecting to a TV Connecting to an amplifier
Automatic input switching
Power off link
Setting up the TV Guide On Screen system
System
Service Set the following
Downloading
Confirm the settings
Press Í, DVD/VHS POWER. The unit turns
Off, then wait 24 hours
Press 3, 4 to select the item and then press Enter
Selecting television type
Television operation
HDD and discs
When the format confirmation screen is displayed
When remove a recorded disc
FR Flexile Recording
Recording modes and approximate recording times
Recording mode
HDD, discs and VHS
To specify a time to stop recording-One Touch Recording
Programs
Recording television programs
Recording television programs
Recording television programs
Flexible Recording mode FR
Selecting audio to record
Press Audio
Recording television programs
Playing while you are recording
Press 1, Play
Press ¥, REC
Scheduled recording
Press 3, 4, 2, 1 to select the program
Scheduled recording
Using VCR Plusi system to make scheduled recordings
Manually programming scheduled recordings
Check, change or delete a program
Listings Options
Utilizing the TV Guide On Screen system
Screen Components
Scheduled recording/Utilizing the TV Guide On Screen system
To make scheduled recording
When the notification message appears on Television screen
To make scheduled reminder
Other Episode Options
To search TV programs by saved keyword
To search TV programs by genre
To search TV programs by new keyword
Utilizing the TV Guide On Screen system
Customizing the channel lineup -Change channel display
Change the initial settings-Change default options
≥No, repeat setup process
≥Yes, but my channel lineup is incorrect
Other Schedule Options
To change the previously set scheduled
Recording or scheduled reminder
History Options
Playing recorded video contents/Playing play-only discs
Quick View
Playing recorded video contents/Playing play-only discs
Operations during play
Status messages
Simple editing operations during play
Changing audio during play
Selecting file type to play
Using the tree screen to find a folder
Playing DivX discs, MP3 discs and still pictures JPEG/TIFF
Playing DivX discs
Playing MP3 discs
About DivX VOD content
Using the tree screen to find a group
Playing still pictures
Press 3, 4, 2, 1 to select the album and then press Enter
Useful functions during still picture play
Pictures JPEG/TIFF
To show the picture properties
Disc menu-Setting the disc content
Using on-screen menus
Common procedures
Play menu-Change the play sequence
Video menu-Change the picture quality
Delete Navigator to delete titles
Deleting titles or pictures during play
Audio menu-Change the sound effect
Playing a video cassette
Operations
Changing audio
Adjusting the playback picture
VHS Index Search System Viss
Auto Bilingual Choice Function
Various on-screen display indications
Playing a video cassette
Press a to select Video
Editing titles/chapters
Editing titles/chapters and playing chapters
Press 3 To select the title
Delete Chapter ¢
Title operations
Chapter operations
Create Chapter
Editing
Creating, editing and playing playlists
Creating playlists
Add
Editing and playing playlists/chapters
Playlist operations
Chapter
Editing still pictures
Press B to select Picture
Type of copy you want
Copying still pictures HDD RAM SD
Direction
Finalize ¢
HDD DVD-R DL +R DL DVD-RAM DVD-RW +RW
Before copying
Approximate copying times Max. speed
Advanced Copy Create List Advanced Copy Time Limit
Copy Navigator One Touch Copy
HDD # DVD HDD # VHS VHS # HDD DVD # HDD DVD # VHS VHS # DVD
HDD # DVD HDD # VHS DVD # HDD VHS # HDD DVD # VHS VHS # DVD
About copying/Copying titles or playlists
Copying titles or playlists
Copy Navigator
Press 2, 1 to select Start Copying and then press Enter
One Touch Copy
HDD l DVD or VHS
DVD l VHS
VHS l HDD or DVD
DVD l HDD
Playlists
Set the copy direction
Copying using the copying list Advanced Copy Create List
Set the recording mode
Register titles and playlists for copy
To return to the previous screen
Copy Navigator/Copying list icons and functions
To stop copying
Recording and playing while copying
Set Time Limit
Setting the unit to copy according to the set time
≥If you are not going to change the setting l step
Press 3, 4 to select Start Copying and then press Enter
Press 3, 4, 2, 1 to
About FR recording mode
Copying titles or playlists
Select the title you want to
Register still pictures for copy
Copying using the copying list
Copying still pictures
Press 3, 4 to select Start Copying and then
Still
To select another folder
Pictures
Press Functions
Start play on the other equipment
Recording from a video cassette recorder
Manual recording
Press , PAUSE, then press ¥, REC
Recording from a video cassette recorder
When recording finishes
DV camcorder recording DV Camcorder Rec
Cartridge-protection
Common procedures
HDD, disc and card management
For a DVD-RAM with a cartridge
Deleting all the contents of a disc or card-Format
Deleting all titles and playlists-Delete All Titles
Creating Top Menu-Create DVD Top Menu
Selecting the background style-Top Menu style
Enabling discs to be played on other equipment-Finalize
HDD, disc and card management
Entering text
Text
Setup
Changing the unit’s settings
Summary of settings
Tabs Menus Options
Video
Changing the unit’s settings
Tabs Menus Options Underlined items are the factory presets
Changing the unit’s settings
DTS
Screen
Speaker presence and size a
Changing the speaker setting to suit your speaker
Delay time B
Guide On Screen system is not used
Auto channel/clock settings
Adjust Time Zone
Press 3, 4 to select s1 or r1 and then press Enter
Channel captions
VCR Plusr Channel Setting
Preset Channel Captions
Manual Channel Captions
PCM DTS
Frequently asked questions
Cover
Audio
Frequently asked questions
TV Guide On Screen system
On the television
Frequently asked questions/Messages
Messages
Messages On the unit’s display
Troubleshooting guide
Messages/Troubleshooting guide
Troubleshooting guide
Troubleshooting guide
Time even when high-speed
Stop even when , Stop is
When copying, it takes a long
Mode is selected
Listings does not display when
TV Guide On Screen system
Guide On Screen system was
TV Guide is pressed
TV Guide On Screen system Two stations are received on
Password
You want to cancel the ratings
Certain channels morning
Edit Cannot edit
Copying, deleting and setting
Type There is noise when playing a
Cannot format
Specifications
JPEG, Tiff
Structure of folders displayed by this unit
Specifications/Glossary
Glossary
Product information
Product Service
Language code list
Glossary
Warranty
Limited Warranty
Panasonic DVD Recorder Limited Warranty
Index
DVD-RAM, DVD-R, DVD-R DL
Para gozar de una calidad de la imagen aún más alta
Instalación básica
Conexión a un televisor y caja del cable o receptor DirecTV
Index/Instalación básica
6JET REW
Configuración del sistema TV Guide On Screen
Instalación básica
Direct Navigator
Nota acerca de la grabación
Inserción de un disco
Inserción de un videocasete
Grabación de programas de televisión
Reproducción mientras usted está grabando
Reproducción
Operaciones durante la reproducción
Reproducción
Reproducción de imágenes fijas
Reproducción de un videocasete
Pantalla de vista álbum
REW
Operaciones
Reproducción
Ave de Infantería, Km
F0206Fa0