OPTION menu
Remote control | Control panel |
See “Navigating through the MENU” on page 29. See “Main menu and
INPUT GUIDE
When the input signal is changed, the input signal information will be displayed in the upper right corner of the projected images. You can select the level of the input signal information.
Options | Function | |
|
| |
OFF | The input signal information will not | |
be displayed. | ||
| ||
SIMPLE | Only the name of the input signal will | |
be displayed. | ||
| ||
DETAILED | The input signal information will be | |
displayed in detail. | ||
| ||
|
|
NOTE:
•If “INPUT GUIDE” is set to “DETAILED”, the guide screen for computer connection will be displayed when COMPUTER1 or COMPUTER2 is selected and no signal is being input to the COMPUTER1 IN or COMPUTER2 IN connector. If you would like the guide screen not to be displayed, set “INPUT GUIDE” to “SIMPLE” or “OFF”.
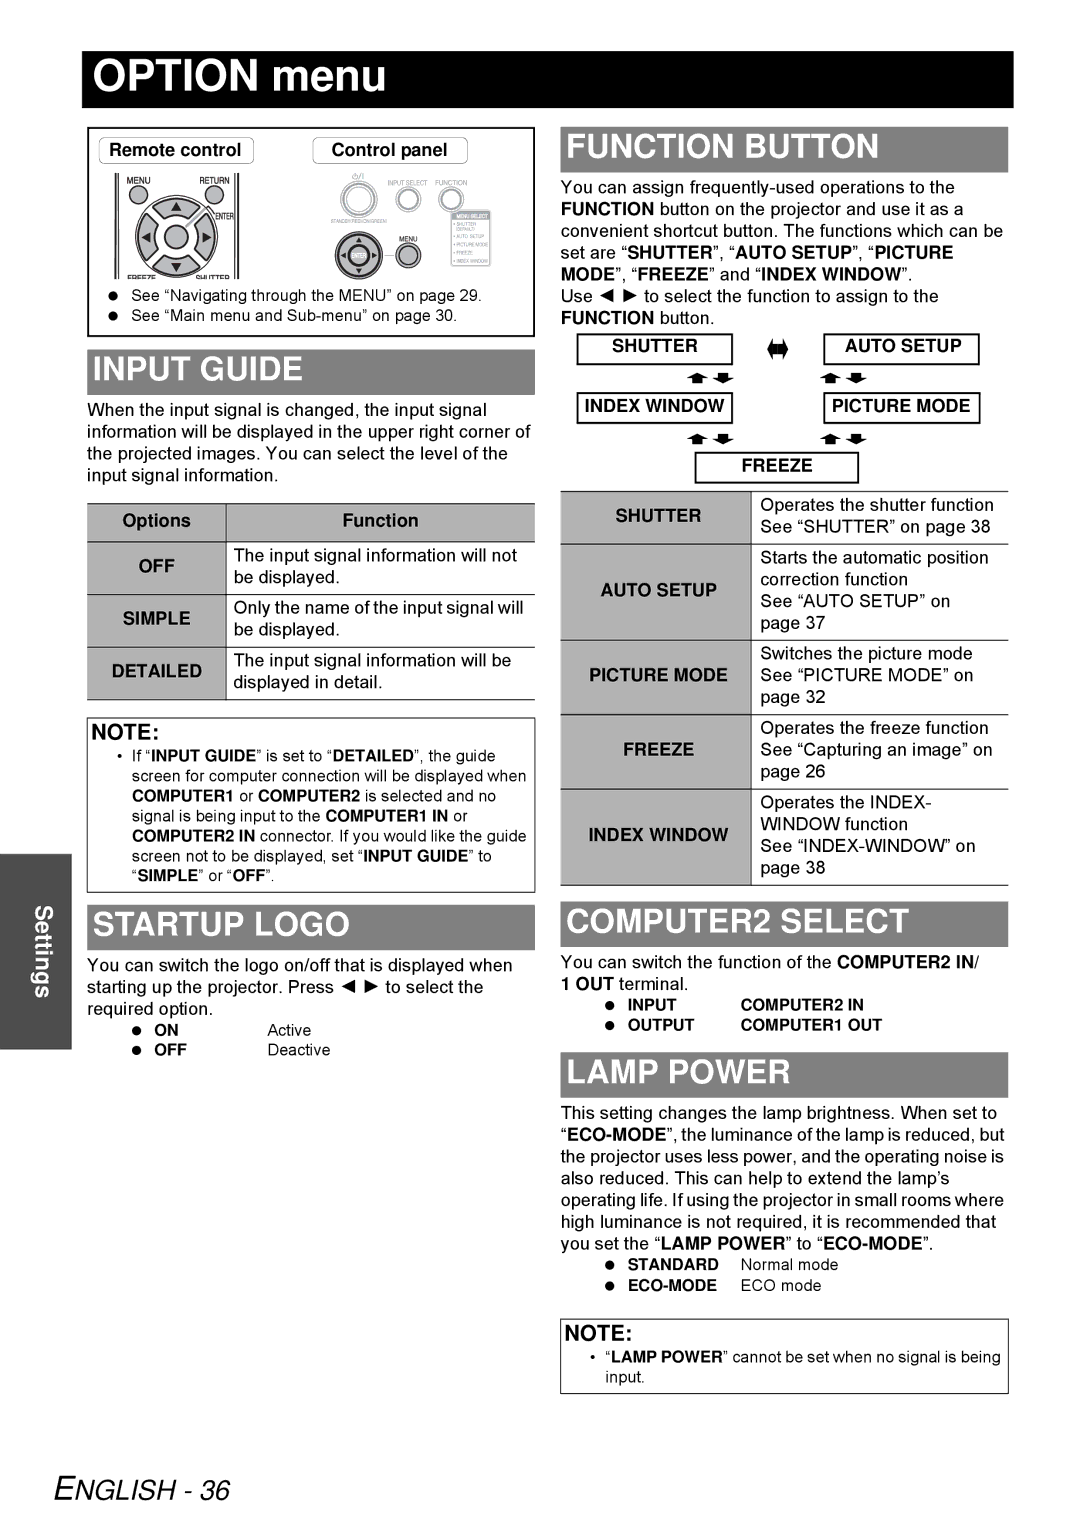
FUNCTION BUTTON
You can assign
Use I H to select the function to assign to the FUNCTION button.
| SHUTTER |
|
|
|
|
| AUTO SETUP |
| ||||||||
|
|
|
|
|
|
| ||||||||||
|
|
|
|
|
|
|
|
|
|
|
|
|
|
|
|
|
|
|
|
|
|
|
|
|
|
|
|
|
|
|
|
|
|
|
|
|
|
|
|
|
|
|
|
|
|
|
|
|
|
|
| INDEX WINDOW |
|
|
|
| PICTURE MODE |
| |||||||||
|
|
|
|
|
|
|
|
|
|
|
|
|
|
|
| |
|
|
|
|
|
|
|
|
|
|
|
|
|
|
| ||
|
|
|
|
|
|
|
|
|
|
|
|
|
|
|
|
|
|
|
|
|
|
|
| FREEZE |
|
|
| ||||||
|
|
|
|
|
|
|
|
|
|
|
|
|
|
|
|
|
|
|
|
|
|
|
|
|
|
|
|
|
|
|
|
|
|
| SHUTTER |
| Operates the shutter function | |||||||||||||
|
| See “SHUTTER” on page 38 | ||||||||||||||
|
|
|
|
|
|
|
| |||||||||
|
|
|
|
|
|
|
| Starts the automatic position | ||||||||
| AUTO SETUP |
| correction function | |||||||||||||
|
| See “AUTO SETUP” on | ||||||||||||||
|
|
|
|
|
|
|
| |||||||||
|
|
|
|
|
|
|
| page 37 | ||||||||
|
|
|
|
|
|
|
| Switches the picture mode | ||||||||
| PICTURE MODE |
| See “PICTURE MODE” on | |||||||||||||
|
|
|
|
|
|
|
| page 32 | ||||||||
|
|
|
|
|
|
|
| Operates the freeze function | ||||||||
| FREEZE |
| See “Capturing an image” on | |||||||||||||
|
|
|
|
|
|
|
| page 26 | ||||||||
|
|
|
|
|
|
|
| Operates the INDEX- | ||||||||
| INDEX WINDOW |
| WINDOW function | |||||||||||||
|
| See | ||||||||||||||
|
|
|
|
|
|
|
| |||||||||
|
|
|
|
|
|
|
| page 38 | ||||||||
|
|
|
|
|
|
|
|
|
|
|
|
|
|
|
|
|
Settings
STARTUP LOGO
You can switch the logo on/off that is displayed when starting up the projector. Press I H to select the required option.
ON | Active |
OFF | Deactive |
COMPUTER2 SELECT
You can switch the function of the COMPUTER2 IN/ 1 OUT terminal.
INPUT | COMPUTER2 IN |
OUTPUT | COMPUTER1 OUT |
LAMP POWER
This setting changes the lamp brightness. When set to
STANDARD | Normal mode |
ECO mode |
NOTE:
•“LAMP POWER” cannot be set when no signal is being input.
