Operating Instructions
Thank you for choosing Panasonic
Above markings are located on the appliance bottom cover
Important Safeguards
Precautions
End User License Agreement for USB Driver and DV Studio
Before opening the CD-ROM package, please read the following
Audio Decoder End User License Agreement
Limited USE Software License
Contents
Standard Accessories
Battery Pack l14
AC Adaptor, DC Cable and AC Cable l14
USB Cable l53
Charge the Battery. l
Quick Guide
To View the Playback Picture
Start recording. l
Controls and Components
Reset Button Reset l80
MagicWire Remote Control Jack Remote l12
Remote Control Sensor l13
Speaker
Remote Controller
MagicWire Remote Control
Inserting the Button-type Battery
˚ 15˚ 15˚ 15˚ Using the Remote Controller
While pressing the Stopper 1, pull out the Battery Holder
Selecting Remote Controller Modes
Power Supply
Using the AC Adaptor
Using the Battery
Attach the Battery to AC Adaptor and charge it
Adjust the Easy-Grip Strap
Lens Cap and Easy-Grip Strap
ªAttach the Lens Cap
1ªTo Use as a Free Style Easy-Grip Strap
Attaching the Shoulder Strap
Inserting a Cassette
Accidental Erasure Prevention
If the Cassette Holder Does Not Go Back
Turning on/off the Palmcorder and Selecting Modes
Using the Viewfinder
Using the LCD Monitor
Using the Menu Screen
File Selection in the Card Playback Mode
List of Menus
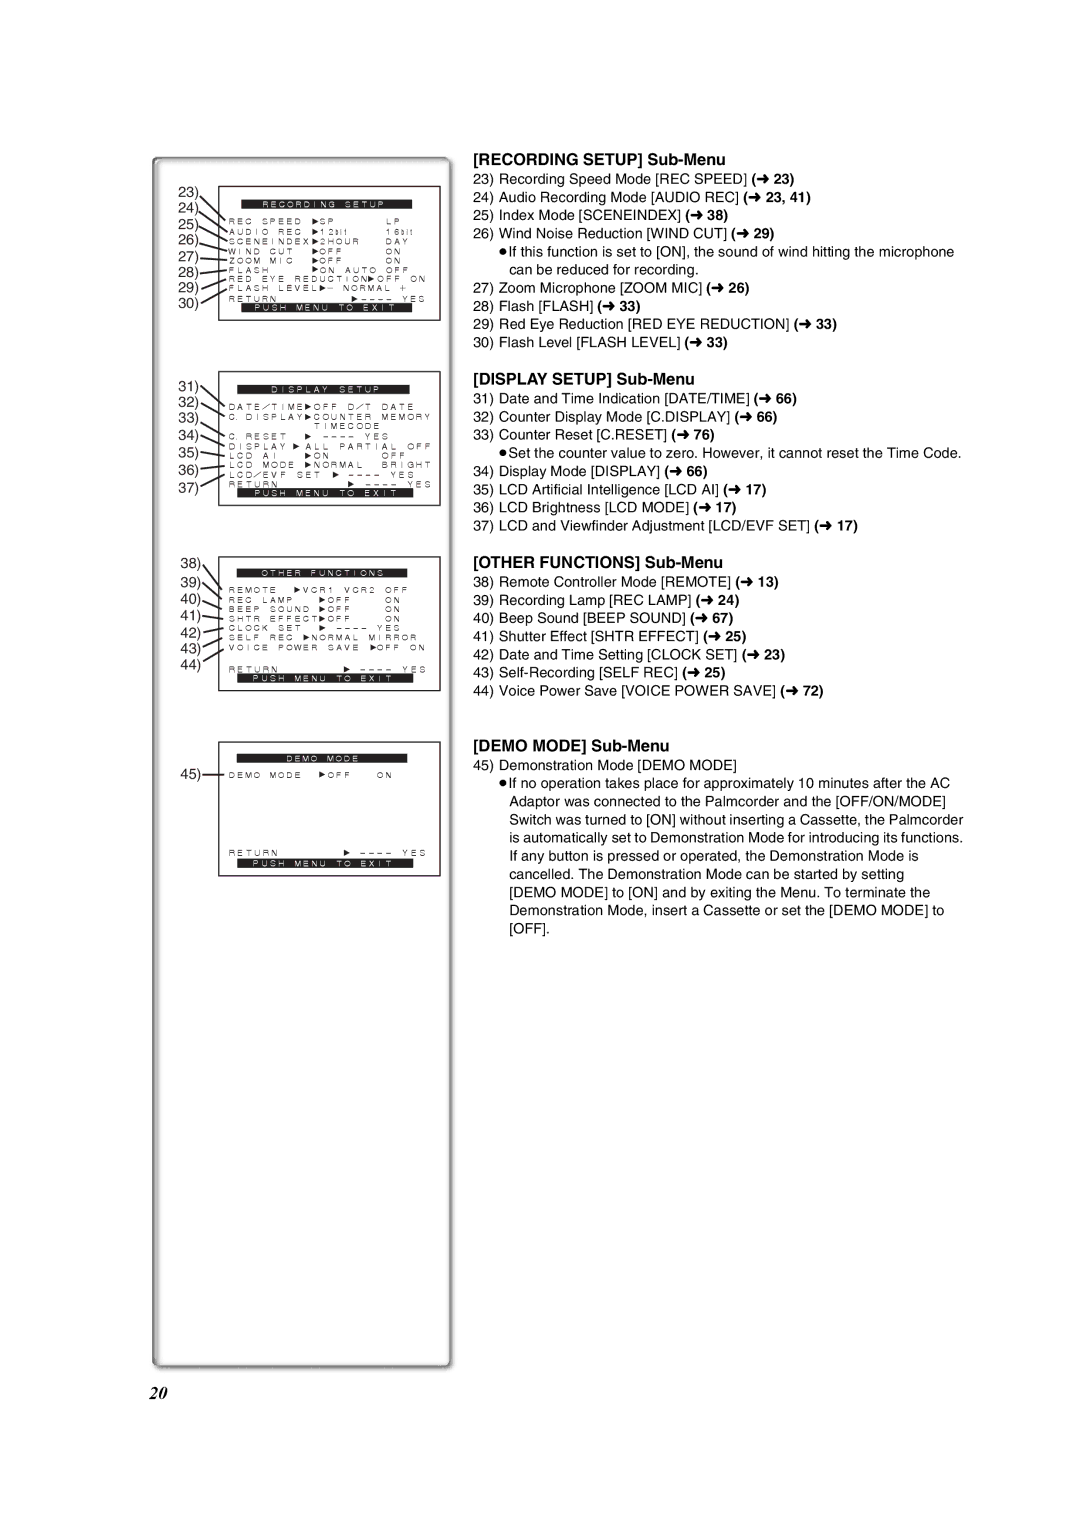
Recording Setup Sub-Menu
Display Setup Sub-Menu
Demo Mode Sub-Menu
Other Functions Sub-Menu
AV IN/OUT Setup Sub-Menu
VCR Mode Main-Menu VCR Functions
Playback Functions Sub-Menu
Camera data will not be recorded in the following cases
Card Playback Mode Main-Menu Card Functions
Short-Cut Menus of the Card Playback Mode a
Delete Card File Sub-Menu
Card Editing Sub-Menu
Setting Date and Time
Internal Lithium Battery Recharge
LP Mode
Audio Recording Mode
Recording
To Check the Recording
To View the recorded scene while the Recording is
To Finish the Recording
PhotoShot Recording on the DV Cassette
Set Camera Functions Camera Setup D.ZOOM 25t or 700t
Zoom In/Out Functions
Digital Zoom Function
Times Tele Jump Zoom Function
Optical Image Stabilizer Function
Fade In/Out Functions
Hold down the Fade Button while recording
Fade
Cinema Function and Wide Function
Backlight Compensation Function
MagicPix Function
Cinema Function
Recording with a Fixed Brightness AE Lock Function
Wind Noise Reduction Function
Recording in Special Situations Program AE
Manual Shutter Speed Adjustment
Manual Iris Adjustment F Number
Manual Focus Adjustment
To Resume Automatic Adjustment
About White Balance Sensor
Adjusting White Balance Manually
Recording in Natural Colors White Balance
Picture Adjustment
Advanced Functions
Zebra Pattern
Microphone Sensitivity Level
Using the Auto Pop-up Flash
Wipe Mode and Mix Mode
Digital Effect Functions
Multi-Picture Mode
Picture-in-Picture Mode
Set MULTI-PICTURES Scan Mode Strobe or Manual
To Display the Multi-Pictures again
Playing Back
Finding a Scene You Want to Play Back
Slow Motion Playback
Still Playback/Still Advance Playback
Finding the End of a Recording Blank Search Function
Jog Playback
Index Search Functions
ªPhotoShot Index Search
Scene Index Search
Press the 9 Button or the Button on the Remote
Canceling the Playback Zoom Function
Playback Zoom Function
Playback Digital Effect Functions
Suspending Playback Digital Effect Temporarily
Playing Back with Multi-Picture Mode
Press the Index Button or 9 4 on the Remote controller
Playing Back on Your TV
Audio Dubbing
Using a Memory Card
Recording on the Memory Card
After setting the Palmcorder to the VCR Mode l36
Automatically copying still pictures recorded on a Cassette
To Stop the Transfer of Images
Press the Button ≥For other notes, see
Recording Moving Pictures MPEG4
Recording Voice Voice Recording Function
Maximum recording time on the supplied Card 16 MB
Maximum recording time on the supplied Card 16MB
Set the Palmcorder to Card Playback Mode
Playing Back Files from the Memory Card
Playing back Still Pictures
Playing back Moving Pictures MPEG4
To Select a Desired File and Play it Back
Using File Search Mode
Copying Pictures from a Memory Card to a Cassette
Slide Show
Creating a Title
Inserting a Title
Deleting the Files Recorded on a Memory Card
Dpof Setting
Formatting a Memory Card
Copying an S-VHS or VHS Cassette to your DV Cassette
Using your Palmcorder with Digital Video Equipment Dubbing
Analog-Digital Conversion
Stopping Dubbing
≥Recording starts
Using the Software with a Computer
Using USB Driver
Software Installation Windows
Select the software to be installed from Setup Menu
Installing USB Driver
Finish installation by following the on-screen instructions
Click OK when the Restarting Windows Dialogue appears
For Windows 98SE/Me Users
Connecting Computer and Palmcorder
After the completion of setting, click on Finish
For Windows XP/2000 Users
Use auxiliary USB Connection Cable to connect
Start the NetMeeting
Using as a Web Camera
ªOperating environment
Setting up the NetMeeting
ªTo start DV Studio 3.1E-SE
Using the DV Studio 3.1E-SE
Installation of DV Studio 3.1E-SE
Using the G.726 Audio Decoder
Installing the G.726 Audio Decoder
Install it by following the instructions on the screen
Click Finish when the Setup Complete Dialog appears
Using the ArcSoft Software
Software Installation Macintosh
Installation of ArcSoft Software Suite
≥Installation begins
To start software in the ArcSoft Software Suite
For Information on ArcSoft Software
If you no longer need software or driver Uninstall
To disconnect USB cable safely
Double click the icon in task tray
Windows XP/2000
About the SD Memory Card MultiMediaCard
About the compatibility of the card files
SD Memory Card
MultiMediaCard
Indications
Recording Mode
White Balance Mode
≥Number set Dpof 00 l50 Dpof setting & Slide Show
Voice cyan l42 ≥File number No.000 l45 ≥Lock setting l49
Changing the Counter Display Mode
Changing the Display Mode
Battery is low. Recharge it
Displaying Date/Time Indication
Alarm Sounds l20
Progressive PhotoShotTM Function l25
Zoom In/Out Functions l26
Cinema Function and Wide Function l28
Manual Shutter Speed Adjustment l30
Manual Iris Adjustment l30
MagicPix Function l28
Program AE l29
Listening to Playback Sound Through Headphones
Using the Auto Pop-up Flash l33
Digital Effect Functions Camera Mode
Multi-Picture Mode VCR Mode l40
Selecting the Sound during Playback
Playback Zoom Functions l39
Playback Digital Effect Functions l39
Recording to a Card from other equipment
Card PhotoShot l42
Recording Moving Pictures MPEG4 l44
Voice Voice Recording Function l44
Voice Power Save l20
Using a Card in a Personal Computer
Card Playback l45
Copying Pictures from a Memory Card to a Cassette l46
Tips for using your Palmcorder
After Use
About the AC Adaptor
≥If you use the Palmcorder near a TV, images or sounds
Digital Video Head Cleaner
Optimal Use of the Battery
Condensation
Take out the Cassette
LCD Monitor/Viewfinder/Lens Hood
Explanation of Terms
Specifications
Digital Palmcorder
Palmcorder Accessory System
Accessory# Description
Palmcorder Accessory Order Form For USA Customers
Visa
Before Requesting Service Problems and Solutions
Problems Solutions
Headphones of the Palmcorder
Is pressed
Mosaic-like noise patterns appear on images during
Cue, Review or Slow Motion Playback
Request for Service Notice
Limited Warranty For USA Customers
Limited Warranty Coverage
Parts Labor Service Contact Number
Carry-In, Mail-in or In-Home Service
Panasonic Services Company 1705 N. Randall Road Elgin, IL
Customer Services Directory
Centralized Factory Servicenter
Warranty For Canadian Customers
Panasonic Canada Inc
Ambler Drive, Mississauga, Ontario L4W 2T3
Camcorder Product One 1 year, parts and labour
Index
Spanish Quick Use Guide/Guía española para el uso rápido
Para iniciar
Para grabar
Para comprobar lo que ha sido grabado
Para introducir una tarjeta de memoria
Para grabar en una tarjeta de memoria
Para reproducir la imagen en la tarjeta de memoria
Ajuste la videocámara según el modo de playback de tarjeta
Page
Page
Page
Panasonic Canada Inc
LSQT0619A F0103Nm0 600 a