P PC
Mini
Operating Instructions
Digital Video Camcorder
WARNING TO PREVENT FIRE OR SHOCK HAZARD
Safety Precautions
Things You Should Know
Thank you for choosing Panasonic
Panasonic
If you see this symbol Information on Disposal in other
Declaration of Conformity
Trade Name
IMPORTANT SAFETY INSTRUCTIONS
USE & LOCATION
Precautions
U.S.A./CANADA CONSUMERS ATTENTION
THE POWER SUPPLY TURNED ON WHEN NOT IN USE
Before opening the CD-ROM package, please read the following
Article 5 Reverse Engineering, Decompiling or Disassembly
Contents
Before using
Record mode
Menu
Playback mode
Edit mode
With a PC
ª How to turn on the power
Quick Guide
ª Charging the battery
ª Attaching the battery
ª Recording still pictures onto a card Photoshot
ª How to turn off the power
1 While pressing the button 1, set the OFF/ON switch to OFF
ª Recording on a tape
2 Battery pack 3 Remote control, button-type battery
Before using
Accessories
Parts identification and handling
25 DV input/output terminal DV 26 Reset button RESET
11 Battery holder 12 Battery release lever BATT
13 Power switch OFF/ON 14 Status indicator 15 Menu button MENU
23 Power LCD button POWER LCD 24 USB terminal
37 Lens hood
Attaching the lens cap
38 Smart accessory shoe
36 Shoulder strap fixture
ª To use as a grip belt
Power supply
The one-touch free-style grip belt
1 Adjust the belt length and the pad position
3 Connect the DC Cable to this product
ª Connecting to the AC outlet
ª Removing the battery
2 Connect the DC Cable to the AC adaptor
Charging time and recordable time
Turning the Camcorder on
≥Set the OFF/ON switch to OFF when not using the Camcorder
≥The power does not turn off even if the
Setting date and time
ª How to turn the power on and off with the LCD monitor/viewfinder
ª Recharging the built-in lithium battery
1 Adjust the focus by sliding the eyepiece corrector knob
Using the LCD monitor
Using the viewfinder
ª Adjusting the field of view
1 Set SETUP QUICK START OFF
Quick Start
ª To cancel Quick Start
≥Set to Tape/Card Recording Mode 1 Set SETUP QUICK START ON
1 Fit the AC adaptor or the battery and turn on the power
Inserting/removing a cassette
ª When the cassette holder does not come out
ª When the cassette holder cannot be housed
1 Turn off the power
Inserting/removing a card
ª Card access lamp
ª Concerning the write protection switch on the SD Memory Card
ª Basic joystick operations
How to use the joystick
Selecting a mode
1 Tape recording mode AUTO/MANUAL/FOCUS switch is set to AUTO
3 Tape playback mode
2 Tape recording mode AUTO/MANUAL/FOCUS switch is set to MANUAL
4 Card recording mode AUTO/MANUAL/FOCUS switch is set to AUTO
5 Card recording mode AUTO/MANUAL/FOCUS switch is set to MANUAL
MENU
Switching the language
Using the menu screen
Help mode
ª Adjusting the brightness and color level
Adjusting LCD monitor/viewfinder
ª About the menu setting
ª Operating with remote control
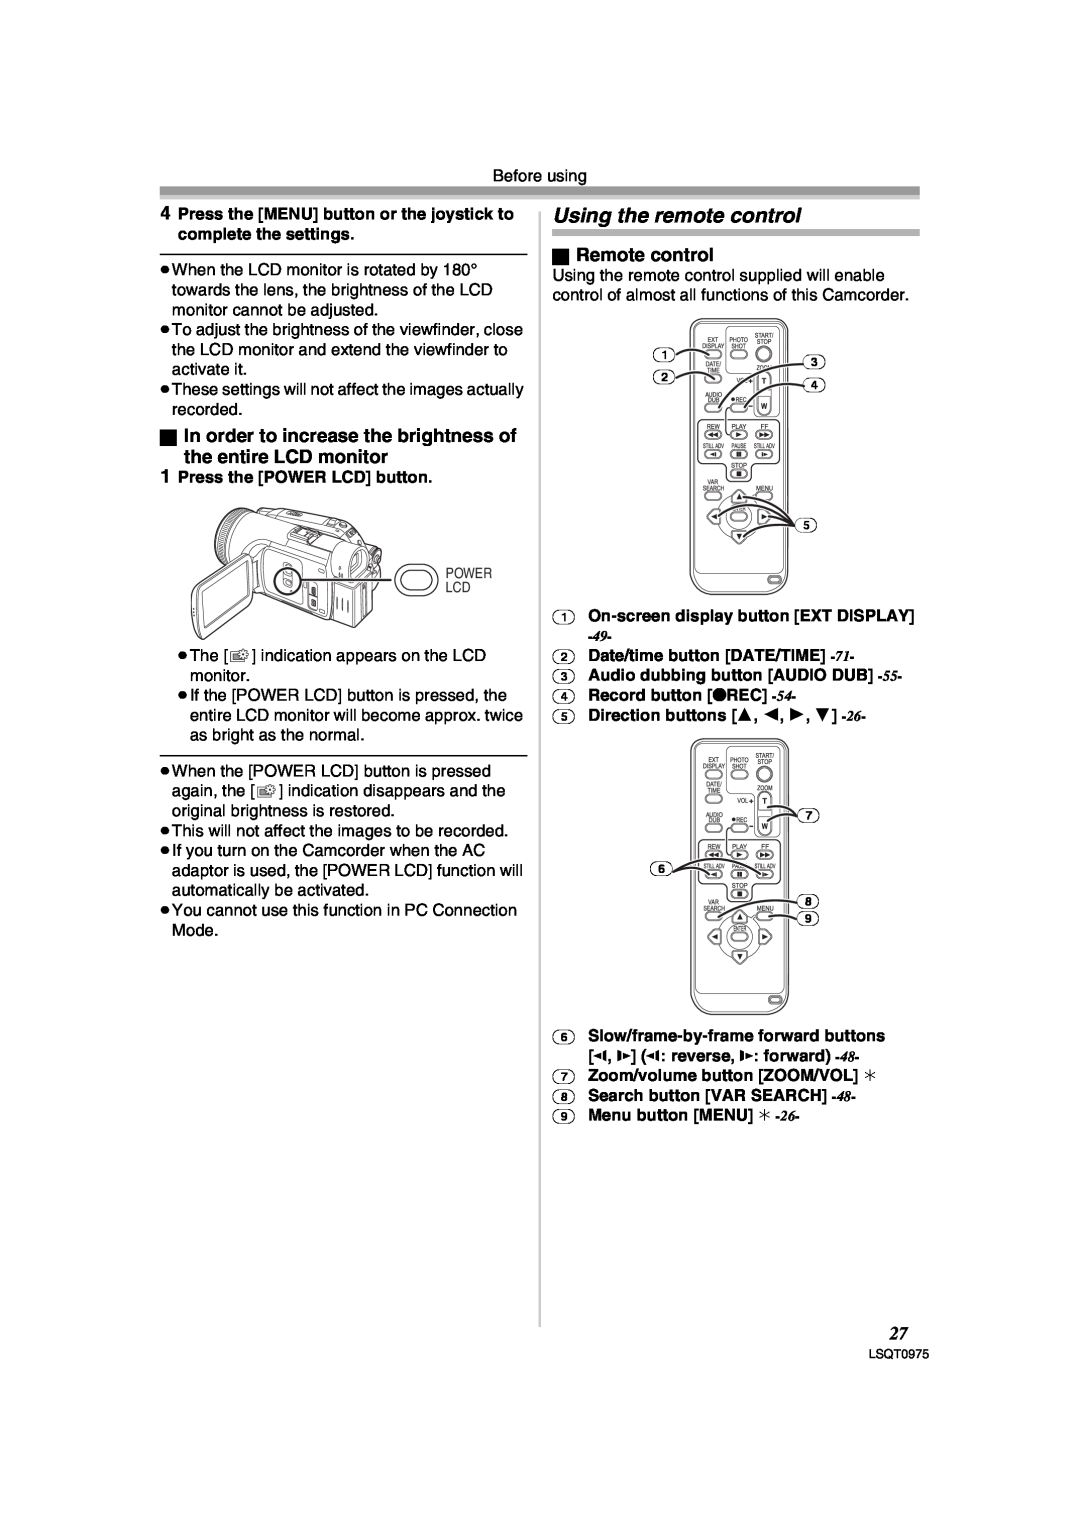
1 Press the POWER LCD button
Using the remote control
ª Remote control
4 Press the MENU button or the joystick to complete the settings
Danger of explosion if battery is incorrectly replaced
ª Install a button-type battery
ª Remote control usable range
1 While pressing the stopper 1, pull out the battery holder
ª Connect the Magic Wire Remote Control to the Camcorder
Magic Wire Remote Control
ª Selecting the remote control mode
ª Concerning the button-type battery
ª Check points
Record mode
Check before recording
ª Basic Camcorder positioning
Recording on a tape
ª On-screen display in the tape recording mode
ª Concerning the remaining tape time indication on the screen
ª Stopping blank search midway through
Recording check
Blank search function
ª POWER SAVE
1 Press the PHOTO SHOT button fully while recording image onto a tape
Recording still pictures on a card while recording image onto a tape
Recording still pictures onto a card Photoshot
Mode
ª Select the picture quality for photoshot images
ª To record still pictures clearly
ª On-screen display in the card recording mode
ª Select the size of still pictures to be recorded on a card
ª About the variable speed zoom function
Zoom in/out function
ª Concerning the focusing area
ª Digital zoom function
ª To return to normal recording
Recording yourself
Backlight compensation function
MagicPix functions
ª To cancel the soft skin mode
Soft skin mode
Tele macro function
ª To cancel the MagicPix function
ª To cancel fading
Fade in/fade out function
Wind noise reduction function
ª To cancel the wind noise reduction function
≥Set to Tape Recording Mode Set SETUP AGS ON
Adjusting the Microphone Sensitivity Level
Auto Ground-Directional Standby AGS
ª To cancel Auto Ground-Directional Standby
ª Using the flash VW-FLH3 optional
Using the built-in flash
ª When the flash is not used
ª To adjust the brightness of the flash 1 Set ADVANCED FLASH LEVEL
2 Move the joystick left to select the self-timer recording icon
Self-timer recording
Wide/Pro-Cinema Function
ª To stop the timer midway through
ª To stop RapidFire Consecutive Photoshot midway through
Optical image stabilizer function
RapidFire Consecutive Photoshot
ª To cancel the image stabilizer function
2 Set BASIC SCENE MODE select the desired mode
Recording in various situations Scene mode
ª To cancel the scene mode function
1 Set the AUTO/MANUAL/FOCUS switch to MANUAL
When the manual adjustment mode is selected
Recording in natural colors White balance
ª To restore to the automatic adjustment
ª About the black balance adjustment
2 Set the AUTO/MANUAL/FOCUS switch to FOCUS
Manual focus adjustment
Manual shutter speed/aperture adjustment
ª To restore to automatic adjustment
ª Card slow shutter mode
Manual iris/gain adjustment
ª Shutter speed range
ª Iris/gain value range
ª Settings on the audio
Playback mode
Playing back tape
ª To adjust volume
1 During playback, press the button on the remote control
Slow-motion playback/ frame-by-frame playback
Variable-speed search function
1 Press the E button or the D button on the remote control
ª To display the on-screen information on the TV
Playback on TV
1 Press the EXT DISPLAY button on the remote control
ª If the image or audio from this Camcorder is not output on the TV
ª About the compatibility of still pictures
Playing back card
1 Move the s /VOLr lever to switch the images
ª To display multiple playback files
ª Deleting still picture files recorded on a card by other equipment
Deleting files recorded on a card
Formatting a card
ª To delete all files
ª What is DPOF?
Writing the printing data on a card DPOF setting
Protecting files on a card
ª To complete the settings
≥Insert a tape which already has recorded contents and a card
Edit mode
Recording from a tape onto a card
Copying onto a DVD recorder or a VCR Dubbing
the Camcorder is output to the TV set
Using the DV Cable for Recording Digital Dubbing
ª When neither image nor sound from
When operating with the remote control
4 Press the button on the remote control to start audio dubbing
Audio dubbing
ª To cancel the standby for recording
Audio dubbing can only be performed by using the remote control
≥Insert a card and set to Card Playback Mode
Printing pictures by directly connecting to the printer PictBridge
ª Before recording with audio dubbing
ª To play back the sound recorded with audio dubbing
6 Select PAPER SIZE
ª When you stop printing halfway
5 Select the setting for date printing
4 Select the desired number of prints
ª Software Installation
Using the Camcorder with a PC
With a PC
Check before Use
ª Operating environment
Connecting Computer and Camcorder
ª Using Built-in SD Drive
4 Camcorder power is turned on
4 Finish installation by following the on-screen instructions
Using as a Web camera
ª Installing USB Driver
Please see chart below
2 Select .NET Messaging Service and click OK
ª Connecting the Camcorder to personal computer For Use as a Web
ª Setting up Windows Messenger
1 Install the supplied USB Driver on the provided CD-ROM
4 After the setup is completed, sign in and start MSN Messenger
ª Setting up MSN Messenger
5 After the setup is completed, sign in and start Windows Messenger
1 Click Sign In 2 Type in your Sign-in name and password
Hard disk
Using Quick Movie Magic or MotionDV STUDIO
ª Installation of Quick Movie Magic/ MotionDV STUDIO
Sound
3 Click Next
5 After the completion of setup, click on Finish
1 Click Update Driver
ª To start Quick Movie Magic or MotionDV STUDIO
5 Click Finish
Connecting the Camcorder to a personal computer
3 For Windows XP Users
For Windows 2000 Users
When using on Macintosh
Using on Macintosh
If you no longer need software or driver Uninstall
To disconnect USB cable safely
Cancel
computer
ª About the folder structure when using the Memory Card in a personal
ª About the SD Memory Card
ª About the compatibility of the card files
EVF SET -26- POWER SAVE -32- TV ASPECT -49- JOYSTICK LED 4 LANGUAGE
Menu
Menu list
3 SETUP 12bit AUDIO -56- AUDIO OUT -71- DISPLAY -71- REMOTE LCD SET
ª CARD PLAYBACK MENU
3 SETUP DISPLAY -71- REMOTE
LCD SET -26- EVF SET -26- POWER SAVE -32- TV ASPECT -49- JOYSTICK LED
ª CARD RECORDING MENU
ª H.SHOE MIC
Menus related to recording
Menus related to playback
Other menus
Recording indications
Others
Indications
Basic indications
Warning/alarm indications
Confirmatory indications
Textual indications
Others
the functions
Functions that cannot be used simultaneously
Conditions which disable
Functions
3 The Camcorder power does not stay on long enough
Before requesting repair Problems and solutions
Power/Body
2 The Camcorder power is turned off automatically
4 Auto focus function does not work
4 The original sound was erased when audio dubbing was performed
2 The screen has changed suddenly
3 A cassette cannot be inserted
3 Horizontal stripes appear on images during cue and review playback
2 “PUSH THE RESET SWITCH” is displayed
Playback Pictures
The playback images are vertical
ª About condensation
Cautions for Use
using “MotionDV STUDIO 5.6E LE for DV” or “Quick Movie Magic”
When the lens is fogged
While carrying the Camcorder, do not drop or bump it
When normal playback cannot be performed even after the head cleaning
ª About dirty heads
ª About the Camcorder
Prepare spare batteries when going out for recording
ª About the battery
When you are not going to use Camcorder for an extended time
Be sure to detach the battery after use
ª LCD monitor/viewfinder
ª About the cassette
ª About the card
ª Folder structure of the card
Viewfinder
Explanation of terms
ª Periodical check-ups
ª Automatic white balance
Recording a subject in dark surroundings
ª White balance
ª Auto focus
Recording a subject behind dirty or dusty glass
http//panasonic.co.jp/pavc/global/cs
Specifications
43 mode
compatible with MultiMediaCard
Camcorder Accessory System
Accessory#
Description
Camcorder Accessory Order Form For USA Customers
Request for Service Notice USA Only
Request for Service Notice
Limited Warranty
Limited Warranty For USA Customers
Panasonic/Quasar Video Products
Centralized Factory Servicenter
Customer Services Directory
Accessory Purchases
npcparts@us.panasonic.com
IF YOU SHIP THE PRODUCT TO A SERVICENTRE
PANASONIC PRODUCT - LIMITED WARRANTY
Warranty For Canadian Customers
WARRANTY SERVICE
ª Numerics
Index
ª Insertar/quitar un cassette
Spanish Quick Use Guide Guía española para el uso rápido
ª Carga de la batería
ª Montaje de la batería
ª Reproducción de la cinta
ª Cómo apagar la alimentación
ª Grabación en una cinta
ª Grabación de imágenes fijas en una tarjeta Photoshot
Panasonic Canada Inc
Panasonic Consumer Electronics Company
Division of Panasonic Corporation of North America
Panasonic Puerto Rico, Inc