Check that the Network settings are as shown below, and then start “Connection test”.
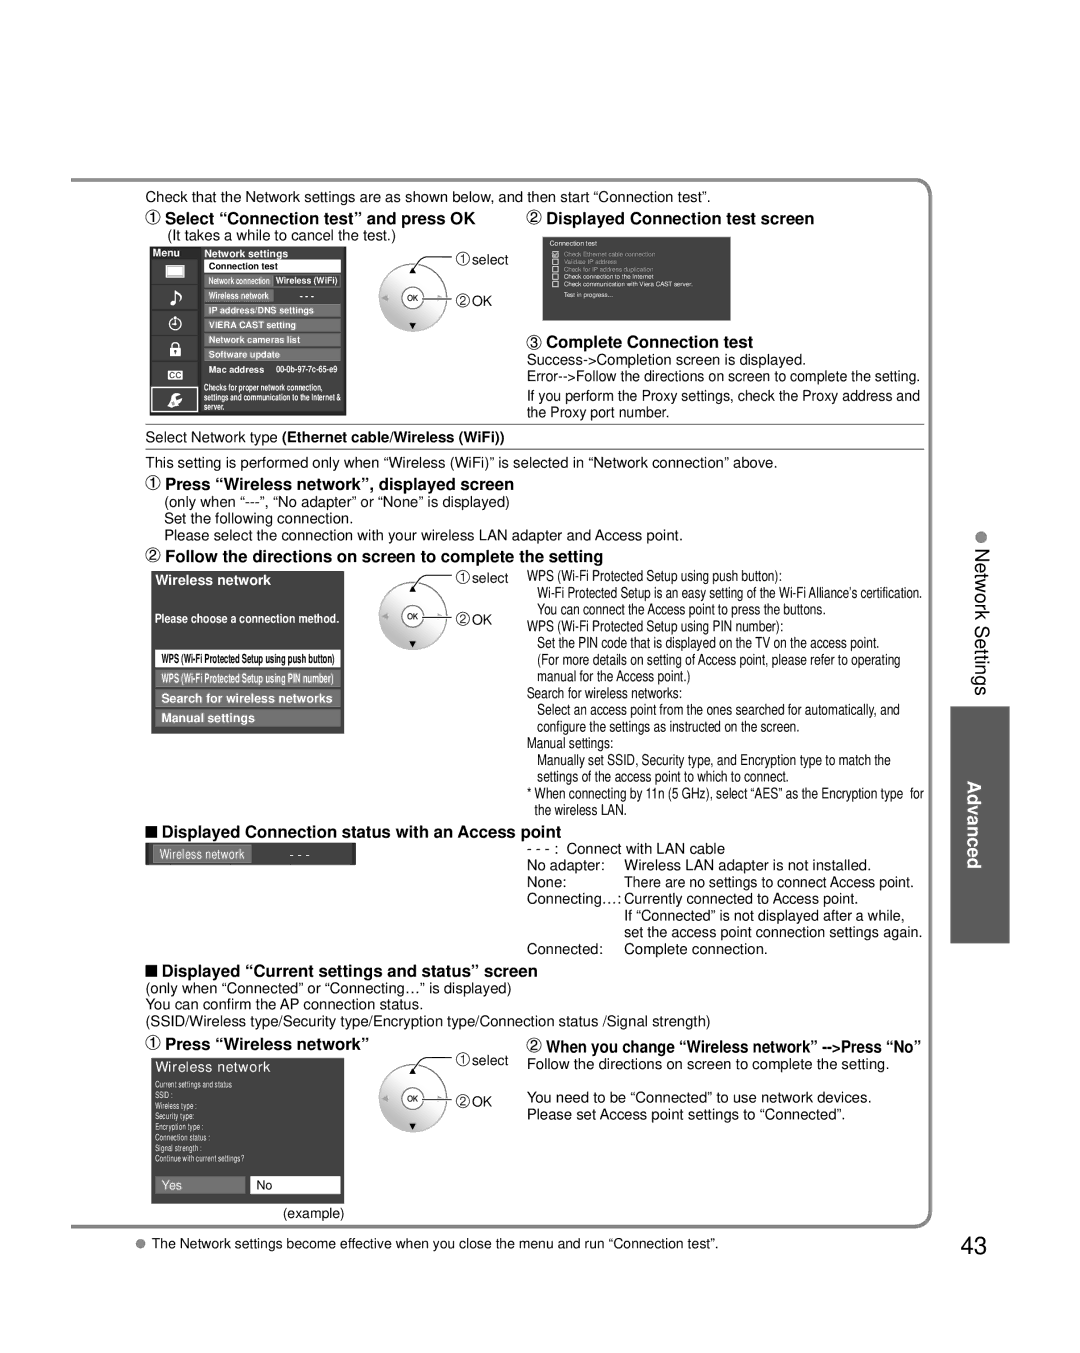
Select “Connection test” and press OK |
| Displayed Connection test screen | ||||
(It takes a while to cancel the test.) |
|
|
|
| ||
|
| Connection test |
| |||
Menu Network settings | select |
| Check Ethernet cable connection |
| ||
| Connection test |
| Validate IP address |
| ||
|
|
| Check for IP address duplication |
| ||
| Network connection Wireless (WiFi) |
|
| Check connection to the Internet |
| |
|
|
| Check communication with Viera CAST server. |
| ||
| Wireless network | - - - | OK |
| Test in progress... |
|
| IP address/DNS settings |
|
|
| ||
|
|
|
|
| ||
| VIERA CAST setting |
|
| Complete Connection test | ||
| Network cameras list |
|
| |||
|
|
|
|
| ||
| Software update |
|
| |||
| Mac address |
| ||||
|
| |||||
| Checks for proper network connection, |
| ||||
| settings and communication to the Internet & |
| If you perform the Proxy settings, check the Proxy address and | |||
| server. |
|
| the Proxy port number. | ||
|
|
|
| |||
Select Network type (Ethernet cable/Wireless (WiFi))
This setting is performed only when “Wireless (WiFi)” is selected in “Network connection” above.
 Press “Wireless network”, displayed screen
(only when
Please select the connection with your wireless LAN adapter and Access point.
 Follow the directions on screen to complete the setting
Wireless network
Please choose a connection method.
WPS
![]() select
select
![]() OK
OK
WPS (Wi-Fi Protected Setup using push button):
WPS (Wi-Fi Protected Setup using PIN number):
Set the PIN code that is displayed on the TV on the access point. (For more details on setting of Access point, please refer to operating manual for the Access point.)
Search for wireless networks:
Select an access point from the ones searched for automatically, and configure the settings as instructed on the screen.
Manual settings:
Manually set SSID, Security type, and Encryption type to match the settings of the access point to which to connect.
*When connecting by 11n (5 GHz), select “AES” as the Encryption type for the wireless LAN.
 Displayed Connection status with an Access point
Wireless network | - - - | - - | ||
No adapter: | Wireless LAN adapter is not installed. | |||
|
| |||
|
| None: | There are no settings to connect Access point. | |
|
| Connecting…: Currently connected to Access point. | ||
|
|
| If “Connected” is not displayed after a while, | |
|
|
| set the access point connection settings again. | |
|
| Connected: | Complete connection. | |
![]() Displayed “Current settings and status” screen (only when “Connected” or “Connecting…” is displayed) You can confirm the AP connection status.
Displayed “Current settings and status” screen (only when “Connected” or “Connecting…” is displayed) You can confirm the AP connection status.
(SSID/Wireless type/Security type/Encryption type/Connection status /Signal strength)
Network Settings
Advanced
 Press “Wireless network”
Wireless network
Current settings and status
SSID :
Wireless type :
Security type:
Encryption type :
Connection status :
Signal strength :
Continue with current settings?
YesNo
![]() select
select
![]() OK
OK
 When you change “Wireless network”
 -->Press “No”
Follow the directions on screen to complete the setting.
You need to be “Connected” to use network devices. Please set Access point settings to “Connected”.
(example) |
|
The Network settings become effective when you close the menu and run “Connection test”. | 43 |