Specifications
Power Source
Consuamption | Power | Maximum | |
|
| ||
|
| Standby condition | |
PlasmaDisplay panel | Drive method | ||
Aspect Ratio | |||
|
| ||
|
| Visible screen size | |
|
| (W × H × Diagonal) | |
Sound | (No. of pixels) | ||
Audio Output | |||
|
| ||
|
|
| |
PC signals
Channel Capability (Digital/Analog)
Operating Conditions
Connection | VIDEO IN | |
COMPONENT IN | ||
| ||
| HDMI | |
Terminals | USB | |
(for VIERA CAST IPTV) | ||
| PC | |
| LAN | |
| Card slot | |
| DIGITAL AUDIO OUT | |
FEATURES | ||
| ||
Dimensions ( W × H×D) |
| |
| Including pedestal | |
| TV Set only | |
Mass | Including pedestal | |
TV Set only | ||
|
|
AC 120 V, 60 Hz |
|
327 W | 384 W |
0.3 W | 0.2 W |
|
|
AC type
16:9
42 ” class (41.6 inches measured diagonally) | 46 ” class (46.0 inches measured diagonally) | ||
36.2 ” × 20.4 ” × 41.6 ” |
| 40.1 ” × 22.5 ” × 46.0 ” | |
(921 mm × 518 mm × 1,057 mm) |
| (1,019 mm × 573 mm × 1,169 mm) | |
2,073,600 (1,920 (W) × 1,080 (H)) |
|
| |
[5,760 × 1,080 dots] |
|
|
|
20 W [10 W + 10 W] (10 % THD) |
|
| |
VGA, SVGA, XGA, WXGA, SXGA |
|
| |
Horizontal scanning frequency 31 - 69 kHz |
|
| |
Vertical scanning frequency 59 - 86 Hz |
|
| |
VHF/ UHF: 2 - 69, CATV: 1 - 135 |
|
| |
Temperature: | 32 °F – 104 °F (0 °C – 40 °C) | ||
Humidity: | 20 % – 80 % RH | ||
VIDEO: | RCA PIN Type × 1 | 1.0 V | |
AUDIO | RCA PIN Type × 2 | 0.5 V [rms] | |
Y:1.0 V
PB, PR: | ±0.35 V |
AUDIO | RCA PIN Type × 2 0.5 V [rms] |
TYPE A Connector × 3
•This TV supports “HDAVI Control 5” function. USB 2.0 Type A connector x 2
| R,G,B / 0.7 V |
|
| |
| HD, VD / 1.0 - 5.0 V | |||
RJ45 |
|
| ||
SD CARD slot × 1 |
|
|
| |
PCM / Dolby Digital, Fiber Optic |
|
| ||
3D Y/C FILTER | CLOSED CAPTION |
|
| |
| IPTV (VIERA CAST) | HDAVI Control 5 | ||
VIERA IMAGE VIEWER | Media player | |||
40.6 ” × 27.3 ” × 12.2 ” |
| 44.6 ” × 30.0 ” × 13.2 ” | ||
(1,029 mm × 693 mm × 308 mm) | (1,132 mm × 761 mm × 335 mm) | |||
40.6 ” × 25.8 ” × 3.5 ” |
| 44.6 ” × 28.5 ” × 3.5 ” | ||
(1,029 mm × 654 mm × 88 mm) | (1,132 mm × 722 mm × 88 mm) | |||
51.9 lb (23.5 | ) |
| 59.6 lb (27.0 | ) |
45.2 lb (20.5 | ) |
| 53.0 lb (24.0 | ) |
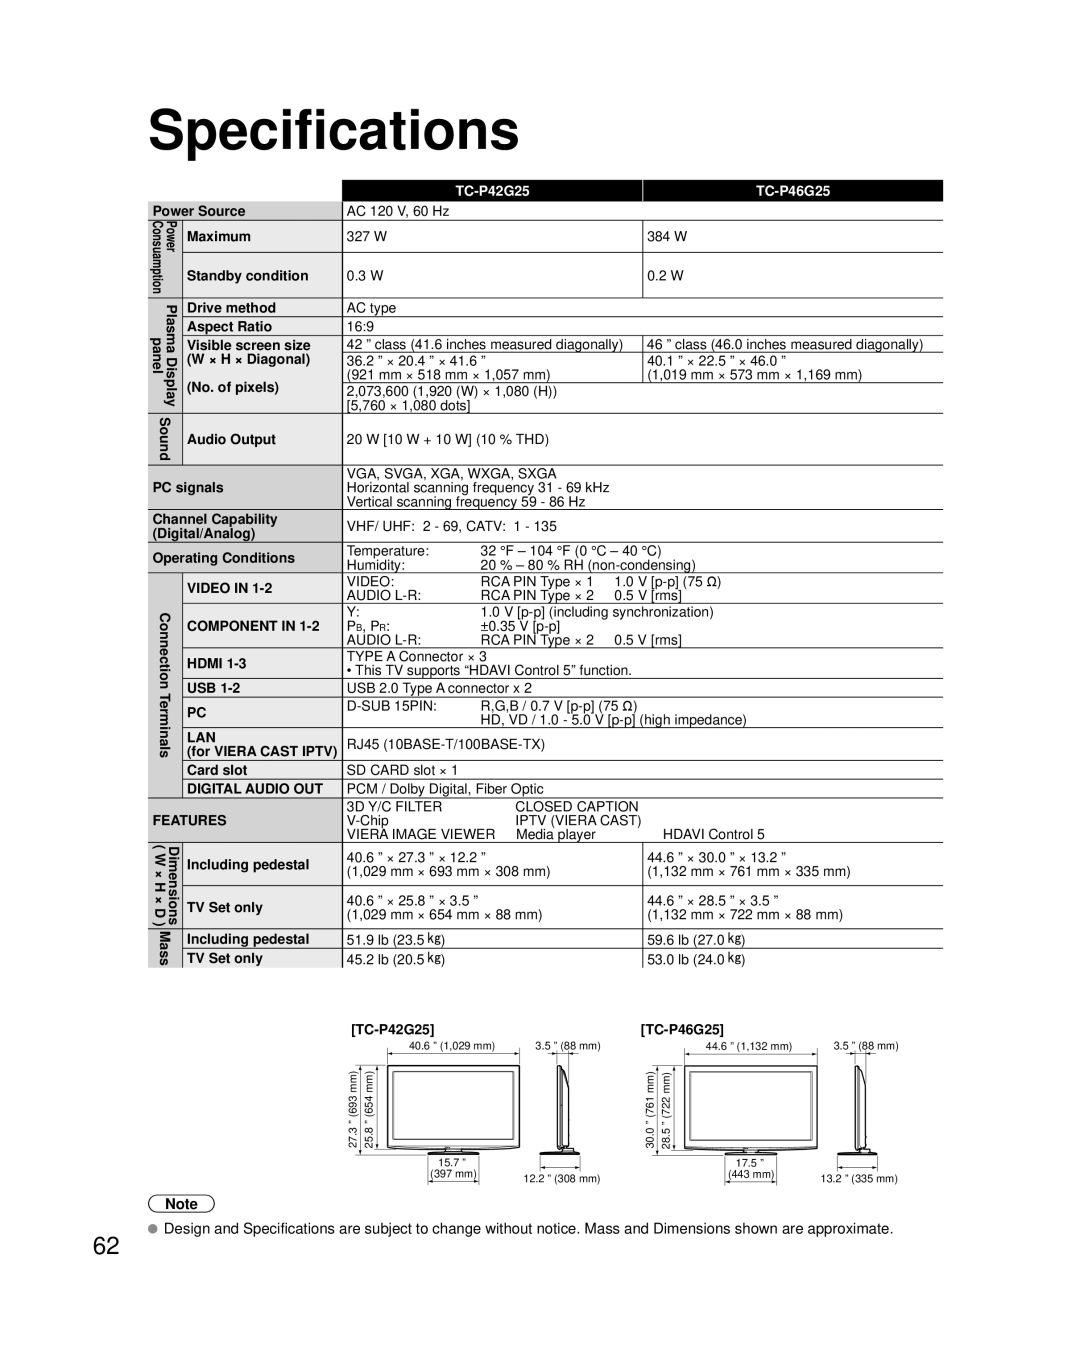
[TC-P42G25]
[TC-P46G25]
40.6 ” (1,029 mm)
27.3 ” (693 mm) 25.8 ” (654 mm)
15.7 ”
(397 mm)
3.5 ” (88 mm)
30.0 ” (761 mm)
12.2 ” (308 mm)
28.5 ” (722 mm)![]()
44.6 ” (1,132 mm)
17.5”
(443 mm)
3.5 ” (88 mm)
13.2 ” (335 mm)
62
Note
![]() Design and Specifications are subject to change without notice. Mass and Dimensions shown are approximate.
Design and Specifications are subject to change without notice. Mass and Dimensions shown are approximate.