TQB4GC0382-2
English
Experience an amazing level of multimedia excitement
Standard accessories
Contents
Safety Precautions
Adjust the LCD panel to your desired angle
Attaching the pedestal
Accessories / Options
Wall-hanging bracket
Optional accessories
Quick Start Guide
Communication Camera TY-CC10W
Connecting aerial
Basic Connection
TV only
ConnectionBasic
Connecting DVD Recorder / VCR
StartGuide
TV, DVD Recorder or VCR
Identifying Controls
Remote control
Function Select
Using the On Screen Displays
How to use remote control
Guide
Auto Tuning
Plug the TV into mains socket and switch On
Select your language
WPS Push button
Setup the wireless LAN connection
Search for access point
Quick Start Guide
Watching TV
Turn power on
Select TV mode Select a channel
Off Timer
Display the selectable settings for the current programme
Display information banner
Change OSD language
Enjoy viewing the picture at its optimum size and aspect
To change the mode using the Aspect button only
Aspect Press repeatedly until you reach the desired mode
Change aspect ratio
Call up a favourite
Viewing Teletext
Select the page up to
Hold Reveal hidden data
View sub
Watch TV while waiting for update
View in multi window
Store frequently viewed pages
View
Select the input mode of the connected equipment
Watching External inputs
Display the input selection menu
Operating the equipment with the TV remote control
Follow the operation of each feature
How to Use Viera Tools
Display icons of the feature
Select a feature
Select the menu
How to Use Menu Functions
Adjust or select
Display the menu
Sound
Setup
How to Use Menu Functions
Picture
Menu list
Adjustments / Configurations alternatives
Viewing Mode
Eco Mode
Picture Sound
Sound Setup
Advanced
Colour
Setting
AV Colour
System Auto / PAL / Secam / M.NTSC / Ntsc
Select Tuning Menu
Tuning and Editing Channels
Select TV mode
Select Setup
To edit channels
Auto Tuning Set all TV channels automatically
Manual Tuning Set TV channel manually
Select a channel and reveal / hide
Select Picture
Advanced Picture Settings
Select the input mode to adjust and setup
Display the menu
Advanced Settings Adjust the detailed picture settings
Advanced Settings
Copy Adjustment Copy the settings to the other input
Select the channel / input to be locked
Child Lock
Select Child Lock
Select Child Lock List
Select an input terminal and set
Select Display Settings
Input Labels
Select Input Labels
Select Shipping Condition
Shipping Condition Reset settings
Select Setup
Select System Menu
SD Card
Using Media Player
Data format for SD Card / USB Flash Memory browsing
To insert or remove the SD Card / USB Flash Memory
Insert the SD Card or USB Flash Memory
Switch to Media Player
Select the icon you want to access to
Select the content
To return to thumbnail view
Photo mode
To sort by folder, recorded date or recorded month
To operate Single view
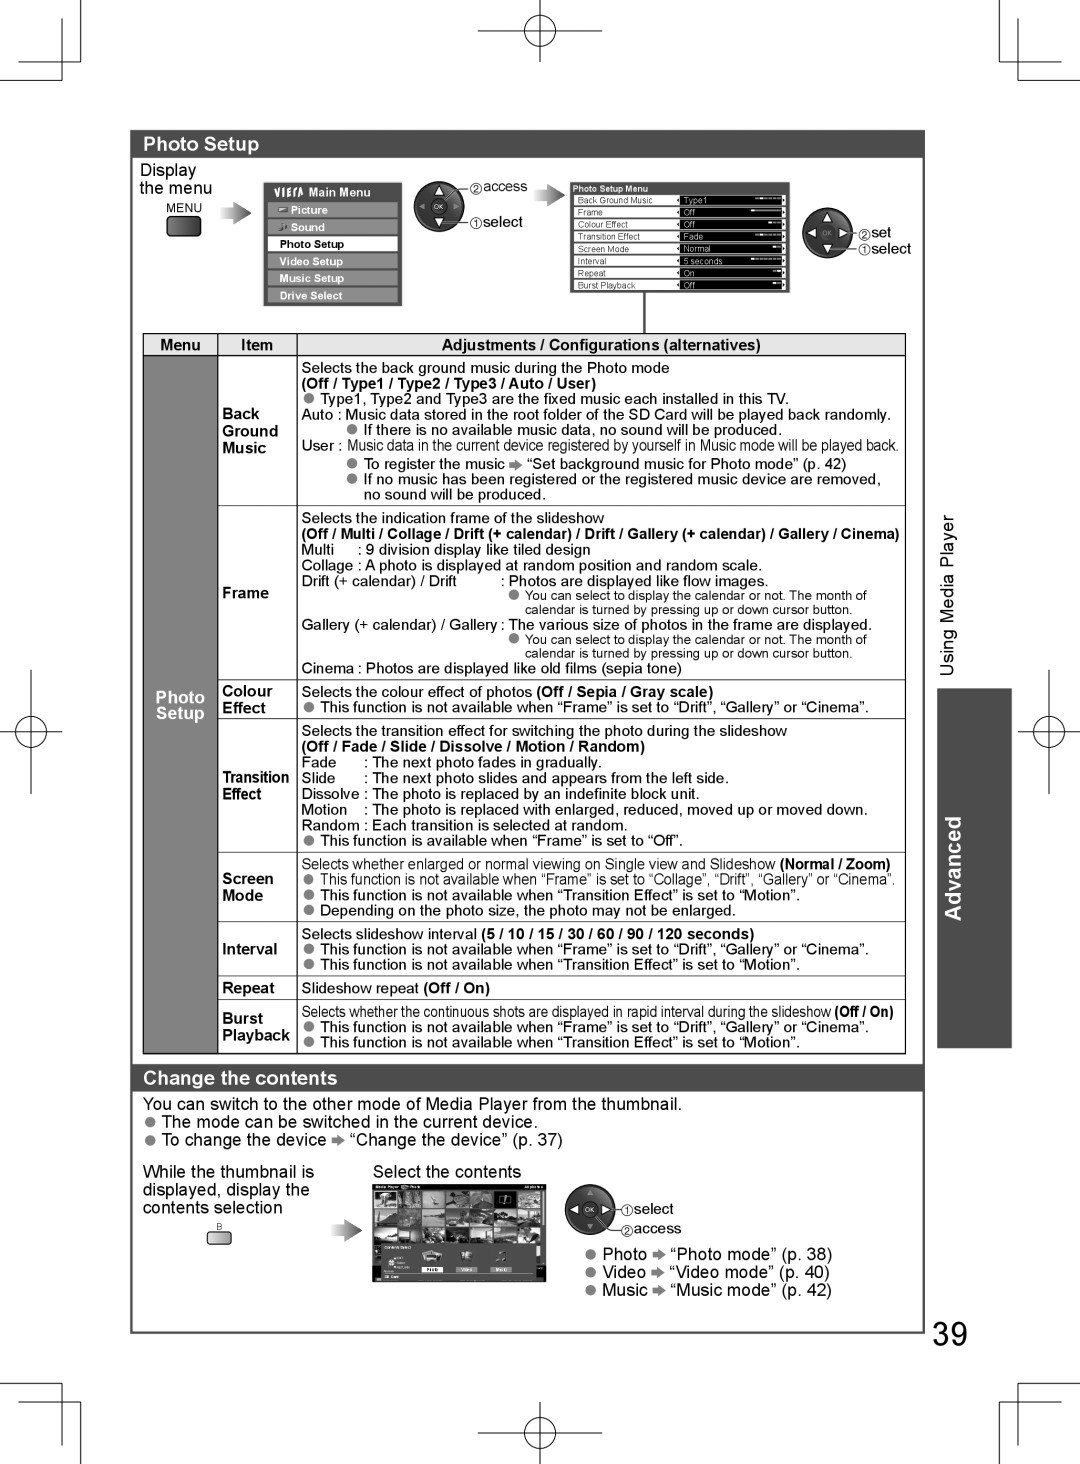
Change the contents
Photo Setup
Video mode
Video Setup p
How to operate during the playback
Video Setup Setup for Video mode
Sound Settings
Music mode
Music Setup
Set background music for Photo mode
Using Network Services
Internet
Wireless LAN connection
Network connections
Example
Using Network Services Dlna / Viera Cast
Select Network Setup
Network Setup
Update TV’s software
Select Proxy Port
Network settings for the LAN Cable connection
Select Network Type and set to Wired
Select IP/DNS Settings and set the items
Confirm the connection status of Access Point Settings
Network settings for the Wireless LAN connection
Select Network Type and set to Wireless
Select Access Point Settings
Select the file to be viewed
Select one of the media servers you want to access
Using Dlna features
Display the input selection menu Select Media Server
For photo file
For video file
Single view
Photo Setup for photo contents
Sound Settings for video contents
Video Setup for video contents
USB Keyboard
Access Viera Cast
Viera Link ControlTM
Viera Link Functions
Viera Link Functions
Connection
Channel download
Power on link
Power off link
Channel setting can be downloaded to the recorder
Advanced Advanced
Pause Live TV Pause Live TV programme
To stop recording
Viera Link ControlTM
Display Viera Link Menu Select Speaker Selection
Set to Home Cinema or TV
Home Cinema
To watch DVDs
External Equipment
To listen with speakers
To record / playback
Game equipment
Headphones
USB devices
Camcorder
Channel Allocation
Technical Information
Stereo / Bilingual Sound Selection
Nicam .......Used in New Zealand, Singapore, Hong Kong etc
A2 German .......Used in Australia, Malaysia etc
PC connection
Applicable Hdmi features
Sub 15-pin connector signal
Hdmi connection
Technical Information
Input signal that can be displayed
PC from D-sub 15P
PC from Hdmi terminal
No SD card inserted
SD Card
Subtitle text file of DivX
DivX VOD in the Setup Menu p
DivX
DivX video file
Server not found
Network
USB connection
Connection to the server failed
Maintenance
Display panel, Cabinet, Pedestal
Mains plug
Check the position, direction, and connection of the aerial
FAQs
An error message appears
White spots or shadow images noise
Problem Actions
VGA, SVGA, WVGA, XGA
Specifications
Licence
Customer’s Record

