How to Use Menu Functions
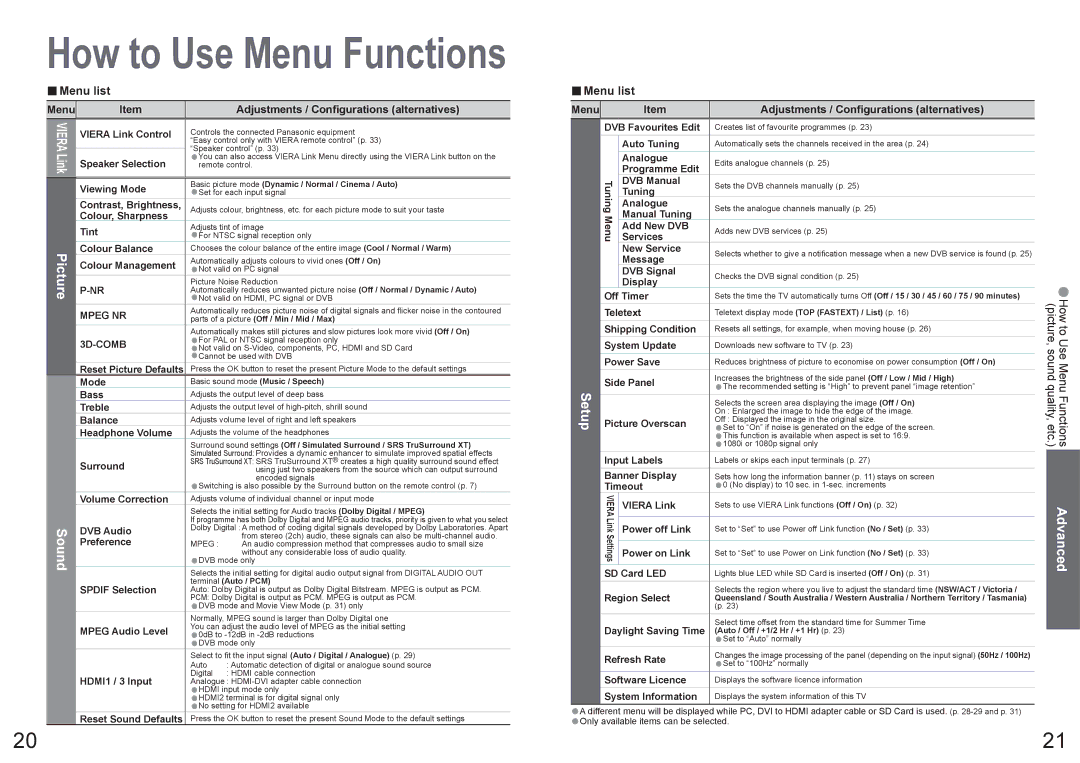
■Menu list
Menu |
| Item |
| Adjustments / Configurations (alternatives) | |
VIERA | VIERA Link Control | “Speaker control” (p. 33) | |||
|
| Controls the connected Panasonic equipment | |||
|
|
| “Easy control only with VIERA remote control” (p. 33) | ||
Link |
| You can also access VIERA Link Menu directly using the VIERA Link button on the | |||
Speaker Selection | •remote control. | ||||
|
| ||||
|
| Viewing Mode | Basic picture mode (Dynamic / Normal / Cinema / Auto) | ||
|
| •Set for each input signal | |||
|
| Contrast, Brightness, | Adjusts colour, brightness, etc. for each picture mode to suit your taste | ||
|
| Colour, Sharpness | |||
|
|
|
| ||
|
| Tint | Adjusts tint of image | ||
|
| •For NTSC signal reception only | |||
Picture | Colour Balance | Chooses the colour balance of the entire image (Cool / Normal / Warm) | |||
| Automatically adjusts colours to vivid ones (Off / On) | ||||
|
| Colour Management | •Not valid on PC signal | ||
|
|
| |||
|
| Picture Noise Reduction | |||
|
| Automatically reduces unwanted picture noise (Off / Normal / Dynamic / Auto) | |||
|
|
| •Not valid on HDMI, PC signal or DVB | ||
|
| MPEG NR | Automatically reduces picture noise of digital signals and flicker noise in the contoured | ||
|
| parts of a picture (Off / Min / Mid / Max) | |||
|
|
| Automatically makes still pictures and slow pictures look more vivid (Off / On) | ||
|
|
| For PAL or NTSC signal reception only | ||
|
| •Not valid on | |||
|
|
| ••Cannot be used with DVB | ||
|
| Reset Picture Defaults | Press the OK button to reset the present Picture Mode to the default settings | ||
|
| Mode | Basic sound mode (Music / Speech) | ||
|
| Bass | Adjusts the output level of deep bass | ||
|
| Treble | Adjusts the output level of | ||
|
| Balance | Adjusts volume level of right and left speakers | ||
|
| Headphone Volume | Adjusts the volume of the headphones | ||
|
|
| Surround sound settings (Off / Simulated Surround / SRS TruSurround XT) | ||
|
|
| Simulated Surround: Provides a dynamic enhancer to simulate improved spatial effects | ||
|
| Surround | SRS TruSurround XT: SRS TruSurround XT® creates a high quality surround sound effect | ||
|
|
| using just two speakers from the source which can output surround | ||
|
|
|
| encoded signals | |
|
| Volume Correction | •Switching is also possible by the Surround button on the remote control (p. 7) | ||
|
| ||||
|
| Adjusts volume of individual channel or input mode | |||
|
|
| Selects the initial setting for Audio tracks (Dolby Digital / MPEG) | ||
|
|
| If programme has both Dolby Digital and MPEG audio tracks, priority is given to what you select | ||
Sound | DVB Audio | Dolby Digital : A method of coding digital signals developed by Dolby Laboratories. Apart | |||
•DVB mode only | |||||
|
| Preference | MPEG : | An audio compression method that compresses audio to small size | |
|
|
|
| without any considerable loss of audio quality. | |
|
|
| Selects the initial setting for digital audio output signal from DIGITAL AUDIO OUT | ||
|
| SPDIF Selection | terminal (Auto / PCM) | ||
|
| Auto: Dolby Digital is output as Dolby Digital Bitstream. MPEG is output as PCM. | |||
|
|
| PCM: Dolby Digital is output as PCM. MPEG is output as PCM. | ||
|
|
| •DVB mode and Movie View Mode (p. 31) only | ||
|
|
| |||
|
|
| Normally, MPEG sound is larger than Dolby Digital one | ||
|
| MPEG Audio Level | You can adjust the audio level of MPEG as the initial setting | ||
|
| 0dB to | |||
|
|
| ••DVB mode only | ||
|
|
| |||
|
|
| Select to fit the input signal (Auto / Digital / Analogue) (p. 29) | ||
|
|
| Auto | : Automatic detection of digital or analogue sound source | |
|
| HDMI1 / 3 Input | Digital | : HDMI cable connection | |
|
| Analogue : | |||
|
|
| HDMI input mode only | ||
|
|
| •HDMI2 terminal is for digital signal only | ||
|
| Reset Sound Defaults | ••No setting for HDMI2 available | ||
|
| ||||
|
| Press the OK button to reset the present Sound Mode to the default settings | |||
■Menu list
Menu |
| Item | Adjustments / Configurations (alternatives) | |
| DVB Favourites Edit | Creates list of favourite programmes (p. 23) | ||
|
| Auto Tuning | Automatically sets the channels received in the area (p. 24) | |
|
| Analogue | Edits analogue channels (p. 25) | |
|
| Programme Edit | ||
|
|
| ||
| Tuning | DVB Manual | Sets the DVB channels manually (p. 25) | |
| Tuning | |||
|
| |||
| Analogue | Sets the analogue channels manually (p. 25) | ||
| Menu | Manual Tuning |
| |
| Add New DVB | Adds new DVB services (p. 25) | ||
| Services | |||
|
| |||
|
| New Service | Selects whether to give a notification message when a new DVB service is found (p. 25) | |
|
| Message | ||
|
|
| ||
|
| DVB Signal | Checks the DVB signal condition (p. 25) | |
|
| Display | ||
|
|
| ||
| Off Timer | Sets the time the TV automatically turns Off (Off / 15 / 30 / 45 / 60 / 75 / 90 minutes) | ||
| Teletext | Teletext display mode (TOP (FASTEXT) / List) (p. 16) | ||
| Shipping Condition | Resets all settings, for example, when moving house (p. 26) | ||
| System Update | Downloads new software to TV (p. 23) | ||
| Power Save | Reduces brightness of picture to economise on power consumption (Off / On) | ||
| Side Panel | Increases the brightness of the side panel (Off / Low / Mid / High) | ||
Setup | •The recommended setting is “High” to prevent panel “image retention” | |||
|
| |||
|
| Selects the screen area displaying the image (Off / On) | ||
|
| On : Enlarged the image to hide the edge of the image. | ||
Picture Overscan | Off : Displayed the image in the original size. | |||
Set to “On” if noise is generated on the edge of the screen. | ||||
|
|
| •This function is available when aspect is set to 16:9. | |
|
|
| ••1080i or 1080p signal only | |
| Input Labels | Labels or skips each input terminals (p. 27) | ||
| Banner Display | Sets how long the information banner (p. 11) stays on screen | ||
| Timeout | •0 (No display) to 10 sec. in | ||
| VIERA Link | VIERA Link | Sets to use VIERA Link functions (Off / On) (p. 32) | |
|
|
| ||
| Power off Link | Set to “Set” to use Power off Link function (No / Set) (p. 33) | ||
| Settings |
|
| |
| Power on Link | Set to “Set” to use Power on Link function (No / Set) (p. 33) | ||
|
|
| ||
|
|
|
| |
|
|
|
| |
|
|
|
| |
|
|
|
| |
|
|
|
| |
|
|
|
| |
•How to Use Menu Functions (picture, sound quality, etc.)
Advanced
20 | 21 |