Basic Connection
External equipment and cables shown are not supplied with this TV.
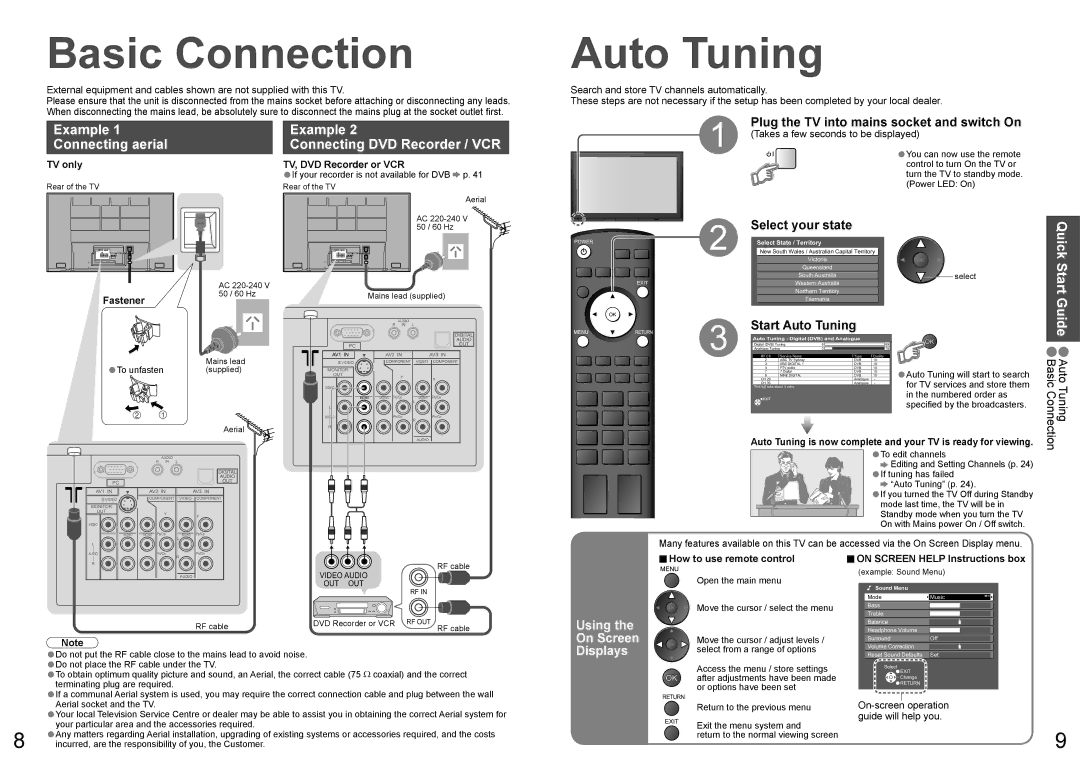
Please ensure that the unit is disconnected from the mains socket before attaching or disconnecting any leads. When disconnecting the mains lead, be absolutely sure to disconnect the mains plug at the socket outlet first.
Example 1 |
| Example 2 |
Connecting aerial |
| Connecting DVD Recorder / VCR |
Auto Tuning
Search and store TV channels automatically.
These steps are not necessary if the setup has been completed by your local dealer.
1 | Plug the TV into mains socket and switch On |
(Takes a few seconds to be displayed) | |
| •You can now use the remote |
TV only
Rear of the TV
Fastener
AC
•If your recorder is not available for DVB ![]() p. 41
p. 41
Rear of the TVTV, DVD Recorder or VCR
Aerial
AC
Mains lead (supplied)
|
|
|
| control to turn On the TV or |
|
|
|
|
| turn the TV to standby mode. |
|
|
|
|
| (Power LED: On) |
|
|
| 2 | Select your state |
| Quick |
POWER | INPUT | Select State / Territory |
| ||
| New South Wales / Australian Capital Territory |
| |||
|
|
| |||
| OPTION SD CARD |
| Victoria |
| Start |
|
| Queensland |
| ||
|
|
| select | ||
| EXIT |
| South Australia | ||
|
| Western Australia |
| ||
|
|
| Northern Territory |
| |
|
|
| Tasmania |
| Guide |
|
|
|
|
|
•To unfasten | Mains lead | |
(supplied) | ||
|
Aerial
|
| R | AUDIO | L |
|
|
| IN |
| ||
PC |
|
|
|
|
|
AV1 IN | AV2 IN |
| AV3 IN | ||
S VIDEO | COMPONENT | VIDEO | COMPONENT | ||
MONITOR |
|
|
|
|
|
OUT |
|
| Y |
| Y |
|
|
|
| ||
|
|
|
|
| |
VIDEO |
|
|
|
|
|
MONO | MONO | PB/CB | MONO | PB/CB | |
|
|
|
| L |
|
L |
|
|
|
|
|
AUDIO |
| PR/CR | R | PR/CR | |
|
|
|
|
| |
R |
|
|
|
|
|
|
|
|
| AUDIO |
|
RETURN | 3 | Start Auto Tuning |
|
|
| • | |||||||
|
| Auto Tuning - Digital (DVB) and Analogue |
|
|
| ||||||||
|
| Digital (DVB) Tuning | 6 |
|
|
|
|
| 69 |
| |||
|
| Analogue Tuning |
| 0 |
|
|
|
|
| 75 |
| ||
|
|
|
|
|
|
|
|
|
|
| |||
|
| RF Ch | Service Name |
|
|
| Type | Quality |
|
| |||
|
|
| 2 | ABC TV Sydney |
|
|
| DVB | 10 |
|
| Auto Tuning Basic Connection | |
|
|
| 3 | SBS DIGITAL 1 |
|
|
| DVB | 10 |
|
| ||
|
|
| 4 | FTV guide |
|
|
| DVB | 10 |
| Auto Tuning will start to search | ||
|
|
| 7 | 7 Digital |
|
|
| DVB | 10 |
| |||
|
|
| 9 | NINE DIGITAL |
|
|
| DVB | 10 |
| |||
|
|
| CH 29 |
|
|
|
| Analogue | - |
| |||
|
|
|
|
|
|
|
|
|
|
| •for TV services and store them | ||
|
|
| CH 33 |
|
|
|
| Analogue | - |
| |||
|
|
| This will take about 3 mins. |
|
|
|
|
|
|
| |||
|
|
| EXIT |
|
|
|
|
|
|
|
| in the numbered order as | |
|
|
|
|
|
|
|
|
|
|
|
| specified by the broadcasters. | |
|
| Auto Tuning is now complete and your TV is ready for viewing. | |||||||||||
|
|
|
|
|
|
|
|
|
| •To edit channels | |||
|
|
|
|
|
|
|
|
|
|
| |||
AUDIO
R IN L
PC
• | Editing and Setting Channels (p. 24) |
If tuning has failed | |
“Auto Tuning” (p. 24). |
AV1 IN | AV2 IN |
| AV3 IN | |
S VIDEO | COMPONENT | VIDEO | COMPONENT | |
MONITOR |
|
|
|
|
OUT |
| Y |
| Y |
|
|
| ||
|
|
|
| |
VIDEO |
|
|
|
|
MONO | MONO | PB/CB | MONO | PB/CB |
|
|
| L |
|
L |
|
|
|
|
AUDIO |
| PR/CR | R | PR/CR |
|
|
|
| |
R |
|
|
|
|
RF cable
If you turned the TV Off during Standby |
•mode last time, the TV will be in |
Standby mode when you turn the TV |
On with Mains power On / Off switch. |
Many features available on this TV can be accessed via the On Screen Display menu.
■How to use remote control | ■ON SCREEN HELP Instructions box |
AUDIO |
VIDEO AUDIO
OUT OUT
Open the main menu
(example: Sound Menu)
Sound Menu |
|
| RF IN |
RF cable | DVD Recorder or VCR | RF OUT |
| RF cable |
Note
•Do not put the RF cable close to the mains lead to avoid noise.
•Do not place the RF cable under the TV.
•To obtain optimum quality picture and sound, an Aerial, the correct cable (75 Ω coaxial) and the correct terminating plug are required.
•If a communal Aerial system is used, you may require the correct connection cable and plug between the wall Aerial socket and the TV.
•Your local Television Service Centre or dealer may be able to assist you in obtaining the correct Aerial system for your particular area and the accessories required.
8 •Any matters regarding Aerial installation, upgrading of existing systems or accessories required, and the costs incurred, are the responsibility of you, the Customer.
Using the
On Screen
Displays
RETURN
EXIT
Move the cursor / select the menu
Move the cursor / adjust levels / select from a range of options
Access the menu / store settings after adjustments have been made or options have been set
Return to the previous menu
Exit the menu system and
return to the normal viewing screen
Mode | Music | ||
Bass |
|
|
|
|
|
| |
Treble |
|
|
|
|
|
| |
Balance |
|
|
|
|
|
| |
Headphone Volume |
|
|
|
|
|
| |
Surround |
|
|
|
Off | |||
Volume Correction |
|
|
|
|
|
| |
Reset Sound Defaults |
| ||
Set | |||
Select
![]() EXIT
EXIT
![]()
![]()
![]() Change
Change
![]() RETURN
RETURN
9