2

1

2

A

3

A

4

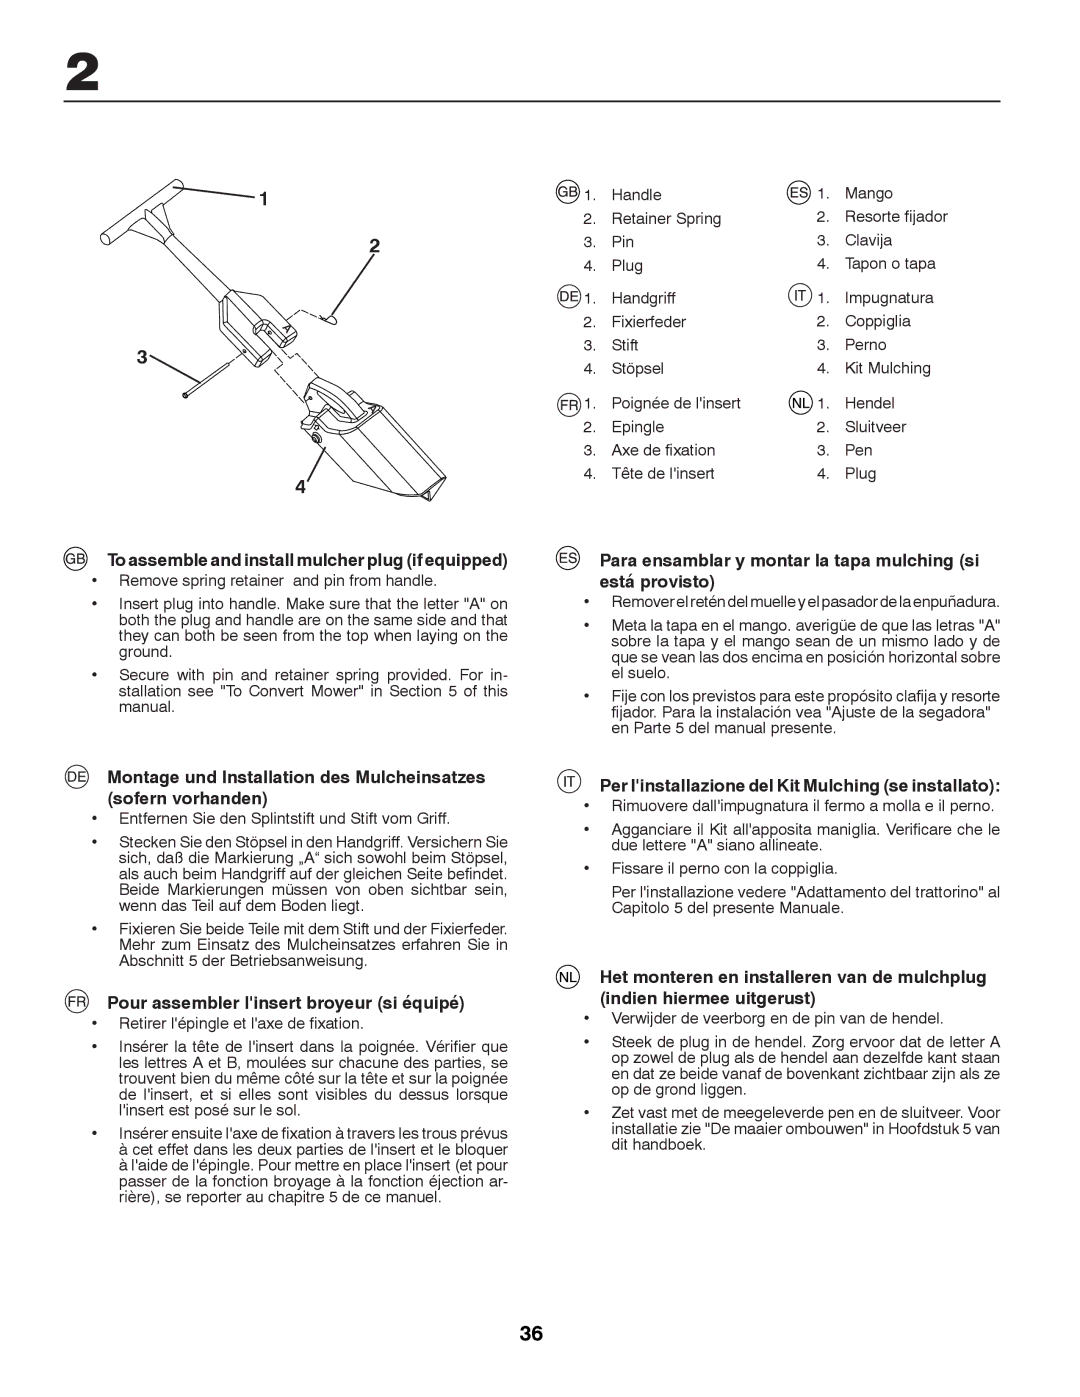
To assemble and install mulcher plug (if equipped)

Remove spring retainer and pin from handle.

Insert plug into handle. Make sure that the letter "A" on both the plug and handle are on the same side and that they can both be seen from the top when laying on the ground.

Secure with pin and retainer spring provided. For in- stallation see "To Convert Mower" in Section 5 of this manual.

Montage und Installation des Mulcheinsatzes (sofern vorhanden)

Entfernen Sie den Splintstift und Stift vom Griff.

Stecken Sie den Stöpsel in den Handgriff. Versichern Sie sich, daß die Markierung „A“ sich sowohl beim Stöpsel, als auch beim Handgriff auf der gleichen Seite befindet. Beide Markierungen müssen von oben sichtbar sein, wenn das Teil auf dem Boden liegt.

Fixieren Sie beide Teile mit dem Stift und der Fixierfeder. Mehr zum Einsatz des Mulcheinsatzes erfahren Sie in Abschnitt 5 der Betriebsanweisung.

Pour assembler l'insert broyeur (si équipé)

Retirer l'épingle et l'axe de fixation.

Insérer la tête de l'insert dans la poignée. Vérifier que les lettres A et B, moulées sur chacune des parties, se trouvent bien du même côté sur la tête et sur la poignée de l'insert, et si elles sont visibles du dessus lorsque l'insert est posé sur le sol.

Insérer ensuite l'axe de fixation à travers les trous prévus

àcet effet dans les deux parties de l'insert et le bloquer

àl'aide de l'épingle. Pour mettre en place l'insert (et pour passer de la fonction broyage à la fonction éjection ar-

rière), se reporter au chapitre 5 de ce manuel.

1.

Handle

1.

Mango

2.

Retainer Spring

2.

Resorte fijador

3.

Pin

3.

Clavija

4.

Plug

4.

Tapon o tapa

1.

Handgriff


1.

Impugnatura


2.

Fixierfeder

2.

Coppiglia

3.

Stift

3.

Perno

4.

Stöpsel

4.

Kit Mulching

1.

Poignée de l'insert

1.

Hendel

2.

Epingle

2.

Sluitveer

3.

Axe de fixation

3.

Pen

4.

Tête de l'insert

4.

Plug

Para ensamblar y montar la tapa mulching (si está provisto)

Remover el retén del muelle y el pasador de la enpuñadura.

Meta la tapa en el mango. averigüe de que las letras "A" sobre la tapa y el mango sean de un mismo lado y de que se vean las dos encima en posición horizontal sobre el suelo.

Fije con los previstos para este propósito clafija y resorte fijador. Para la instalación vea "Ajuste de la segadora" en Parte 5 del manual presente.

Per I'installazione del Kit Mulching (se installato):

Rimuovere dall'impugnatura il fermo a molla e il perno.

Agganciare il Kit all'apposita maniglia. Verificare che le due lettere "A" siano allineate.

Fissare il perno con la coppiglia.

Per l'installazione vedere "Adattamento del trattorino" al Capitolo 5 del presente Manuale.

Het monteren en installeren van de mulchplug (indien hiermee uitgerust)

Verwijder de veerborg en de pin van de hendel.

Steek de plug in de hendel. Zorg ervoor dat de letter A op zowel de plug als de hendel aan dezelfde kant staan en dat ze beide vanaf de bovenkant zichtbaar zijn als ze op de grond liggen.

Zet vast met de meegeleverde pen en de sluitveer. Voor installatie zie "De maaier ombouwen" in Hoofdstuk 5 van dit handboek.

36

Page 36
Image 36
Partner Tech P12597RB To assemble and install mulcher plug if equipped, Pour assembler linsert broyeur si équipé

P12597RB specifications

The Partner Tech P12597RB is a cutting-edge point-of-sale (POS) terminal that has gained recognition in the retail and hospitality sectors due to its robust features and advanced technology. Designed to facilitate efficient transactions, this terminal combines an intuitive interface with powerful hardware, making it an ideal solution for businesses of all sizes.

One of the standout features of the P12597RB is its 15-inch resistive touchscreen. This display not only offers vivid visuals but is also designed for durability, capable of withstanding the rigors of a busy environment. The touchscreen functions seamlessly, providing staff with a responsive and user-friendly experience, allowing quick access to essential functions like inventory management, sales tracking, and reporting.

In terms of performance, the P12597RB is equipped with a reliable Intel Celeron processor, which ensures swift operation and multitasking capability. This allows businesses to run several applications simultaneously without any lag, significantly enhancing productivity during peak hours. The device also features an impressive memory specification, with options for RAM that enable faster data processing and smoother running of the POS software.

Connectivity is another key area where the P12597RB excels. It comes with multiple connectivity options, including USB, Ethernet, and serial ports, enabling seamless integration with various peripherals such as barcode scanners, receipt printers, and cash drawers. This flexibility ensures that businesses can tailor their POS setup according to specific operational needs.

Security is paramount in any POS system, and Partner Tech has prioritized this aspect in the design of the P12597RB. With built-in security features and compliance with PCI standards, the terminal ensures that sensitive customer data is protected during transactions. This helps build trust with customers and maintains the integrity of business operations.

Additionally, the P12597RB boasts a compact and stylish design, allowing it to fit into a variety of retail and hospitality environments without taking up excessive space. Its fanless design further contributes to its silent operation, making it an excellent choice for settings where noise could be a distraction.

In summary, the Partner Tech P12597RB is a sophisticated POS terminal equipped with a high-performance touchscreen, robust processing capabilities, extensive connectivity options, and essential security features. Its versatility and efficiency make it a valuable asset for any retail or hospitality business aiming to streamline operations and enhance customer service.