Connect Accessory Devices
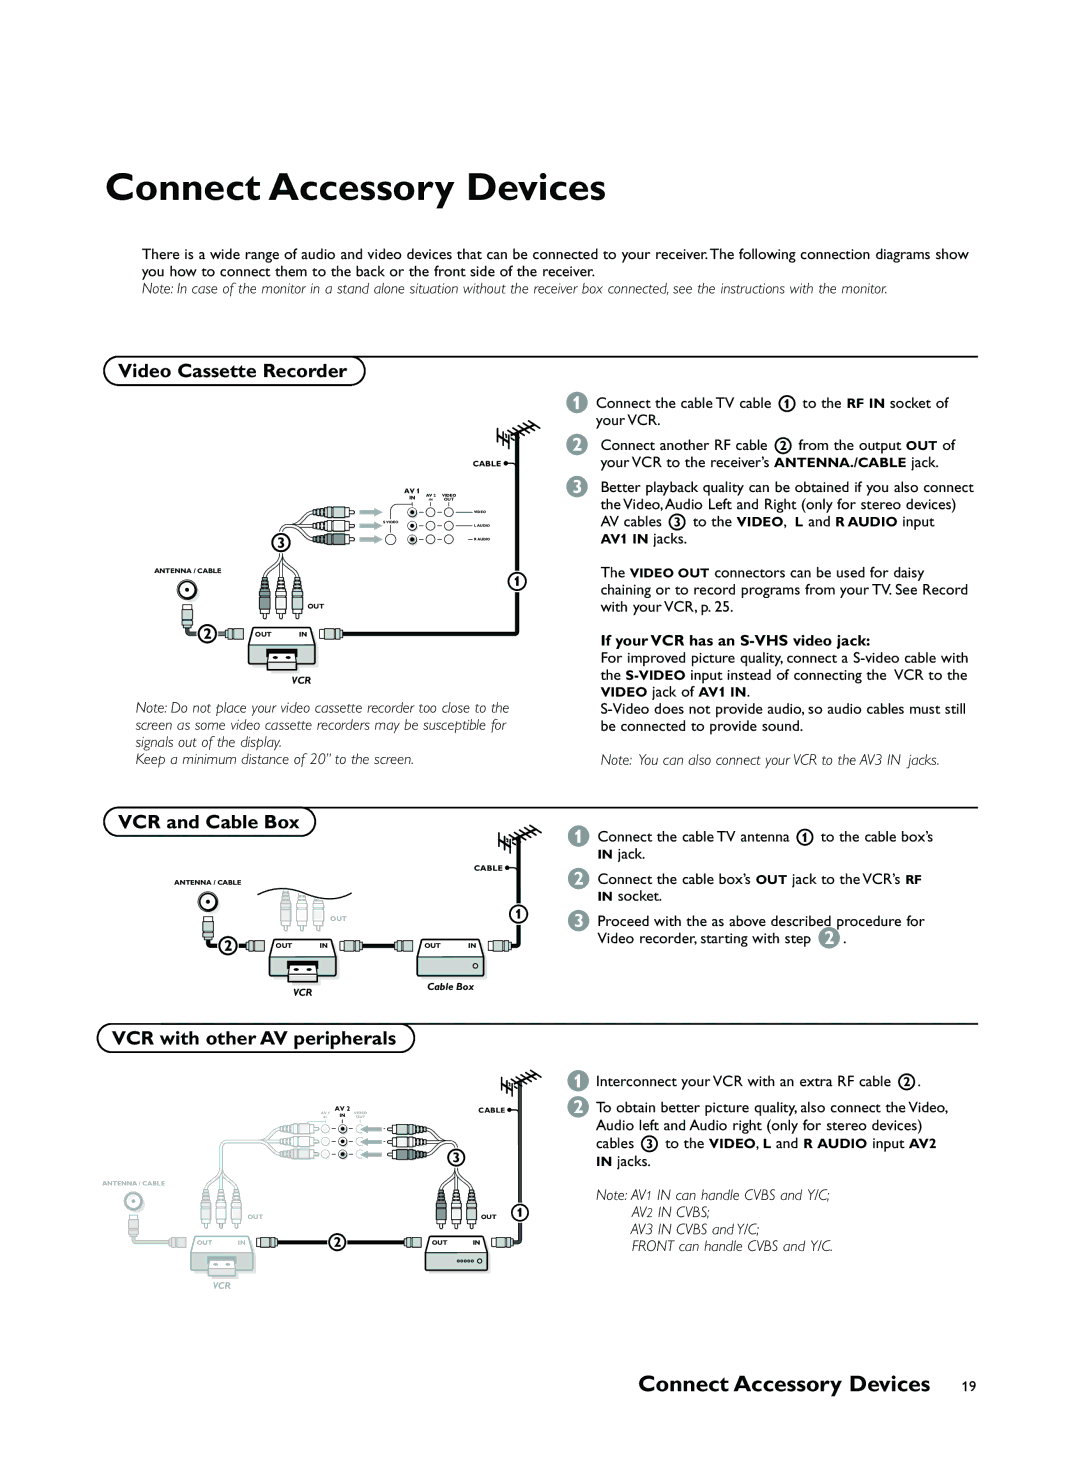
There is a wide range of audio and video devices that can be connected to your receiver. The following connection diagrams show you how to connect them to the back or the front side of the receiver.
Note: In case of the monitor in a stand alone situation without the receiver box connected, see the instructions with the monitor.
Video Cassette Recorder
&Connect the cable TV cable 1 to the RF IN socket of your VCR.
3
ANTENNA / CABLE
OUT
OUT IN
CABLE ![]()
AV 1
IN | AV 2 | VIDEO |
IN | OUT |
VIDEO
S VIDEO
L AUDIO
R AUDIO
éConnect another RF cable 2 from the output OUT of your VCR to the receiver’s ANTENNA./CABLE jack.
“ Better playback quality can be obtained if you also connect |
the Video, Audio Left and Right (only for stereo devices) |
AV cables 3 to the VIDEO, L and R AUDIO input |
AV1 IN jacks. |
The VIDEO OUT connectors can be used for daisy |
chaining or to record programs from your TV. See Record |
with your VCR, p. 25. |
If your VCR has an |
For improved picture quality, connect a |
the |
VCR
Note: Do not place your video cassette recorder too close to the screen as some video cassette recorders may be susceptible for signals out of the display.
Keep a minimum distance of 20” to the screen.
VIDEO jack of AV1 IN. |
be connected to provide sound. |
Note: You can also connect your VCR to the AV3 IN jacks. |
IN IN
VCR and Cable Box
S![]()
VIDEO
L AUDIO
R AUDIO
&Connect the cable TV antenna 1 to the cable box’s IN jack.
ANTENNA / CABLE
OUT
OUT IN
VCR
CABLE ![]()
OUT IN
Cable Box
éConnect the cable box’s OUT jack to the VCR’s RF IN socket.
“Proceed with the as above described procedure for Video recorder, starting with step é.
VCR with other AV peripherals
&Interconnect your VCR with an extra RF cable 2.
ANTENNA / CABLE
OUT
OUT IN
AV 2
AV 1 | IN | VIDEO |
IN | OUT |
VIDEO
S VIDEO
L AUDIO
R AUDIO
CABLE ![]()
3
OUT
OUT IN
éTo obtain better picture quality, also connect the Video, Audio left and Audio right (only for stereo devices) cables 3 to the VIDEO, L and R AUDIO input AV2 IN jacks.
Note: AV1 IN can handle CVBS and Y/C; AV2 IN CVBS;
AV3 IN CVBS and Y/C;
FRONT can handle CVBS and Y/C.
VCR
