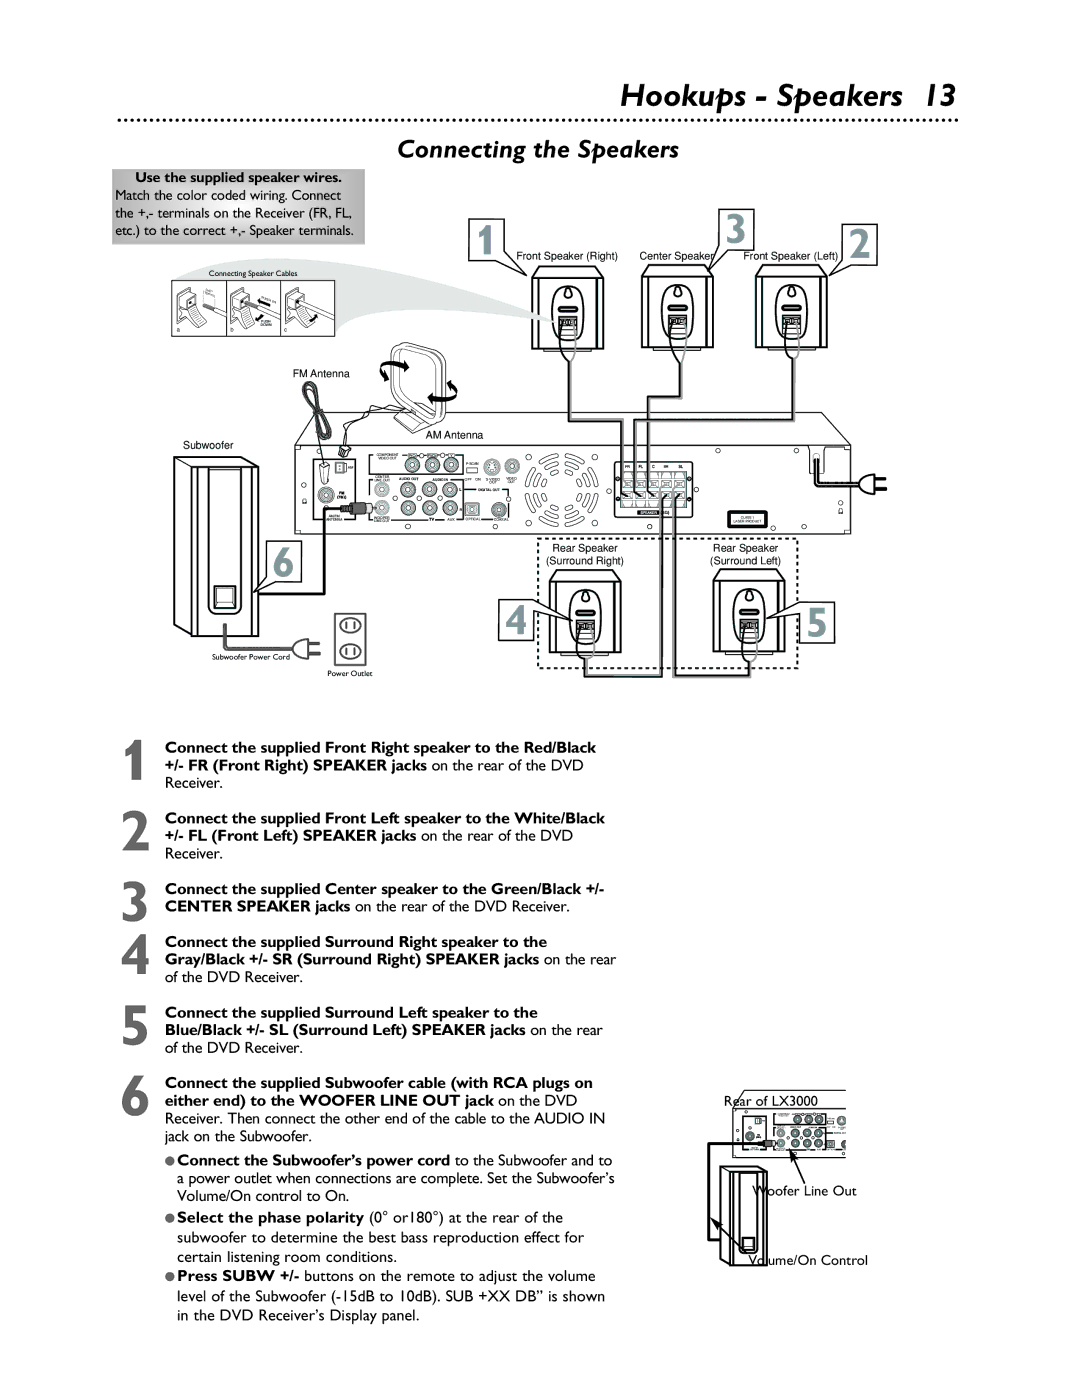
Connect the supplied Center speaker to the Green/Black +/- CENTER SPEAKER jacks on the rear of the DVD Receiver.

Hookups - Speakers 13

Connecting the Speakers


Use

the supplied speaker wires.


Match

the

color

coded wiring.


Connect


3


the +,-


terminals


o

n


R

eceiver


(FR,


FL,


the


1 Front Speaker (Right) Center Speaker


etc.) to

the correct +,- Speaker terminals.


Front Speaker (Left) 2


Connecting Speaker Cables


.


047"


(12mm)

PUSH IN


PUSH


DOWN

a

b

c

FM Antenna

Subwoofer


AM Antenna


COMPONENT

PrCr

PbCb

Y


VIDEO OUT


AM


P-SCAN


FR

SR


CENTER

AUDIO OU

AUDIO IN

OFF ON

S-VIDEO

VIDEO

+

+


LINE OUT


OUT

OUT


DIGITAL OUT


-

-


R


SPEAKER

4

AM/FM


WOOPER


AUX

OPTICAL

COAXIAL


CLASS 1

ANTENNA

LINE OUT


LASER PRODUCT

6

Rear Speaker

Rear Speaker

(Surround Right)

(Surround Left)


4

5

Subwoofer Power Cord

Power Outlet

Connect the supplied Front Right speaker to the Red/Black

1 +/- FR (Front Right) SPEAKER jacks on the rear of the DVD Receiver.

Connect the supplied Front Left speaker to the White/Black

2 +/- FL (Front Left) SPEAKER jacks on the rear of the DVD Receiver.

3

Connect the supplied Surround Right speaker to the

4 Gray/Black +/- SR (Surround Right) SPEAKER jacks on the rear of the DVD Receiver.

Connect the supplied Surround Left speaker to the

5 Blue/Black +/- SL (Surround Left) SPEAKER jacks on the rear of the DVD Receiver.

Connect the supplied Subwoofer cable (with RCA plugs on

6 either end) to the WOOFER LINE OUT jack on the DVD Receiver. Then connect the other end of the cable to the AUDIO IN jack on the Subwoofer.

Connect the Subwoofer’s power cord to the Subwoofer and to a power outlet when connections are complete. Set the Subwoofer’s Volume/On control to On.

Select the phase polarity (0° or180°) at the rear of the subwoofer to determine the best bass reproduction effect for certain listening room conditions.

Press SUBW +/- buttons on the remote to adjust the volume level of the Subwoofer (-15dB to 10dB). SUB +XX DB” is shown in the DVD Receiver’s Display panel.

Rear of LX3000


COMPONENT

PrCr

PbCb

Y


VIDEO OUT


AM


P-SCAN


CENTER

AUDIO OU


OFF ON

VIDEO


LINE OUT


AUDIO IN


S-OUT


DIGITAL OUT


R


AM/FM

WOOPER


AUX

OPTICAL

CO

ANTENNA

LINE OUT


Woofer Line Out

Volume/On Control

Page 13
Image 13
Philips LX3000 warranty Hookups Speakers, Connecting the Speakers

LX3000 specifications

The Philips LX3000 is a remarkable piece of technology designed for enthusiasts who desire an immersive audio experience without compromising on aesthetic appeal. This speaker system is an embodiment of Philips' commitment to high-quality sound reproduction and innovative design.

One of the standout features of the LX3000 is its advanced audio technology, which utilizes a combination of premium speakers and proprietary audio processing. The system incorporates powerful woofers that deliver deep, rumbling bass, while the tweeters ensure crisp, clear highs. This harmonious balance allows users to enjoy a full spectrum of sound, whether they are listening to music, watching movies, or gaming.

Philips has also integrated several audio enhancement technologies into the LX3000. The dynamic sound equalizer automatically adjusts audio output based on the genre of content being played, optimizing sound performance for different types of media. The system also supports various audio formats, making it versatile for different uses, including streaming services and high-definition media.

Aesthetically, the LX3000 is designed to complement modern interiors. Its sleek lines and contemporary finish make it an attractive addition to any room. The speakers are ergonomically designed to provide optimal sound dispersion, ensuring that the audio experience remains consistent across a wide listening area.

Connectivity is another key feature of the LX3000. It offers both wired and wireless options, allowing users to pair their devices via Bluetooth as well as through traditional audio cables. This flexibility ensures compatibility with a variety of devices, from smartphones to televisions. Additionally, the system includes multiple input options, catering to both analog and digital sources.

User-friendliness is at the core of the LX3000's design. The intuitive controls and easy setup process mean that even those who are not tech-savvy can enjoy its advanced features without hassle.

Overall, the Philips LX3000 represents a fusion of cutting-edge technology and elegant design, making it an ideal choice for those seeking outstanding audio performance in a stylish package. Whether for home entertainment or casual listening, it provides an unparalleled auditory experience that meets the demands of contemporary users.