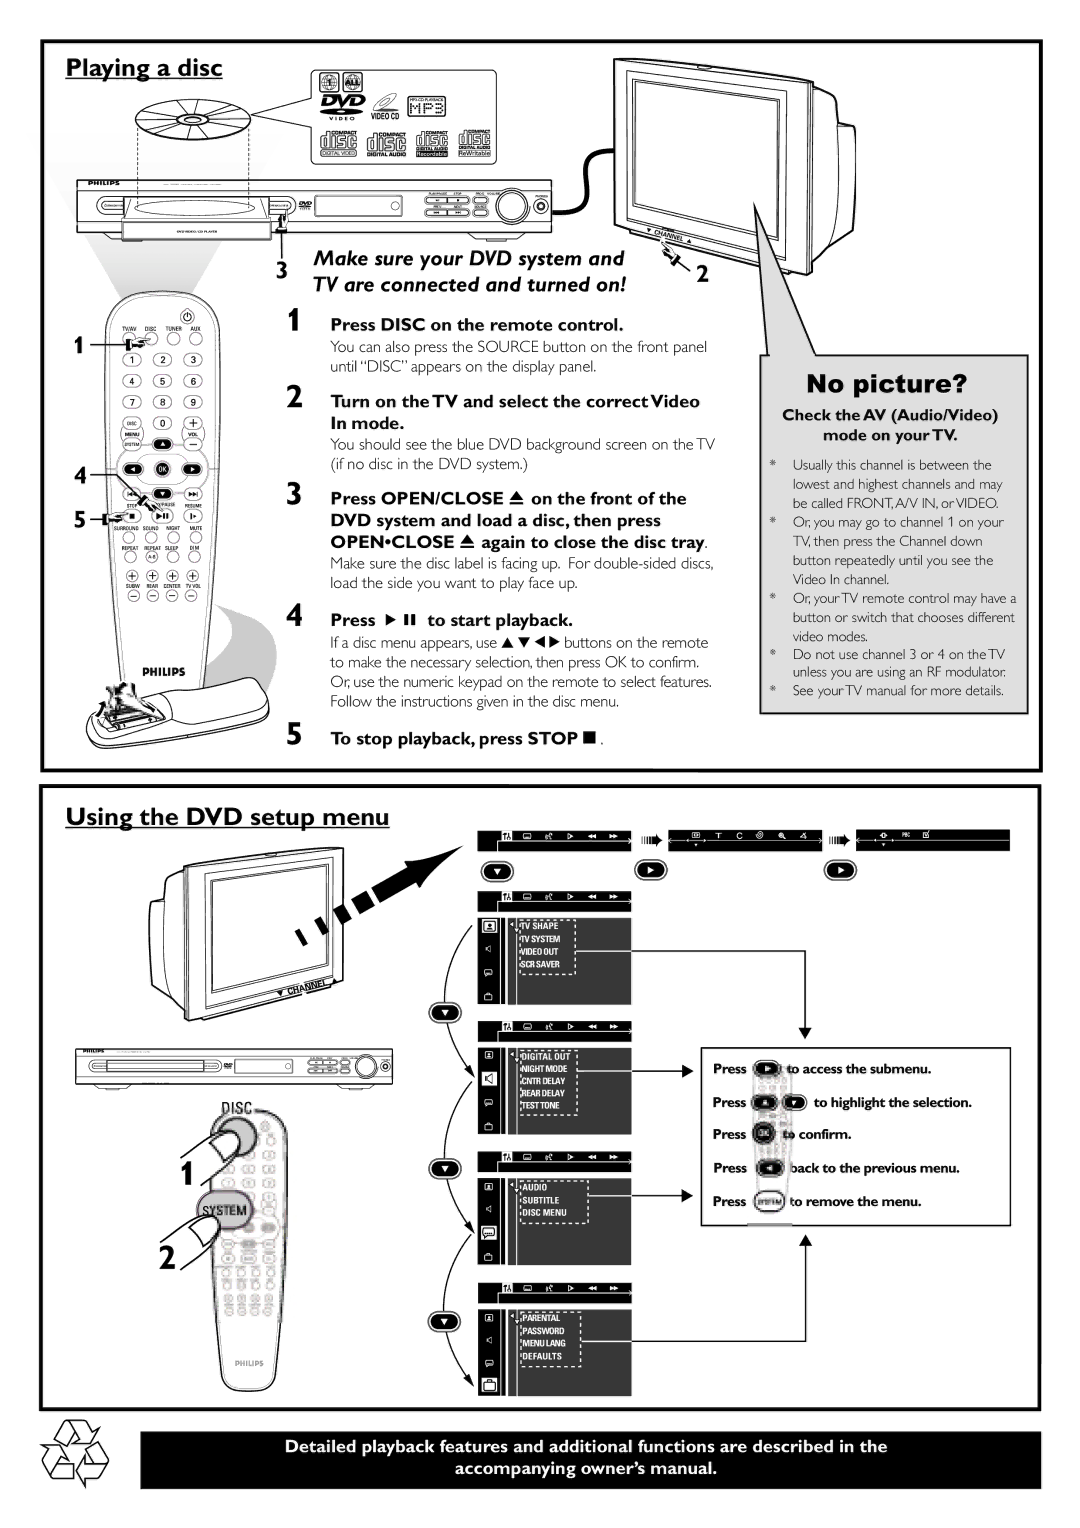
Playing a disc
1 ALL
| DVD VIDEO DIGITAL SURROUND SYSTEM |
|
|
|
|
| PLAY/PAUSE | STOP | PROG VOLUME |
|
|
|
| PHONES |
OPEN/CLOSE | PREV | NEXT | SOURCE |
DVD VIDEO / CD PLAYER | 4 | CH | AN |
| |||
|
|
| NEL |
|
|
| 3 |
3 | Make sure your DVD system and | 2 | |
TV are connected and turned on! | |||
|
| ||
1 | Press DISC on the remote control. |
| |
1 | You can also press the SOURCE button on the front panel | ||
| until “DISC” appears on the display panel. |
| |
2 | Turn on the TV and select the correct Video | ||
| In mode. |
| |
| You should see the blue DVD background screen on the TV | ||
4 | (if no disc in the DVD system.) |
| |
|
| ||
3 | Press OPEN/CLOSE 0 on the front of the |
| |
5 | DVD system and load a disc, then press |
| |
| OPEN•CLOSE 0 again to close the disc tray. | ||
| Make sure the disc label is facing up. For | ||
| load the side you want to play face up. |
| |
4 | Press ÉÅ to start playback. |
| |
| If a disc menu appears, use 3 4 1 2 buttons on the remote | ||
| to make the necessary selection, then press OK to confirm. | ||
| Or, use the numeric keypad on the remote to select features. | ||
| Follow the instructions given in the disc menu. |
| |
5 | To stop playback, press STOPÇ. |
| |
No picture?
Check the AV (Audio/Video)
mode on your TV.
*Usually this channel is between the lowest and highest channels and may be called FRONT, A/V IN, or VIDEO.
*Or, you may go to channel 1 on your TV, then press the Channel down button repeatedly until you see the Video In channel.
*Or, your TV remote control may have a button or switch that chooses different video modes.
*Do not use channel 3 or 4 on the TV unless you are using an RF modulator.
*See your TV manual for more details.
Using the DVD setup menu
![]()
![]()
![]()
![]() ➠
➠![]()
![]()
![]()
![]()
![]()
![]()
![]()
![]()
![]()
![]() ➠
➠![]() ➠
➠![]()
![]()
![]()
![]()
![]()
![]()
![]()
TV SHAPE |
TV SYSTEM |
VIDEO OUT |
SCR SAVER |
PLAY/PAUSE STOP | PROG VOLUME |
PHONES
PREV NEXT SOURCE
DVD VIDEO / CD PLAYER
1
2
DIGITAL OUT |
NIGHT MODE |
CNTR DELAY |
REAR DELAY |
TEST TONE |
AUDIO |
SUBTITLE |
DISC MENU |
PARENTAL |
PASSWORD |
MENU LANG |
DEFAULTS |
Detailed playback features and additional functions are described in the
accompanying owner’s manual.
