Net 1Card IB 2/15/00 12:18 PM Page 30

FACTORY TEST MENU

TELEVISION OPERATION

Once you have completed your general selections under the Commercial Settings menu, you must make specific selections. If you selected “FACTORY”

(See page 19.), follow the directions below.

BEGIN

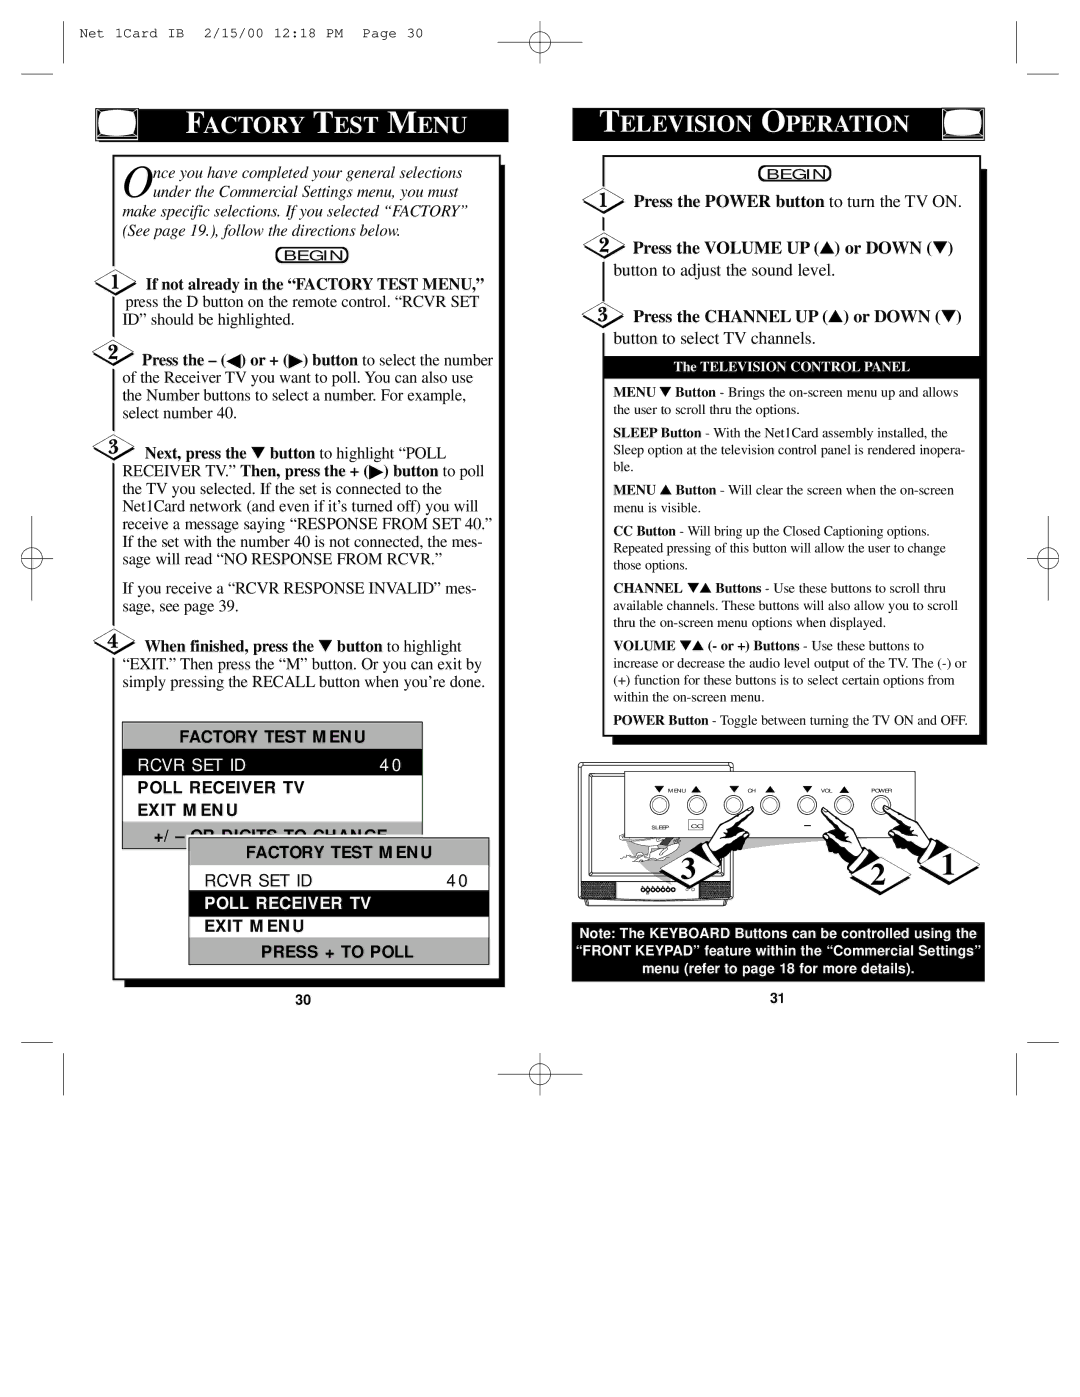
If not already in the “FACTORY TEST MENU,” press the D button on the remote control. “RCVR SET ID” should be highlighted.

Press the – () or + () button to select the number of the Receiver TV you want to poll. You can also use the Number buttons to select a number. For example, select number 40.

Next, press the button to highlight “POLL RECEIVER TV.” Then, press the + () button to poll the TV you selected. If the set is connected to the Net1Card network (and even if it’s turned off) you will receive a message saying “RESPONSE FROM SET 40.” If the set with the number 40 is not connected, the mes- sage will read “NO RESPONSE FROM RCVR.”

If you receive a “RCVR RESPONSE INVALID” mes- sage, see page 39.

When finished, press the button to highlight “EXIT.” Then press the “M” button. Or you can exit by simply pressing the RECALL button when you’re done.


FACTORY TEST MENU


RCVR SET ID

40


POLL RECEIVER TV


EXIT MENU


+/–


FACTORY TEST MENU


RCVR SET ID

40


POLL RECEIVER TV


EXIT MENU


PRESS + TO POLL


30


BEGIN

Press the POWER button to turn the TV ON.

Press the VOLUME UP () or DOWN ()

button to adjust the sound level.

Press the CHANNEL UP () or DOWN ()

button to select TV channels.

The TELEVISION CONTROL PANEL

MENU Button - Brings the on-screen menu up and allows the user to scroll thru the options.

SLEEP Button - With the Net1Card assembly installed, the Sleep option at the television control panel is rendered inopera- ble.

MENU Button - Will clear the screen when the on-screen menu is visible.

CCButton - Will bring up the Closed Captioning options. Repeated pressing of this button will allow the user to change those options.

CHANNEL ▼▲ Buttons - Use these buttons to scroll thru available channels. These buttons will also allow you to scroll thru the on-screen menu options when displayed.

VOLUME ▼▲ (- or +) Buttons - Use these buttons to increase or decrease the audio level output of the TV. The (-) or

(+)function for these buttons is to select certain options from within the on-screen menu.

POWER Button - Toggle between turning the TV ON and OFF.

MENU ▲ ▼ CH

VOL POWER


SLEEP CC

+


3


2

1

Note: The KEYBOARD Buttons can be controlled using the “FRONT KEYPAD” feature within the “Commercial Settings” menu (refer to page 18 for more details).

31

Page 16
Image 16
Philips Network Adaper owner manual Factory Test Menu Television Operation, Press the Channel UP or Down

Network Adaper specifications

The Philips Network Adapter is a state-of-the-art device designed to enhance the way users connect and interact with their digital environments. With the increasing demand for seamless connectivity in the home and office, Philips has developed this versatile adapter to ensure reliable performance and superior user experience.

One of the key features of the Philips Network Adapter is its ability to support a wide range of devices. Whether you are looking to connect smart TVs, streaming devices, gaming consoles, or other Internet-enabled gadgets, this adapter provides the necessary interface for swift and easy connectivity. It eliminates the limitations often faced with traditional wired connections, offering flexibility and convenience.

The Philips Network Adapter employs advanced wireless technologies, including dual-band Wi-Fi support. This allows for simultaneous connections on both the 2.4 GHz and 5 GHz bands, ensuring that users can enjoy smoother streaming, faster downloads, and reduced latency in online gaming. The result is a seamless and uninterrupted experience, ideal for households with multiple devices in use.

Another notable aspect of the Philips Network Adapter is its compatibility with various networking protocols, including IPv4 and IPv6. This future-proofing feature ensures that the adapter can easily integrate into modern network infrastructures, allowing users to take advantage of the latest advances in internet technology without needing frequent upgrades.

Security is a paramount consideration for any network device, and the Philips Network Adapter prioritizes this with robust encryption protocols such as WPA2. This ensures that users can connect confidently, knowing their data and privacy are protected from unauthorized access.

The compact and sleek design of the Philips Network Adapter also cannot go unnoticed. It fits easily into home or office environments without occupying excessive space or becoming an eyesore. Whether placed on a shelf or mounted on a wall, it complements any decor.

In conclusion, the Philips Network Adapter stands out as a powerful solution for anyone looking to enhance their connectivity. With its impressive features, advanced technologies, and commitment to security and design, it offers a comprehensive solution for today’s digital demands. Whether for leisure or work, this network adapter is a reliable tool that ensures users stay connected efficiently and effectively.