4 ENGLISH


Keys and functions


Product illustration

B

Receiver Unit

on inside flap:

19

Power button


switches the receiver between stand-by and on. When the receiver unit is


turned on or off the transmitter unit is automatically turned on or off as well.


20

Power light

red in stand-by mode, green when power is on, flashes when receiving remote control commands

21Remote control signal receiver

receives remote control commands which are sent to the transmitter unit to control the video sources.

22Input source up (+) / down (-) buttons

selects one of the four video sources connected to the transmitter unit for viewing on the second TV.

23Transmission channel switch

switches the frequency channel of the audio/video signal to minimize interference.

24SCART output connector connect to the second TV

25DC power input

26SCART cable

27Power adapter

28Remote control antenna

Important information

Each video source, the main TV and the second TV must have SCART connectors.

Two SCART cables are supplied; you will require additional SCART cables for the video sources you connect.

A video source can be any satellite receiver, Pay-TV decoder box (digital or analogue), video recorder (VCR), DVD player, camcorder, game-console etc.

Before using the Universal Remote Control it must be set up to operate with your other equipment. Refer to its instructions for use to discover the full potential of this versatile unit.

In this guide we call the main TV (connected to the transmitter unit) TV1; we call the second TV (connected to the receiver unit) TV2.

It may be helpful to have the instructions for use for the TVs and the video sources at hand for reference.

AUDIO

OUT

L

DC 9V

Channel

R 1 2 3 4

Aligned

Wireless TV

Link Transmitter

VCR

DVD

Set-top box

L

DC 12V

Channel

R 1 2 3 4

Antenna

Channel 1 2 3 4

DC 12V

ENGLISH 5

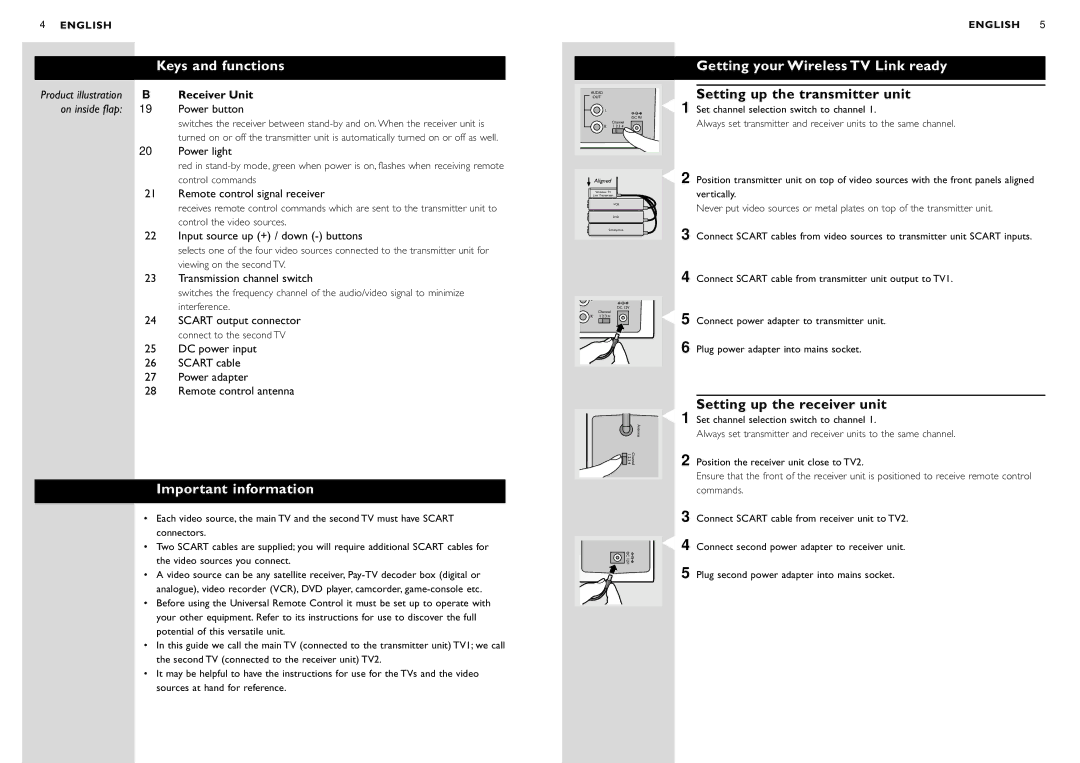
Getting your Wireless TV Link ready

Setting up the transmitter unit

1 Set channel selection switch to channel 1.

Always set transmitter and receiver units to the same channel.

2 Position transmitter unit on top of video sources with the front panels aligned vertically.

Never put video sources or metal plates on top of the transmitter unit.

3 Connect SCART cables from video sources to transmitter unit SCART inputs.

4 Connect SCART cable from transmitter unit output to TV1.

5 Connect power adapter to transmitter unit.

6 Plug power adapter into mains socket.

Setting up the receiver unit

1 Set channel selection switch to channel 1.

Always set transmitter and receiver units to the same channel.

2 Position the receiver unit close to TV2.

Ensure that the front of the receiver unit is positioned to receive remote control commands.

3 Connect SCART cable from receiver unit to TV2.

4 Connect second power adapter to receiver unit.

5 Plug second power adapter into mains socket.

Page 2
Image 2
Philips SBC VL1400 manual Important information, Getting your Wireless TV Link ready, Setting up the transmitter unit

SBC VL1400 specifications

The Philips SBC VL1400 is a remarkable piece of audio technology that has made a significant impact in the realm of personal listening devices. Launched as a compact and portable solution for music enthusiasts, this headset is designed to deliver high-quality sound with a comfortable fit.

One of the main features of the SBC VL1400 is its lightweight design. Weighing in at just a few grams, it is ideal for users who are always on the go. The adjustable headband ensures that the headset sits snugly on the head, providing a secure fit without causing discomfort during prolonged use. The ear cushions are made from soft materials that enhance comfort, making them suitable for extended listening sessions.

In terms of sound quality, the SBC VL1400 utilizes advanced audio technologies to deliver a balanced and immersive listening experience. The headset is equipped with high-performance neodymium drivers, which are known for their ability to produce rich bass tones and clear mid-to-high frequencies. This results in a well-rounded sound profile that appeals to a wide range of musical tastes.

Another noteworthy characteristic of the SBC VL1400 is its foldable design. This feature allows users to easily store the headset when not in use, making it an excellent choice for travel. The compact design fits neatly into backpacks or purses, ensuring that music lovers can take their audio experience with them wherever they go.

The SBC VL1400 also incorporates a universal 3.5mm audio jack, making it compatible with a wide array of devices, including smartphones, tablets, and laptops. This versatility ensures that users can connect to their favorite audio sources seamlessly.

In addition to sound quality and comfort, durability is another vital factor to consider. The materials used in the construction of the SBC VL1400 are robust, designed to withstand the rigors of daily use without compromising on performance. This makes it suitable for both casual listeners and those who require a reliable headset for professional use.

Overall, the Philips SBC VL1400 stands out due to its blend of portability, comfort, and audio performance. It caters to diverse user needs, ensuring that anyone can enjoy high-quality sound on the move. Whether for everyday listening, workouts, or long journeys, the SBC VL1400 proves to be a worthy companion for any audio enthusiast.