DV-656A DV-655A
Important Safety Instructions
For U.S. model
Important Notice
For Canadian model
Operating Environment H045En
On the bonnet of the unit
CD-R/RW Compatibility
Contents
Connecting using the multichannel analog
Setting/changing the CountryCode
Creating your own progressive output
Before You Start Features
Picture zoom interlace output only
Before You Start What’s in the box
Putting the batteries in the remote control
Using the remote control
Photo CD / DVD-RAM / DVD-ROM
CD-ROM
Before You Start
CDs, SACDs and Video CD/Super VCDs are divided into tracks
Digital Audio OUT Optical / Coaxial
Connecting Up Rear panel
Control in / OUT
Video OUT
Connecting Up Easy connections
Connecting using the component video output
Connecting Up Using other types of video output
Connecting using an S-Video output
Connecting Up
Connecting for multichannel surround sound
Connecting using a digital output
Digital Optical
Controlling this player from another Pioneer component
OPEN/CLOSE
Controls and Displays Front panel
STANDBY/ON
Controls and Displays
About progressive scan video
GRP TRK
Part
Prgsve
Remain
Audio
Remote control
Setup
Subtitle
14 0 OPEN/CLOSE
Play Mode
Surround
Angle
Getting Started Switching on
Let’s Get Started
Press Enter again to finish setting up
Getting Started
Select ‘Setup Navigator’
Getting Started Using the on-screen displays
Setting up with the Setup Navigator
Select a DVD language
Did you connect this player to an AV receiver?
Congratulations, setup is complete
Press 0 OPEN/CLOSE to open the disc tray
Getting Started Playing discs
Basic playback controls
Press 3 play to start playback
Stops playback
Front panel controls
DVD disc menus
¢ Skips to the next track or chapter
Numbers
Video CD/Super VCD PBC menus
TOP Menu
Why won’t the disc I loaded play?
Some MP3 tracks don’t show up. Where are they?
Disc may have been illegally copied
Using the Disc Navigator to browse the contents of a disc
Playing Discs Introduction
Scanning discs
To resume normal playback, press Play
Press repeatedly to change the slow motion speed
Playing in slow motion
Frame advance/frame reverse
Slow motion speed is displayed on- screen
Press Enter on ‘AStart Point’ to set the loop start point
Using repeat play
Playing Discs Looping a section of a disc
Press Enter on ‘BEnd Point’ to set the loop end point
Using random play
Random Title Random Chapter Random Off
Creating a program list
Select a random play option
Random Group Random Track Random Off
Select ‘Create/Edit’ from the list of program options
Repeat to build up a program List
Editing a program list
To play the program list, press
Other functions available from the program menu
Select a search mode
Searching a disc
Select a program play function
Press Subtitle repeatedly to select a subtitle option
Switching subtitles
Press Enter to start playback
Switching DVD-RW audio channel
Playing Discs Switching DVD-Video audio language
Switching DVD-Audio audio channel
Switching camera angles
Playing Discs Zooming the screen
Super VCD displays
Playing Discs Displaying disc information
During PBC playback only
MP3 disc displays
Audio Settings Menu Audio DRC
Audio Settings Menu Virtual Surround
Audio Settings Menu Channel Level
Use the / buttons cursor left/ right to select a preset
Video Settings Menu Video Adjust
Creating your own interlace output presets
Select one of the Memory presets see above
Ajust the picture quality settings
Video Settings Menu
Creating your own progressive output presets
Digital Out
Initial Settings Menu Using the Initial Settings menu
Digital Audio Out settings
Dolby Digital Out
Linear PCM Out
Initial Settings Menu
DTS Out
Mpeg Out
Auto Progressive DV-656A only
Video Output settings
TV Screen
Video Out
Still Picture
Language settings
Default setting Auto
Audio Language
Subtitle Language
Auto Language
Subtitle Display
Display settings
DVD Menu Language
OSD Language
Background
Angle Indicator
Options
Screen Saver
Select ‘Password Change’
Select ‘Password’
Use the number buttons to enter a 4- digit password
Enter a new password
Select ‘Country Code’
Use number buttons to enter your password, then press Enter
Select ‘Level Change’
Select a new level
Bonus Group
Auto Disc Menu
Sacd Playback DV-655A only
DVD Playback Mode
Group Playback
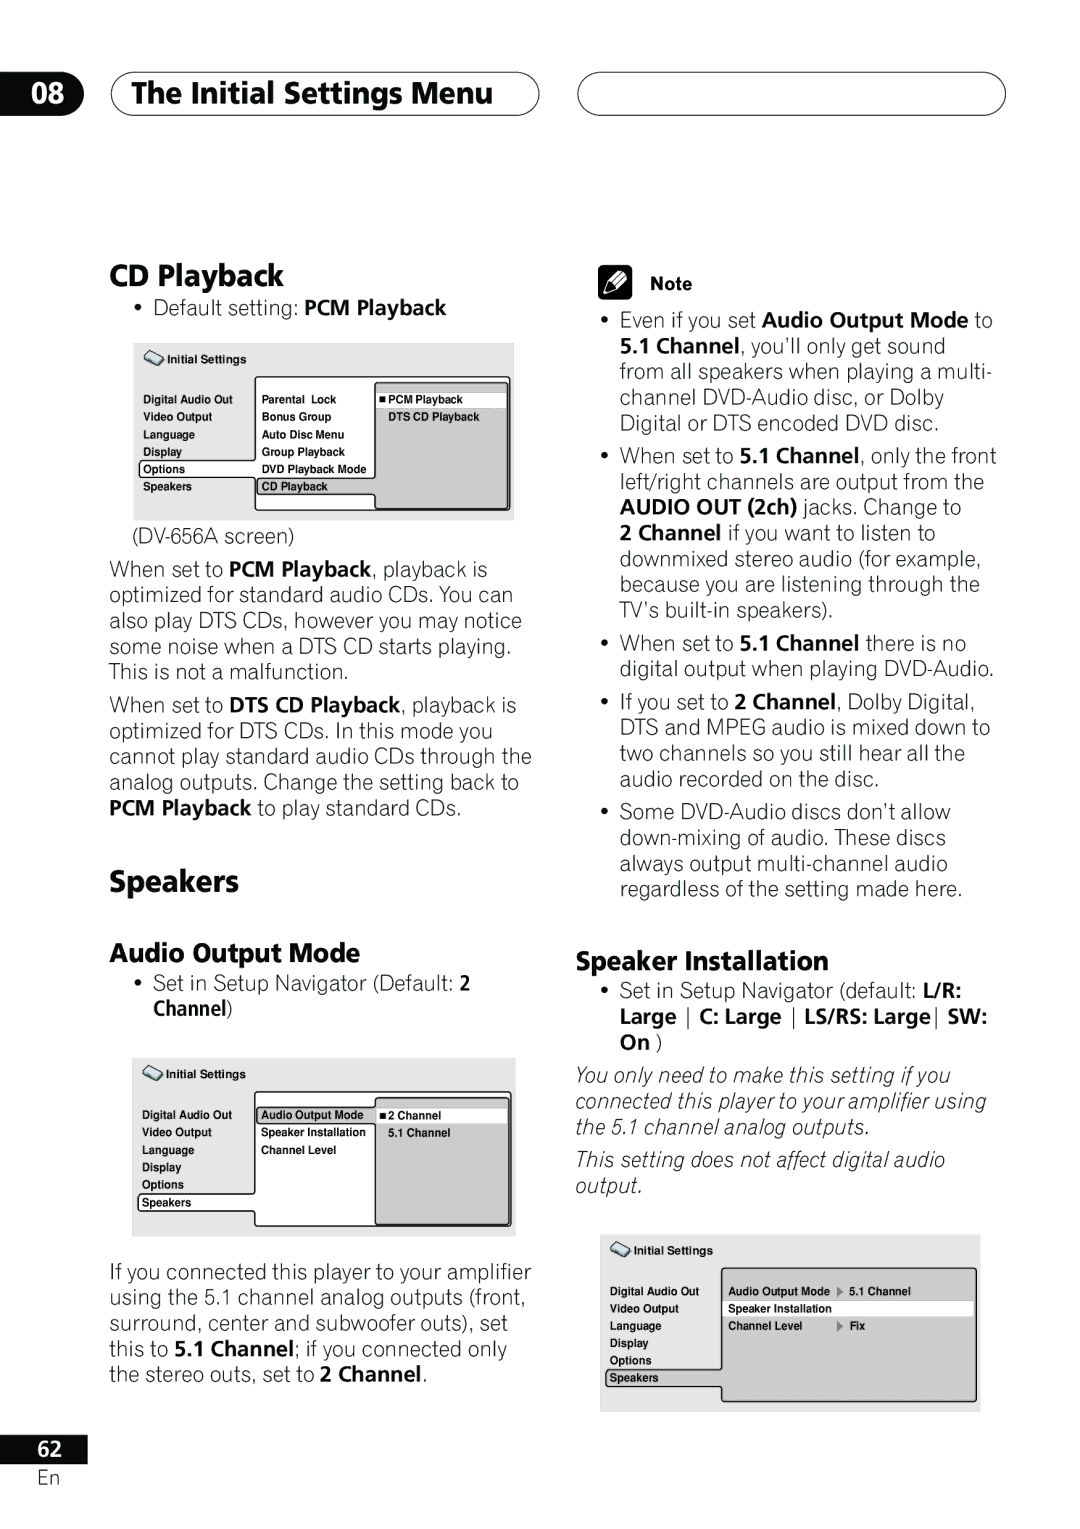
Speaker Installation
Initial Settings Menu CD Playback
Audio Output Mode
Speakers
Default setting Fix
Press cursor right to modify the selected speaker
Auto
Storing discs
Additional Information Taking care of your player and discs
Handling discs
Discs to avoid
Additional Information
Widescreen TV users
Resetting the player
Additional Information Screen sizes and disc formats
Standard TV users
Additional Information About the audio output settings
DTS CD
Language Language code letter, Language code
Additional Information Language code list
Country code list
Country, Country code, Country code letter
MP3
Glossary
DTS
Packed PCM DVD-Audio only
Mpeg audio
Mpeg video
PCM Pulse Code Modulation
Use the / / / cursor up/down
TV system changes as follows
Additional Information Setting the TV System
Watching Ntsc on a PAL TV
Auto = Ntsc Ntsc = PAL PAL = Auto
Additional Information Troubleshooting
Screen is stretched or aspect does not change
No picture/No color
Video OFF button
No audio, or audio is dis
Analog audio is OK, but
Audio signal
CD volume
Output
VCD disc is not output
Make sure that Audio Output Mode is set to 2 Channel
Won’t play
Properly
Other terminals
Additional Information Specifications
General
Additional Information
TPTZW/02D00001 Printed