DV-F07
Important Safety Instructions
Information to User
Important Notice
For U.S. and Canadian models
For Canadian model
Hi-bit Legato Link Conversion
Features of This Player
State of the art digital audio and video
Digital Noise Reduction Video Quality Enhancement
Easy text input
Easy setup and adjustment using on-screen menus
New graphical control and disc management
Connection to another disc changer for increased capacity
How to Proceed in This Manual
Differences in Disc Composition
Table of Contents
Preparing the Remote Control
Before Using
Checking Accessories
Inserting batteries into the remote control
Front Panel
Using
Names Functions
Names
Display Window
Names and Functions
Remote Control
Multi Dial
JOG Mode button
# SUB Setup button
Dial mode indicator
Search Mode button
Audio OUT jacks
Video Select switch
Interface Connector jack
Audio in jacks
Connection Guide
Connecting Your DVD Player
Connecting two DV-F07 players?
Names
Home Theater Component Connections
Analog Audio Connections
Audio Connections
Digital Audio Connections
Audio OUT
Video OUT
Video Connections
Component Video OUT
System Control Connections
CD-Deck Synchro Connections
Setting Up the Player
Using the Setup Navigator
Setting the TV screen size
Setting the OSD Language On-Screen Display Language
PCM
To exit the Setup screen
Setting compatibility with 96 kHz output
Confirming the settings
To change other player settings in the Setup screen menus
Loading DVDs, Video CDs
Getting Started
Player
CDs into the Player- DVD/Video CD/CD
To load a 3 inch 8 cm CD
Playing DVDs, Video CDs
To play a disc
To remove discs from the rack
To navigate a menu screen
When a menu screen is displayed
To open or return to the DVD or Video CD menu screen
Turning PBC Playback Control on and off
Play Mode
Selecting a disc in the disc rack Selecting a play mode
Press Play Mode repeatedly to select one of the play modes
To create and select one of the custom play modes
Skipping back to the previous chapter track
Getting Started Using Your DVD Player
Advancing to the next chapter track
Fast forward scanning
Press Single Loader Play on the front
Press Single Loader Access on the front panel
Panel
You stopped -- DVD/Video CD
Stopping Playback Switching Power Off
Resuming playback from where
About the Last Disc Memory function
Next ¢ ¡ ¢on the front panel to
Press SUB Setup
Input the title of the disc and the artist’s name
Proceed to the next disc
To cancel All Update
To performing Add. Update using controls on the front panel
To cancel Add. Update
Inputting and Changing Text Information
Repeat steps 6 to 8 to complete the artist’s name
Inputting characters using the remote control
When a disc already contain text information
To clear text that has been entered
Inputting characters using a PS/2* compatible keyboard
Inputting characters using controls on the front panel
Clear
Click both mouse buttons at the same time
Inputting characters using a PS/2* compatible mouse
To use a connected keyboard for other player functions
Click on the characters you want to select
Searching for a Disc, Title, Chapter, Track, or Location on
Press Search Mode repeatedly during
Selecting a Disc On-Screen
Disc DVD/Video CD/CD
Press Search Mode
Searching for a disc by format, title, or artist name
To create and select custom files
To perform a disc search using controls on the front panel
Creating and Selecting Custom Files
Press Text Search
To input a name for the custom file
To select a custom file using controls on the front panel
To remove a disc from the custom file
To add the currently playing disc to a custom file
Options available for each setting appear to
Video Settings
Press STANDBY/ON on the front panel Press Setup
Move the cursor control joystick down to enter the menu
Settings Expert
Changing to the Setup Screen Expert Menu Mode
Setup screen closes
Basic
DTS Out
Adjusting Audio and Video Settings
Dolby Digital Out
KHz PCM Out
Setting the position of the on-screen display Expert
Adjusting the OSD On-Screen Display
Setting the on-screen display OSD language
Turning the Digital Output On and Off Expert
Settings 43 Letter Box Pan & Scan Wide
Setting the TV Screen Size
Differences in screen sizes and DVD formats
DVD
Setting Language Options
Selecting a Subtitle Language Multi-Language Subtitles
Press Subtitle repeatedly during playback
Changing Audio Type Video CD/CD
Setting the Language Options
Changing the Audio Language Multi-Language Function DVD
Press Audio repeatedly to select the desired language
Selecting a subtitle language preference
Preferences in the Setup Screen Menus
Selecting an audio language preference
French Spanish
Selecting a DVD menu language preference Expert
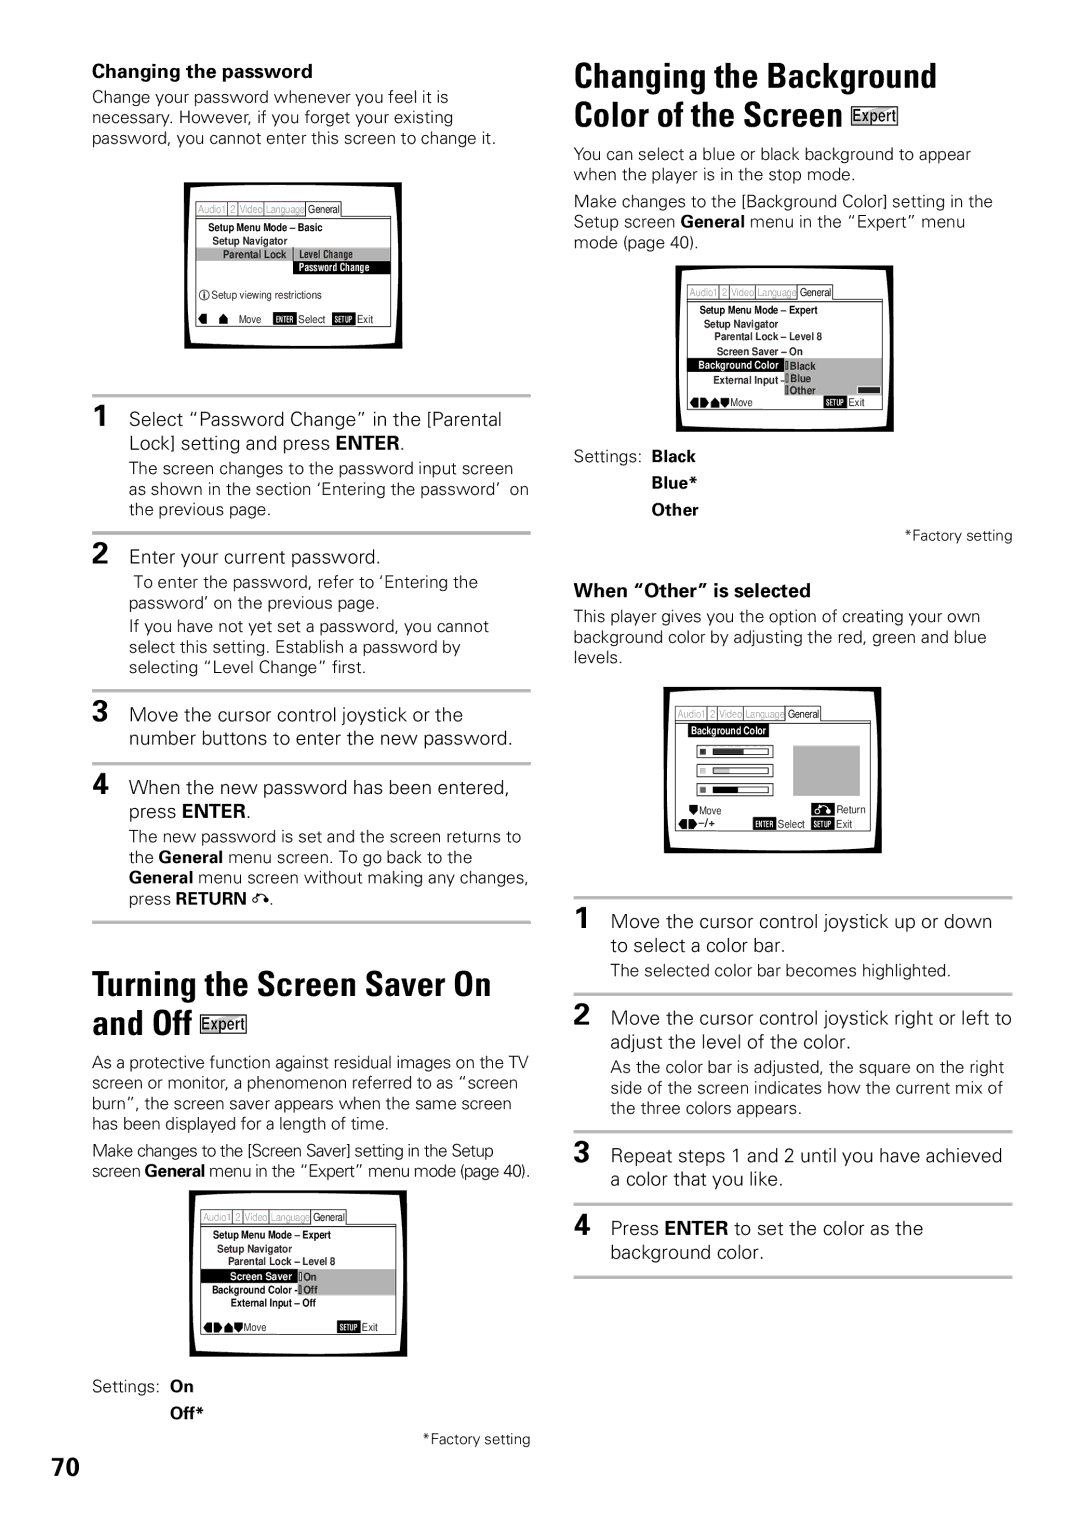
When Other is selected
Move the cursor control joystick to select Other
Off Assist Subtitle
Settings With Audio
Selecting the language of forced subtitles Expert
Selected Subtitle
Advanced Functions
Adjusting the Dynamic Range of the Audio Soundtrack DVD
Settings Large
VDD/TruSurround
DVD/Video CD
Adjusting the Video Quality Digital Noise Reduction
Selecting a preprogrammed setting
Press DNR
To display all of the settings at once
Adjusting the picture quality settings
Repeat steps 3 and 4 to make adjustments to other settings
Display
Viewing slow playback
Still Frame/Slow Play/Frame Advance Playback DVD/Video CD
Viewing a still frame
Selecting the type of paused image to display Expert
Press JOG Mode
Manual scanning using the Jog
Mode DVD/Video CD
Speeds DVD/Video CD
Press Angle during playback
Turning the angle indicator on
Viewing from a Desired Camera Angle Multi-Angle
Angle
Repeat play of a specified section
Repeat play of a chapter/track
Repeat play of a title/disc
Return to a specified location on a disc
Random playback in Single play mode
Programming
Playback in a Desired Order
Program Play DVD/Video CD/CD
To repeat the contents of a program
To confirm the contents of a program
To change the contents of a program
To add to a program
To erase a step in the Best play program
To cancel Best play
To add a title, chapter, or track to the Best play program
To perform Best play
Previewing Discs Current Play Mode Hi-Lite Scan Video CD/CD
Reviewing Previously Played Discs Previous Scan
Press Last Memory during play
Resuming playback from where Last Memory was pressed
Memorizing a Last Memory location to return to later
Press Last Memory
Following 6 settings are memorized
When a disc that has memorized settings is played
Clearing the memorized settings
Press Condition Memory during playback
Memorizing Regularly Used Menu Settings Function
Viewing Disc Information
DVD
Video CD with PBC turned off
CD/Video CD
Analog audio connections
Digital audio connections
Getting both players set up
Video connections
Video
Selecting External Input Expert
Audio
Audio and Video
Entering the password
When a DVD with a set Parental Lock level is played
Setting the Parental Lock level
Turning the Screen Saver On and Off Expert
Changing the password
Enter your current password
Changing the Background Color of the Screen Expert
Additional Information
Disc Care
For Proper and Long Use of This Unit
Language Code List
Language Input-code
Troubleshooting
Slave DV-F07 does not operate when connected
Resetting the Player to System Settings
Remote control operation is not possible
Condition Memory are cleared, and all Setup screen
CD Text
Terms
DTS
Mpeg
MASTER-SLAVE Control
PCM
Specifications
EIA
Listening
99L00ZF0G00