Installation

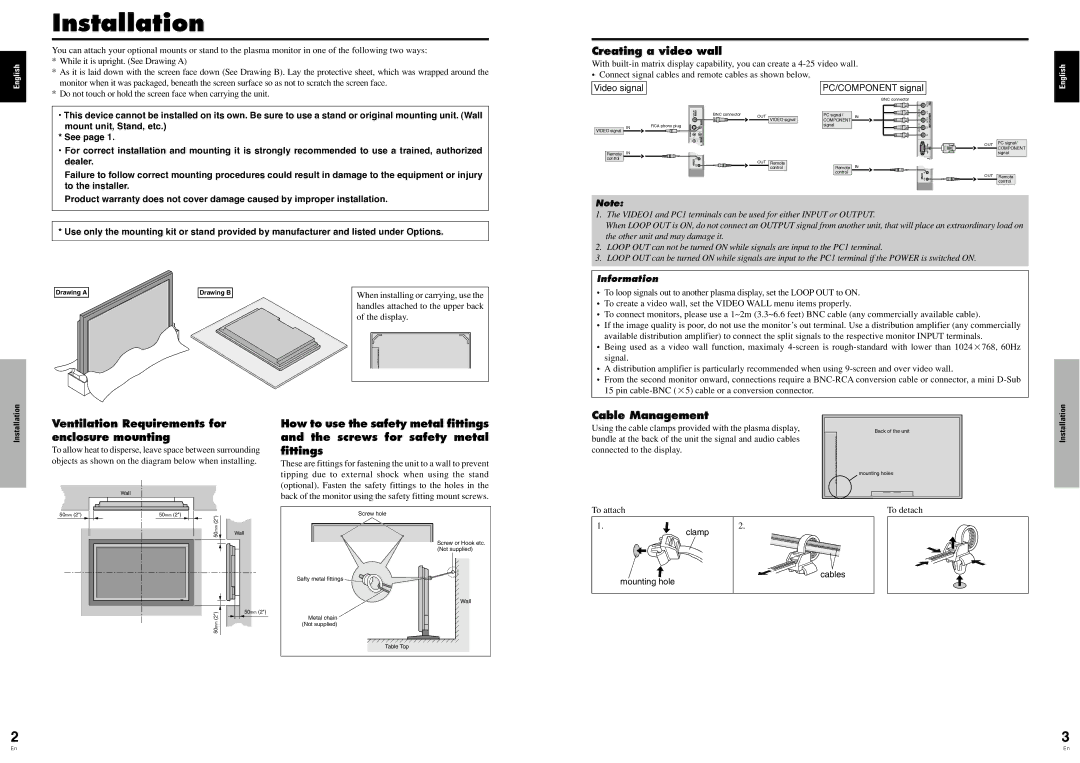
You can attach your optional mounts or stand to the plasma monitor in one of the following two ways: * While it is upright. (See Drawing A)

English

* As it is laid down with the screen face down (See Drawing B). Lay the protective sheet, which was wrapped around the

monitor when it was packaged, beneath the screen surface so as not to scratch the screen face.

Creating a video wall

With built-in matrix display capability, you can create a 4-25 video wall.

• Connect signal cables and remote cables as shown below.

English

* Do not touch or hold the screen face when carrying the unit.

This device cannot be installed on its own. Be sure to use a stand or original mounting unit. (Wall mount unit, Stand, etc.)

* See page 1.

• For correct installation and mounting it is strongly recommended to use a trained, authorized

dealer.

Failure to follow correct mounting procedures could result in damage to the equipment or injury

to the installer.

Product warranty does not cover damage caused by improper installation.

Video signal

IN

RCA phono plug

VIDEO signal


Remote IN


control


PC/COMPONENT signal


BNC connector

BNC connector

OUT


PC signal/

IN


VIDEO signal

COMPONENT


signal


OUT


OUT

Remote


IN


control

Remote


control

OUT


PC signal/

COMPONENT signal

Remote control

* Use only the mounting kit or stand provided by manufacturer and listed under Options.

Drawing A


Drawing B


When installing or carrying, use the


handles attached to the upper back


of the display.


Note:

1. The VIDEO1 and PC1 terminals can be used for either INPUT or OUTPUT.

When LOOP OUT is ON, do not connect an OUTPUT signal from another unit, that will place an extraordinary load on the other unit and may damage it.

2.LOOP OUT can not be turned ON while signals are input to the PC1 terminal.

3.LOOP OUT can be turned ON while signals are input to the PC1 terminal if the POWER is switched ON.

Information

To loop signals out to another plasma display, set the LOOP OUT to ON.

To create a video wall, set the VIDEO WALL menu items properly.

To connect monitors, please use a 1~2m (3.3~6.6 feet) BNC cable (any commercially available cable).

If the image quality is poor, do not use the monitor’s out terminal. Use a distribution amplifier (any commercially available distribution amplifier) to connect the split signals to the respective monitor INPUT terminals.

Being used as a video wall function, maximaly 4-screen is rough-standard with lower than 1024768, 60Hz signal.

A distribution amplifier is particularly recommended when using 9-screen and over video wall.

From the second monitor onward, connections require a BNC-RCA conversion cable or connector, a mini D-Sub 15 pin cable-BNC (5) cable or a conversion connector.

Installation

Ventilation Requirements for enclosure mounting

To allow heat to disperse, leave space between surrounding objects as shown on the diagram below when installing.

Wall

How to use the safety metal fittings and the screws for safety metal fittings

These are fittings for fastening the unit to a wall to prevent tipping due to external shock when using the stand (optional). Fasten the safety fittings to the holes in the back of the monitor using the safety fitting mount screws.

Cable Management

Using the cable clamps provided with the plasma display, bundle at the back of the unit the signal and audio cables connected to the display.

Back of the unit

Installation


mounting holes


50mm (2")


50mm (2")


(2")


50mm


Wall


50mm (2") (2")mm 50

Screw hole

Safty metal fittings

Metal chain (Not supplied)

Screw or Hook etc. (Not supplied)

Wall

To attach

To detach

1.

2.


clamp

cables mounting hole

Table Top

2

3

En

En

Page 6
Image 6
Pioneer PDP-614MX Installation, Creating a video wall, Ventilation Requirements for enclosure mounting, Cable Management

PDP-614MX specifications

The Pioneer PDP-614MX is a notable plasma display panel that emerged in the early 2000s, reflecting the cutting-edge technology of its time. With a screen size of 61 inches, it became a significant choice for consumers seeking a large-format display for both home theaters and professional environments.

One of the standout features of the PDP-614MX is its impressive resolution. Boasting a native resolution of 1,024 x 768 pixels, the display delivers a clear and vibrant picture quality, which was particularly remarkable at its launch. The use of plasma technology allowed for deeper blacks and an expansive color gamut, making images appear more lifelike and immersive.

The PDP-614MX also introduced advancements in contrast ratio and brightness, contributing to an enhanced viewing experience. With a contrast ratio of 3000:1, it was able to handle a diverse range of lighting situations, from bright living rooms to darker home theaters. This feature was particularly appreciated in high-definition content playback, where sharp contrasts and rich colors are essential.

In terms of connectivity, the PDP-614MX provided a variety of inputs, including HDMI and component video, ensuring compatibility with multiple devices such as DVD players, gaming consoles, and cable boxes. This versatility was crucial for users looking to integrate the display into existing home entertainment systems seamlessly.

Another significant characteristic of the PDP-614MX was its design. The sleek, modern aesthetics complemented contemporary home décor, making it a visually appealing option. Its lightweight structure also allowed for easier installation and mounting, which was a boon for consumers who wanted to optimize their viewing space.

Pioneer's commitment to durability and longevity was evident in the construction of the PDP-614MX. With a lifespan of around 60,000 hours, users could expect years of reliable service. In addition, features such as anti-image retention technology helped to minimize the risk of burn-in, a common issue with older plasma displays.

Overall, the Pioneer PDP-614MX was a remarkable product for its time, combining advanced plasma technology with practical design and user-friendly features. Its rich picture quality, extensive connectivity options, and thoughtful construction made it a desirable choice for those looking to take their viewing experience to the next level.