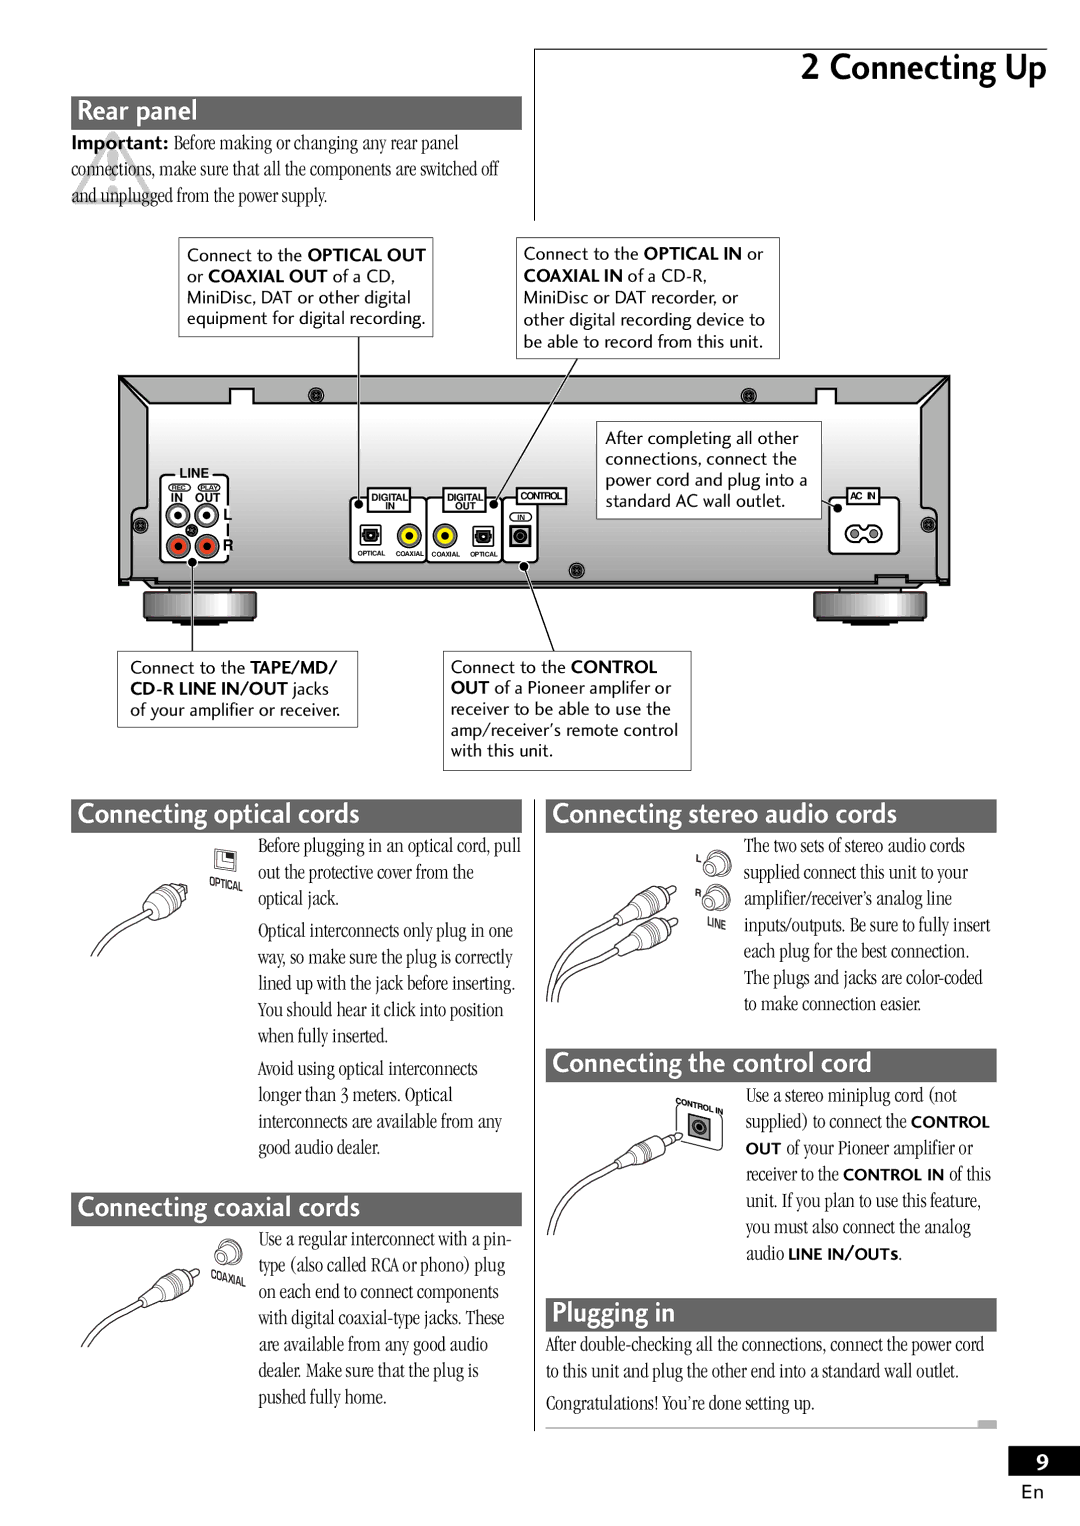
Rear panel

Important: Before making or changing any rear panel connections, make sure that all the components are switched off and unplugged from the power supply.

2 Connecting Up

Connect to the OPTICAL OUT


Connect to the OPTICAL IN or

or COAXIAL OUT of a CD,


COAXIAL IN of a CD-R,

MiniDisc, DAT or other digital


MiniDisc or DAT recorder, or

equipment for digital recording.


other digital recording device to


be able to record from this unit.


After completing all other


LINE


connections, connect the


power cord and plug into a


REC

PLAY


IN

OUT

DIGITAL

DIGITAL

CONTROL

standard AC wall outlet.

AC IN


IN


OUT


L


IN


R

COAXIAL

COAXIAL OPTICAL


OPTICAL


Connect to the TAPE/MD/


Connect to the CONTROL

CD-R LINE IN/OUT jacks


OUT of a Pioneer amplifer or

of your amplifier or receiver.


receiver to be able to use the


amp/receiver's remote control


with this unit.


Connecting optical cords


Before plugging in an optical cord, pull

OPTICAL

out the protective cover from the

optical jack.


Optical interconnects only plug in one way, so make sure the plug is correctly lined up with the jack before inserting. You should hear it click into position when fully inserted.

Avoid using optical interconnects longer than 3 meters. Optical interconnects are available from any good audio dealer.

Connecting coaxial cords


Use a regular interconnect with a pin-

COAXIAL

type (also called RCA or phono) plug

on each end to connect components


with digital coaxial-type jacks. These


are available from any good audio


dealer. Make sure that the plug is


pushed fully home.

Connecting stereo audio cords

The two sets of stereo audio cords supplied connect this unit to your amplifier/receiver’s analog line

LINE

inputs/outputs. Be sure to fully insert


each plug for the best connection.


The plugs and jacks are color-coded


to make connection easier.

Connecting the control cord

Use a stereo miniplug cord (not supplied) to connect the CONTROL OUT of your Pioneer amplifier or receiver to the CONTROL IN of this unit. If you plan to use this feature, you must also connect the analog audio LINE IN/OUTs.

Plugging in

After double-checking all the connections, connect the power cord to this unit and plug the other end into a standard wall outlet.

Congratulations! You’re done setting up.

9

En

Page 9
Image 9
Pioneer PDR-W839 Rear panel, Connecting optical cords, Connecting coaxial cords, Connecting stereo audio cords, Plugging

PDR-W839 specifications

The Pioneer PDR-W839 is a sophisticated component designed for audio enthusiasts who appreciate the nostalgia and warmth of CD recording and playback technology. This versatile CD recorder combines advanced digital audio technology with user-friendly features, making it an appealing addition to any home audio setup.

One of the standout features of the PDR-W839 is its ability to easily record from various sources, such as vinyl records, cassette tapes, or even through external microphones. The device is equipped with a high-quality analog-to-digital converter, which ensures that recordings maintain their integrity, capturing every nuance and detail of the audio source. This feature positions the PDR-W839 as an excellent tool for archiving old audio content into modern formats.

The PDR-W839 supports a wide range of CD formats, including CD-R and CD-RW, allowing users to create permanent or rewritable discs based on their needs. The process of recording is streamlined through an intuitive interface that allows for easy track selection and disc management. Users can easily edit tracks or create seamless transitions between songs, offering a personalized touch to their recordings.

Another notable characteristic is its dual digital audio inputs, including optical and coaxial connections, enabling users to connect various digital devices for high-fidelity recording. This ensures that recordings capture the best possible sound quality, minimizing any loss during the transfer process.

In terms of playback, the Pioneer PDR-W839 boasts robust sound quality, with support for various playback formats. The device features advanced error correction technology, ensuring smooth playback even when the discs are less than perfect. Users can enjoy their recordings with clarity, experiencing music as it was meant to be heard.

Additionally, the PDR-W839 is equipped with a convenient LCD display that provides essential information during operation, such as track number and remaining time. The user-friendly remote control allows for easy navigation through menus and settings, offering flexibility in how users interact with their audio library.

Overall, the Pioneer PDR-W839 stands out for its combination of high-quality recording capabilities, multiple connectivity options, and user-friendly design. This makes it an invaluable asset for anyone looking to preserve and enjoy their audio collections in a modern format.