Connecting up

Connecting antennas

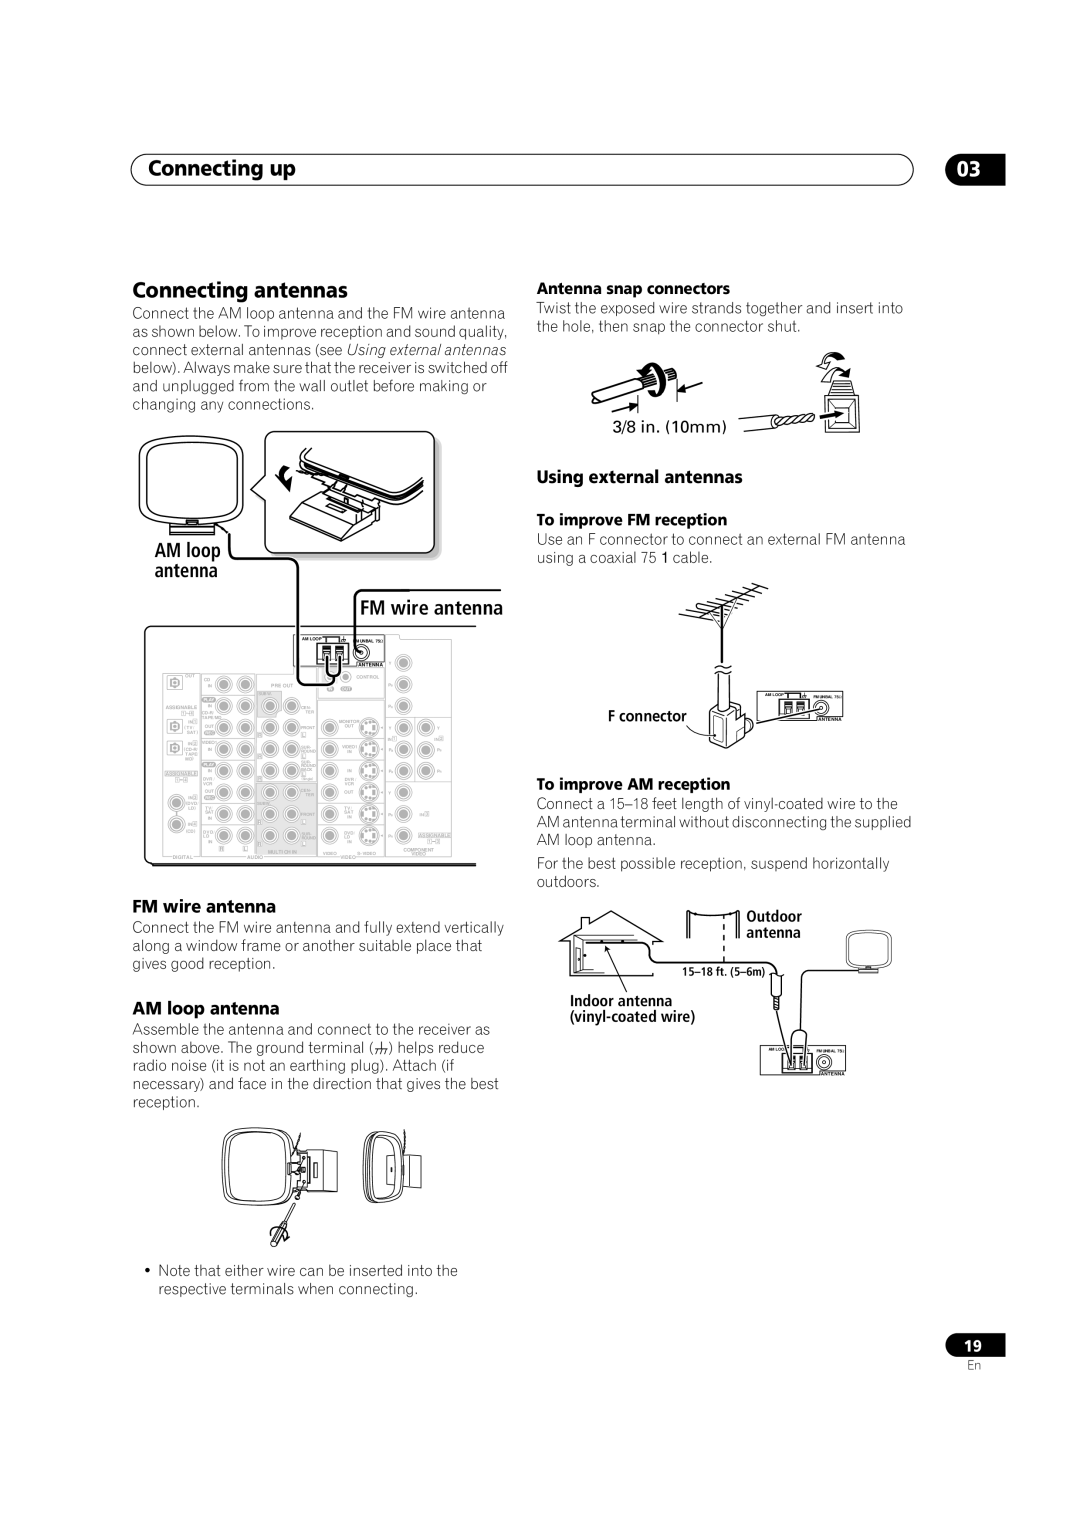
Connect the AM loop antenna and the FM wire antenna as shown below. To improve reception and sound quality, connect external antennas (see Using external antennas below). Always make sure that the receiver is switched off and unplugged from the wall outlet before making or changing any connections.

AM loop antenna

FM wire antenna

03

Antenna snap connectors

Twist the exposed wire strands together and insert into the hole, then snap the connector shut.

3/8 in. (10mm)

Using external antennas

To improve FM reception

Use an F connector to connect an external FM antenna using a coaxial 75cable.

OUT

ASSIGNABLE

14

IN 1

(TV/ SAT )

IN 2

(CD-R/ TAPE/ MD)

ASSIGNABLE

1 4

IN 3

(DVD/ LD)

IN 4

(CD)

DIGITAL


AM LOOP

FM UNBAL 75


ANTENNA

Y


CD


CONTROL


IN


PRE OUT

IN

OUT

PB


SUBW.


PLAY


IN


CEN-


PR


CD-R/


TER


TAPE/MD


MONITOR


OUT


FRONT

OUT

Y


Y

REC


R

L


IN 1


IN 2

VIDEO1


IN


SUR-

VIDEO1

PB


PB


ROUND

IN


R

L


PLAY


SUR-


ROUND


IN


BACK

IN

PR


PR

DVR /


R

L


(Single)

DVR /


VCR


VCR


OUT


CEN-

OUT

Y


REC


TER


TV/


SUBW.


TV/


SAT


FRONT

SAT

PB

IN 3


IN


IN


R

L


DVD/


SUR-

DVD/


ASSIGNABLE

LD


ROUND

LD

PR

IN


R

L

IN


1

3

R

L


MULTI CH IN

VIDEO

S-VIDEO


COMPONENT


VIDEO


AUDIO


VIDEO


AM LOOP

FM UNBAL 75

F connector


ANTENNA

To improve AM reception

Connect a 15–18 feet length of vinyl-coated wire to the AM antenna terminal without disconnecting the supplied AM loop antenna.

For the best possible reception, suspend horizontally outdoors.

FM wire antenna

Connect the FM wire antenna and fully extend vertically along a window frame or another suitable place that gives good reception.

AM loop antenna

Assemble the antenna and connect to the receiver as shown above. The ground terminal ( ) helps reduce radio noise (it is not an earthing plug). Attach (if necessary) and face in the direction that gives the best reception.

Note that either wire can be inserted into the respective terminals when connecting.

Outdoor antenna

15–18 ft. (5–6m)

Indoor antenna (vinyl-coated wire)

AM LOOP

FM UNBAL 75

ANTENNA

19

En

Page 19
Image 19
Pioneer VSX-1015TX Connecting up Connecting antennas, AM loop antenna, Using external antennas, FM wire antenna

VSX-1015TX specifications

The Pioneer VSX-1015TX is a distinguished piece of audio equipment that caters to enthusiasts seeking an all-encompassing home theater experience. Launched in the mid-2000s, this receiver combines advanced technology with usability, making it a popular choice among music and movie aficionados.

One of the defining features of the VSX-1015TX is its robust multi-channel surround sound system. It supports up to 7.1 channels, allowing users to fully immerse themselves in their favorite films, games, and music. With a power output of 110 watts per channel, it delivers rich sound quality across various formats, enhancing the auditory experience.

The VSX-1015TX is equipped with Dolby Digital and DTS decoding, providing a comprehensive sound stage that captures every detail. Its Multi-Channel Acoustic Calibration System (MCACC) optimizes audio output based on the physical characteristics of your room. This feature intelligently analyzes the acoustics and adjusts the speakers to achieve balanced sound, ensuring that listeners receive the best audio experience possible.

Furthermore, the receiver supports many audio and video formats, including MPEG, WMA, and MP3, making it versatile for different media sources. The inclusion of HDMI inputs allows for high-definition video and audio transmission, simplifying connectivity with modern devices like Blu-ray players and gaming consoles.

Another notable characteristic of the VSX-1015TX is its user-friendly interface. The on-screen display and remote control make navigating through settings and configurations straightforward. Users can easily switch between different audio sources and adjust sound parameters to suit their preferences.

Additionally, this model is designed with several speaker configurations in mind, allowing for flexible setups. Whether you are using conventional speakers or opting for surround sound systems, the VSX-1015TX caters to various configurations, making it suitable for different home theater environments.

The Pioneer VSX-1015TX also emphasizes build quality and durability, ensuring that it can withstand the rigors of regular use while maintaining performance levels. With its blend of advanced features, streamlined usability, and robust sound performance, the VSX-1015TX remains a cherished option for those looking to enhance their audio-visual experiences at home.