Pioneer VSX-90TXV operating instructions Other connections Connecting an IR receiver

Models: VSX-90TXV

1 78
Download 78 pages 62.82 Kb
Page 52
Image 52

08Other connections

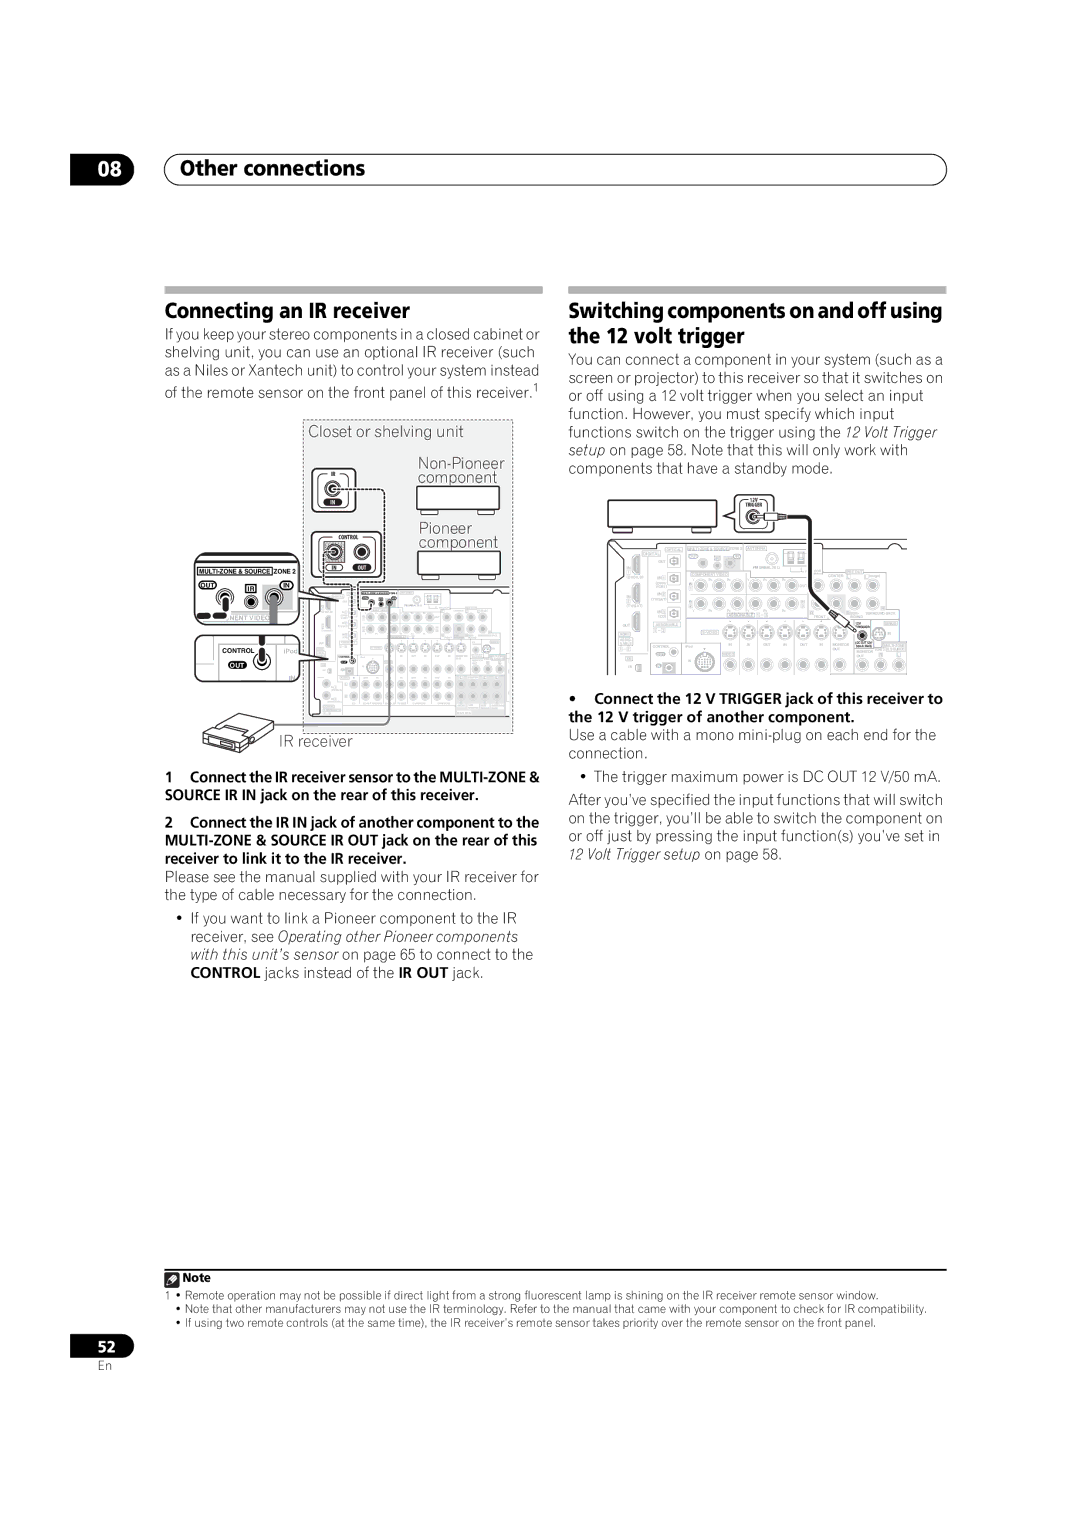
Connecting an IR receiver

If you keep your stereo components in a closed cabinet or shelving unit, you can use an optional IR receiver (such as a Niles or Xantech unit) to control your system instead

of the remote sensor on the front panel of this receiver.1

Closet or shelving unit

Non-Pioneer

IRcomponent


IN


Pioneer


CONTROL


component


MULTI-ZONE & SOURCE ZONE 2

IN


OUT


ANTENNA


OUT

IR

IN


MULTI-ZONE & SOURCE ZONE 2

ANTENNA


OPTICAL


DIGITAL


OUT

IR

IN


OUT


IN


AM LOOP


PRE OUT


1


COMPONENT VIDEO


CENTER


(Single)


(DVD/LD)


IN 1


L

L

L


Y

P

P

Y

P

P


COMPONENT VIDEO


(DVR/


IN


OUT


VCR1)


IN 2


1


IN


2

(TV/SAT)


IN


IN


(TV/SAT)


2


3


R


IN 3


Y

P

P

Y

P

P


R

SUB

R SUR-


(CD)


ASSIGNABLE 1

3


FRONT WOOFER

ROUND


OUT

ASSIGNABLE


12V


SIRIUS


TRIGGER


CONTROL

iPod

HDMI

1

3


S-VIDEO


IN


ASSIG-


(DC OUT 12V/


NABLE


MULTI-ZONE


CONTROL


iPod


IN

IN

OUT

IN

OUT

IN

MONITOR 50mA MAX)


1 2


OUT


VIDEO


OUT

MONITOR ZONE 2 & SOURCE


OUT


XM


OUT


R

L


IN


IN


IN


IN


AUDIO

IN

OUT

IN

IN

IN

OUT

IN

OUT

IN

L

CENTER


L

L


L


IN 1

(DVD/LD)

IN 2

R


(DVR/VCR2)

CD

CD-R/TAPE/MD DVD/LD TV/SAT

DVR/VCR1

DVR/VCR2

R

R

R

COAXIAL


FRONT SUB

SUR-

SURROUND


WOOFER

ROUND

BACK

ASSIGNABLE


MULTI CH IN


1 2


IR receiver

1Connect the IR receiver sensor to the MULTI-ZONE & SOURCE IR IN jack on the rear of this receiver.

2Connect the IR IN jack of another component to the MULTI-ZONE & SOURCE IR OUT jack on the rear of this receiver to link it to the IR receiver.

Please see the manual supplied with your IR receiver for the type of cable necessary for the connection.

If you want to link a Pioneer component to the IR receiver, see Operating other Pioneer components with this unit’s sensor on page 65 to connect to the CONTROL jacks instead of the IR OUT jack.

Switching components on and off using the 12 volt trigger

You can connect a component in your system (such as a screen or projector) to this receiver so that it switches on or off using a 12 volt trigger when you select an input function. However, you must specify which input functions switch on the trigger using the 12 Volt Trigger setup on page 58. Note that this will only work with components that have a standby mode.

12V

TRIGGER


OPTICAL

MULTI-ZONE & SOURCE ZONE 2

ANTENNA


DIGITAL

OUT


IN


OUT

IR


IN


AM LOOP


PRE OUT


1


COMPONENT VIDEO


CENTER

L (Single)


(DVD/LD)

IN 1


L

L


Y

PB

PR

Y


PB

PR


(DVR/

IN


OUT


VCR1)

1


IN


IN 2


(TV/SAT)


2

IN


IN


(TV/SAT)


2


3


R


IN 3

Y

PB

PR

Y


PB

PR


R


R SUR-


ASSIGNABLE

1

3


SURROUND BACK


(CD)


FRONT


ROUND


OUT

ASSIGNABLE


12V


SIRIUS


1

3


TRIGGER


HDMI


S-VIDEO


IN


ASSIG-


(DC OUT 12V/


NABLE


IN

IN


OUT

IN

OUT

IN

MONITOR

MULTI-ZONE

CONTROL

iPod


50mA MAX)

1

2


VIDEO


OUT


MONITOR ZONE 2 & SOURCE


XM


OUT


OUT

R

L


IN


IN


IN


Connect the 12 V TRIGGER jack of this receiver to the 12 V trigger of another component.

Use a cable with a mono mini-plug on each end for the connection.

• The trigger maximum power is DC OUT 12 V/50 mA.

After you’ve specified the input functions that will switch on the trigger, you’ll be able to switch the component on or off just by pressing the input function(s) you’ve set in 12 Volt Trigger setup on page 58.

Note

1• Remote operation may not be possible if direct light from a strong fluorescent lamp is shining on the IR receiver remote sensor window.

Note that other manufacturers may not use the IR terminology. Refer to the manual that came with your component to check for IR compatibility.

If using two remote controls (at the same time), the IR receiver’s remote sensor takes priority over the remote sensor on the front panel.

52

En

Page 52
Image 52
Pioneer VSX-90TXV Other connections Connecting an IR receiver, Switching components on and off using the 12 volt trigger

VSX-90TXV specifications

The Pioneer VSX-90TXV is a powerhouse of a receiver that caters to the most discerning audiophiles and home theater enthusiasts. With its robust build and an impressive array of features, this model stands out as a staple in the Pioneer lineup, making it a noteworthy option for anyone looking to enhance their audio experience.

One of the most significant features of the VSX-90TXV is its impressive multi-channel amplification. It offers a powerful output of 135 watts per channel at 8 ohms, ensuring that even the most demanding audio signals are handled with ease. This receiver supports a variety of configurations, including 7.1 channel surround sound, delivering an immersive audio environment that brings movies, music, and gaming to life.

The VSX-90TXV is equipped with advanced surround sound technologies. It supports Dolby TrueHD and DTS-HD Master Audio formats, providing lossless audio that retains the original quality of recordings. The inclusion of Pioneer's proprietary MCACC (Multi-Channel Acoustic Calibration System) allows users to optimize their speaker setup for any room, by analyzing and adjusting the acoustics to provide the best possible sound.

Connectivity is another strong suit of the VSX-90TXV. It features multiple HDMI inputs, allowing for a hassle-free connection to various devices. With support for 4K Ultra HD pass-through and HDR (High Dynamic Range), it ensures that users can enjoy high-quality video along with high-fidelity audio. Additionally, there are plenty of analog and digital inputs for versatility with other audio sources.

Another remarkable aspect of the VSX-90TXV is its compatibility with wireless technologies, including Bluetooth and Wi-Fi. This allows for effortless streaming from a variety of devices, making it simple to enjoy music from smartphones, tablets, and computers. Pioneer's proprietary FireConnect technology also facilitates multi-room audio, allowing music to be played throughout the home in different zones.

Design-wise, the receiver features a sleek, modern aesthetic that blends seamlessly into any home entertainment setup. The intuitive interface and remote control make navigation simple, ensuring that users can easily access all the receiver’s features.

In summary, the Pioneer VSX-90TXV combines powerful amplification, advanced surround sound technology, and versatile connectivity options, making it an ideal choice for anyone looking to elevate their home audio experience. Whether it’s for cinematic thrills or soulful music sessions, this receiver delivers on all fronts.