Additional information

12

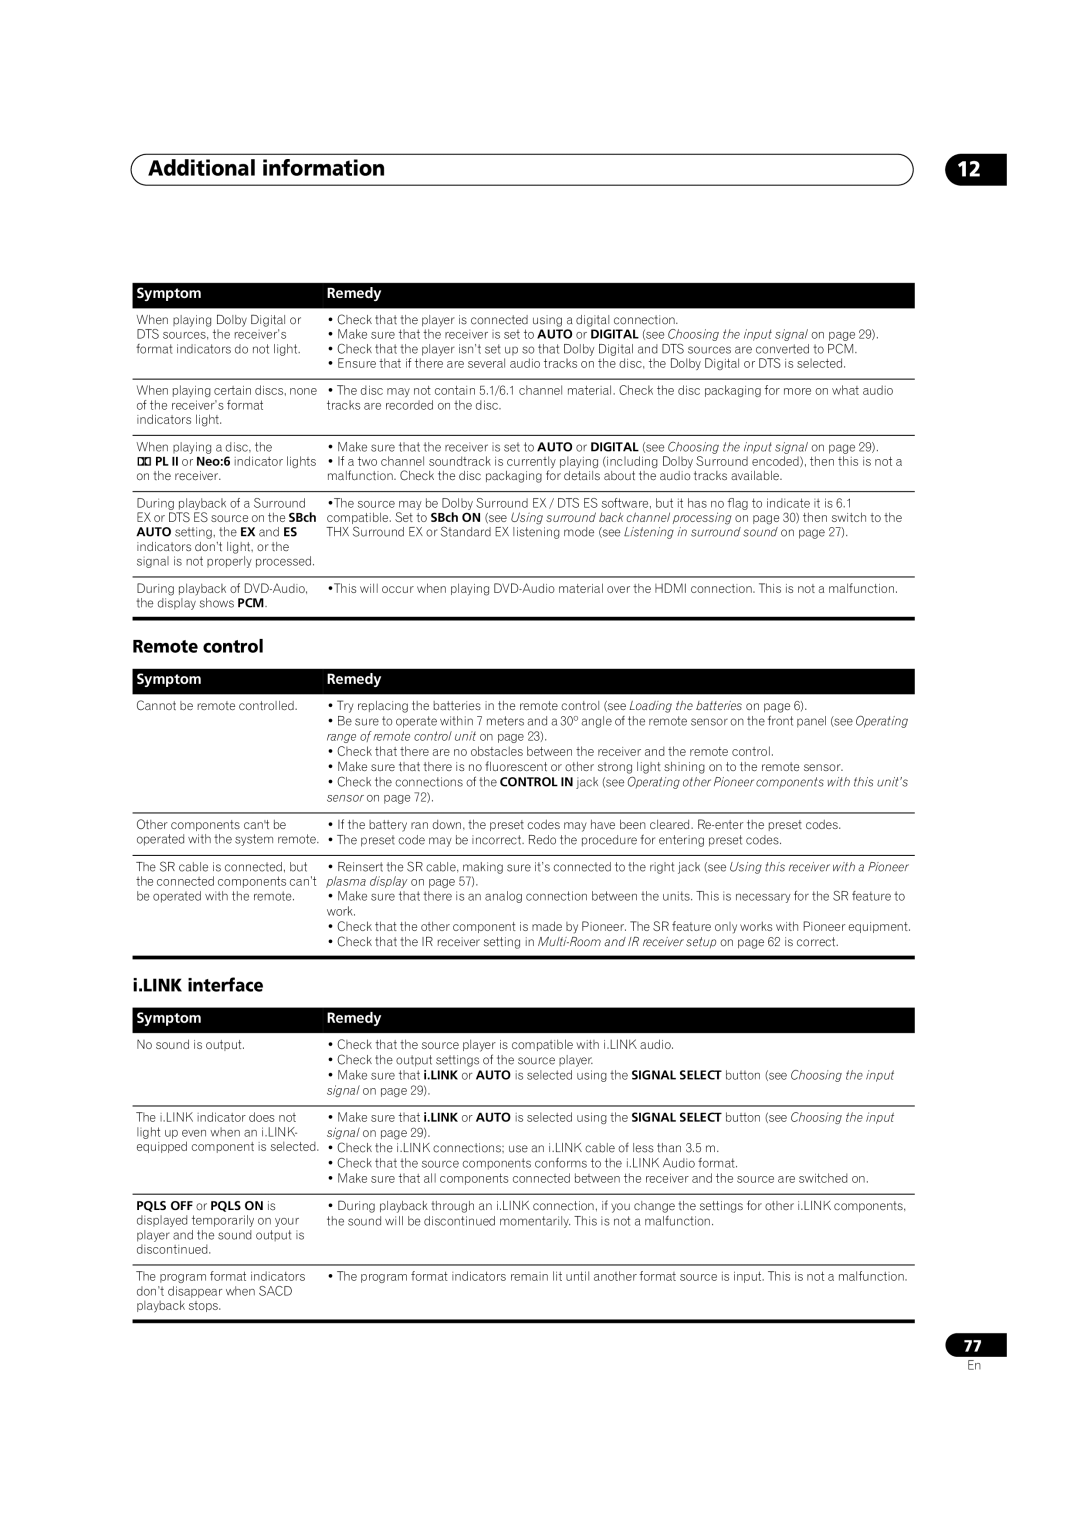
Symptom

Remedy

When playing Dolby Digital or

• Check that the player is connected using a digital connection.

DTS sources, the receiver’s

• Make sure that the receiver is set to AUTO or DIGITAL (see Choosing the input signal on page 29).

format indicators do not light.

• Check that the player isn’t set up so that Dolby Digital and DTS sources are converted to PCM.


• Ensure that if there are several audio tracks on the disc, the Dolby Digital or DTS is selected.


When playing certain discs, none

• The disc may not contain 5.1/6.1 channel material. Check the disc packaging for more on what audio

of the receiver’s format

tracks are recorded on the disc.

indicators light.


When playing a disc, the

• Make sure that the receiver is set to AUTO or DIGITAL (see Choosing the input signal on page 29).

2 PL II or Neo:6 indicator lights

• If a two channel soundtrack is currently playing (including Dolby Surround encoded), then this is not a

on the receiver.

malfunction. Check the disc packaging for details about the audio tracks available.


During playback of a Surround

•The source may be Dolby Surround EX / DTS ES software, but it has no flag to indicate it is 6.1

EX or DTS ES source on the SBch

compatible. Set to SBch ON (see Using surround back channel processing on page 30) then switch to the

AUTO setting, the EX and ES

THX Surround EX or Standard EX listening mode (see Listening in surround sound on page 27).

indicators don’t light, or the


signal is not properly processed.


During playback of DVD-Audio,

•This will occur when playing DVD-Audio material over the HDMI connection. This is not a malfunction.

the display shows PCM.


Remote control

Symptom

Remedy

Cannot be remote controlled.

• Try replacing the batteries in the remote control (see Loading the batteries on page 6).


• Be sure to operate within 7 meters and a 30º angle of the remote sensor on the front panel (see Operating


range of remote control unit on page 23).


• Check that there are no obstacles between the receiver and the remote control.


• Make sure that there is no fluorescent or other strong light shining on to the remote sensor.


• Check the connections of the CONTROL IN jack (see Operating other Pioneer components with this unit’s


sensor on page 72).


Other components can't be

• If the battery ran down, the preset codes may have been cleared. Re-enter the preset codes.

operated with the system remote.

• The preset code may be incorrect. Redo the procedure for entering preset codes.


The SR cable is connected, but

• Reinsert the SR cable, making sure it’s connected to the right jack (see Using this receiver with a Pioneer

the connected components can’t

plasma display on page 57).

be operated with the remote.

• Make sure that there is an analog connection between the units. This is necessary for the SR feature to


work.


• Check that the other component is made by Pioneer. The SR feature only works with Pioneer equipment.


• Check that the IR receiver setting in Multi-Room and IR receiver setup on page 62 is correct.


i.LINK interface

Symptom

Remedy

No sound is output.

• Check that the source player is compatible with i.LINK audio.


• Check the output settings of the source player.


• Make sure that i.LINK or AUTO is selected using the SIGNAL SELECT button (see Choosing the input


signal on page 29).


The i.LINK indicator does not

• Make sure that i.LINK or AUTO is selected using the SIGNAL SELECT button (see Choosing the input

light up even when an i.LINK-

signal on page 29).

equipped component is selected. • Check the i.LINK connections; use an i.LINK cable of less than 3.5 m.


• Check that the source components conforms to the i.LINK Audio format.


• Make sure that all components connected between the receiver and the source are switched on.


PQLS OFF or PQLS ON is

• During playback through an i.LINK connection, if you change the settings for other i.LINK components,

displayed temporarily on your

the sound will be discontinued momentarily. This is not a malfunction.

player and the sound output is


discontinued.


The program format indicators

• The program format indicators remain lit until another format source is input. This is not a malfunction.

don’t disappear when SACD


playback stops.


77

En

Page 77
Image 77
Pioneer VSX-AX4AVi-G, VSX-AX2AV-G manual Remote control, Link interface

VSX-AX4AVi-G, VSX-AX2AV-G specifications

The Pioneer VSX-AX4AVi-G and VSX-AX2AV-G are two impressive receivers that exemplify Pioneer’s commitment to high-fidelity audio performance and advanced home theater technology. Both models cater to audio enthusiasts and casual listeners alike with their robust feature sets and innovative technologies.

The VSX-AX4AVi-G is a flagship model that boasts a powerful 7.1 channel surround sound system, delivering an immersive audio experience. With 130 watts per channel, it ensures that even the most demanding soundtracks are reproduced with clarity and strength. Supporting various surround sound formats, including Dolby TrueHD and DTS-HD Master Audio, the receiver creates a cinema-like experience at home. The inclusion of Pioneer's proprietary MCACC (Multi-Channel Acoustic Calibration System) enables automatic speaker setup and calibration, optimizing audio quality based on the specific characteristics of the room.

In contrast, the VSX-AX2AV-G is designed for those seeking high-end audio without a plethora of features. While it also supports 7.1 channel playback, it focuses on delivering a more straightforward user experience. The AX2AV-G offers similar power output per channel, ensuring rich and full-bodied sound reproduction. Its straightforward user interface makes it accessible for users who want quality audio without the complexity.

Both models feature advanced video processing capabilities and support high-definition video formats. They can upscale standard-definition content to 1080p through HDMI, ensuring that users get the best quality possible from their video sources. The HDMI connectivity allows for multiple input sources and supports 4K video resolution, making both receivers future-proof for evolving home theater setups.

In terms of connectivity, the VSX-AX4AVi-G and VSX-AX2AV-G offer a wide range of inputs and outputs, including multiple HDMI ports, component video inputs, and composite connections, accommodating various devices such as Blu-ray players, gaming consoles, and streaming devices. The receivers also feature advanced digital signal processing, enhancing sound quality and making music playback more enjoyable.

Additionally, these receivers come equipped with a range of audio enhancement features such as Phase Control and Advanced Sound Retriever, which help to improve audio playback by enhancing high frequencies and restoring lost details, especially when streaming compressed audio formats.

In summary, the Pioneer VSX-AX4AVi-G and VSX-AX2AV-G represent two excellent options in the receiver market. With their combined focus on high-quality audio, advanced video processing, and user-friendly operation, they provide an ideal solution for anyone looking to enhance their home entertainment experience.