Other connections

08

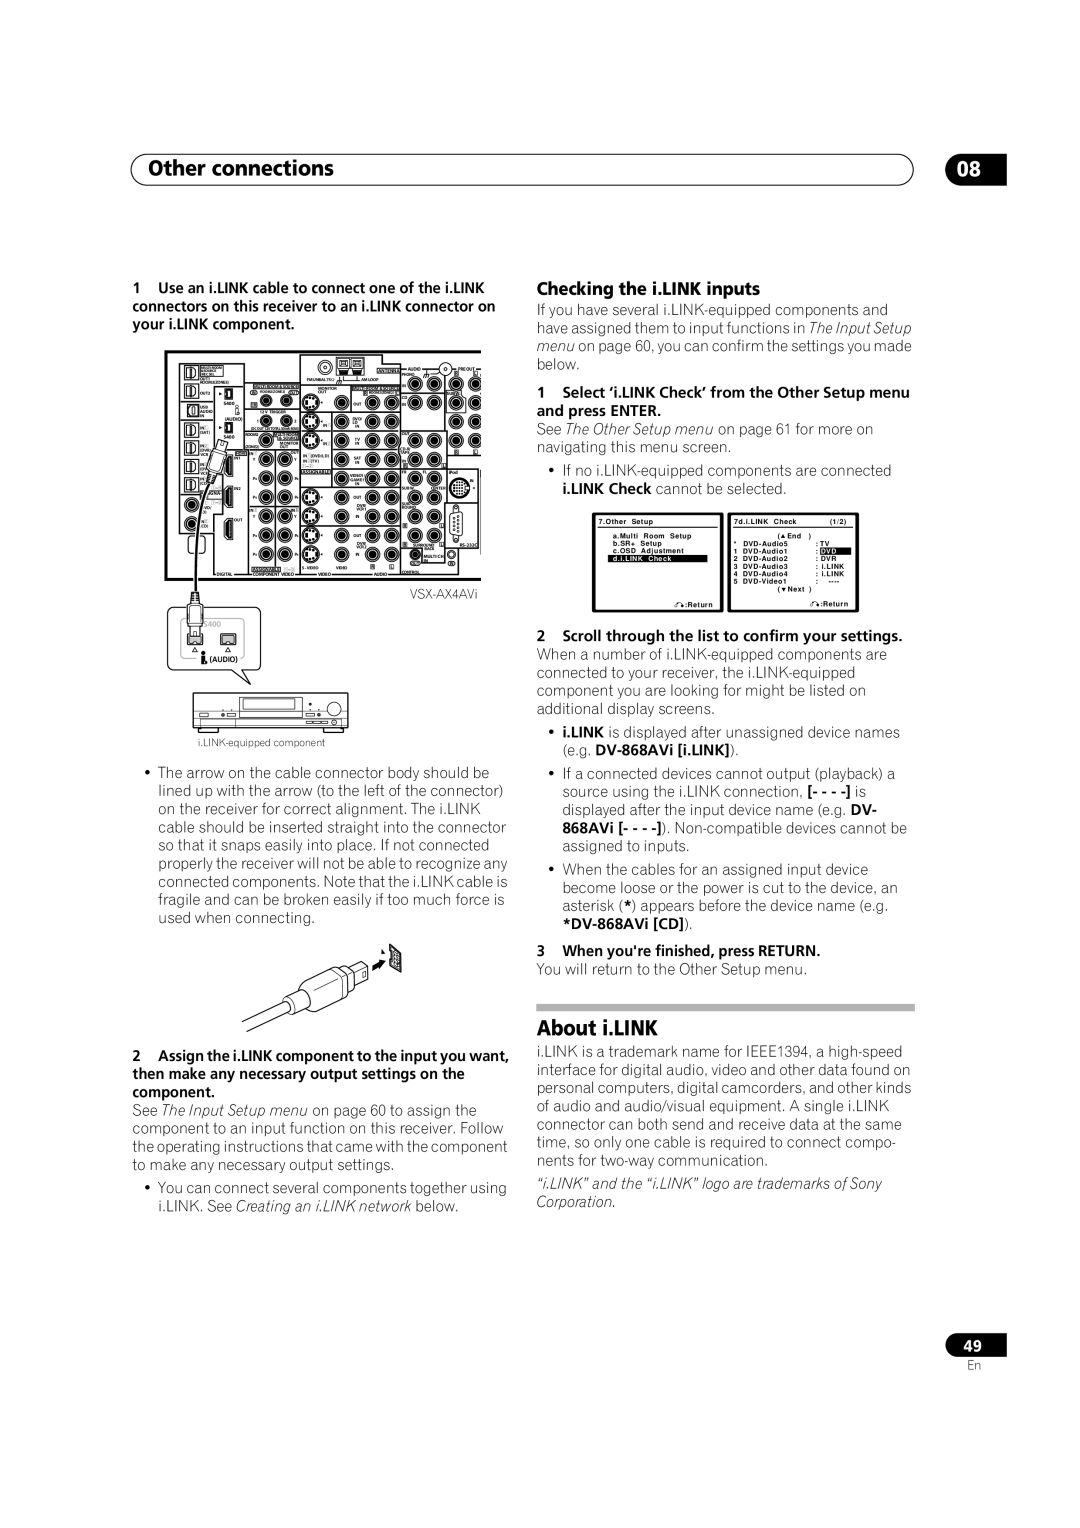
1 Use an i.LINK cable to connect one of the i.LINK

Checking the i.LINK inputs


connectors on this receiver to an i.LINK connector on

If you have several i.LINK-equipped components and

your i.LINK component.


have assigned them to input functions in The Input Setup


menu on page 60, you can confirm the settings you made

&SOURCE


ANTENNA

AUDIO


PRE OUT


below.


MULTI-ROOM


/REC SEL


PHONO


R

L

F


OUT1


FM UNBAL 75


AM LOOP


ROOM3(ZONE3)


MULTI-ROOM & SOURCE IN


1 Select ‘i.LINK Check’ from the Other Setup menu


MULTI-ROOM & SOURCE

MONITOR


OUT2


IN

ROOM2(ZONE2) OUT

OUT


R ROOM2(ZONE2) L

CD


SUBW.


C


S400

IR


OUT


IN


and press ENTER.


IN


USB


AUDIO


12 V TRIGGER


(AUDIO)


1

2


DVD/


See The Other Setup menu on page 61 for more on

(SAT)


IN1


LD


OUT


ROOM2

MULTI-ROOM


IN


IN1


(DC OUT 12VTOTAL 50mA MAX)


S400


& SOURCE


TV


navigating this menu screen.


(DVR/

HDMI IN1


TAPE


R

L


OUT

IN2


IN


IN2


(ZONE2)

MONITOR


OUT


CD-R/


VCR

IN1

Y

Y

IN1(DVD/LD)


SAT


IN3


IN2(TV)


IN


IN


• If no i.LINK-equipped components are connected


12


R

L


VCR


PB

PB

ASSIGNABLE


VIDEO1/


FR

FL

iPod


IN4


GAME1


IN


i.LINK Check cannot be selected.


(CD


IN


SUB W.

CENTER


ASSIGNA-

IN2


14


BLE


PR

PR


OUT


IN1 12


DVR/


SUR-


(DVD/


IN

2

IN

3


VCR 1


ROUND


LD)


IN


OUT

Y

Y


7.Other Setup

7d.i.LINK Check

(1/2)

IN2


R

L


(CD)


PB

PB


OUT


R SURROUND L

RS-232C


a.Multi Room Setup

*

( End

)


VCR 2


b.SR+ Setup

DVD-Audio5

: TV


DVR/


BACK


c.OSD Adjustment

1

DVD-Audio1

: DVD


PR

PR


IN


MULTI CH


d.i.LINK Check

2

DVD-Audio2

: DVR


OUT

IN

IN


ASSIGNABLE 13


S -VIDEO

VIDEO

R

L

CONTROL


3

DVD-Audio3

: i.LINK

DIGITAL


COMPONENT VIDEO


VIDEO


AUDIO


4

DVD-Audio4

: i.LINK


5

DVD-Video1

: ----


VSX-AX4AVi


( Next )


:Return


:Return


S400


2 Scroll through the list to confirm your settings.


(AUDIO)


When a number of i.LINK-equipped components are


connected to your receiver, the i.LINK-equipped


component you are looking for might be listed on


additional display screens.


i.LINK-equipped component

The arrow on the cable connector body should be lined up with the arrow (to the left of the connector) on the receiver for correct alignment. The i.LINK cable should be inserted straight into the connector so that it snaps easily into place. If not connected properly the receiver will not be able to recognize any connected components. Note that the i.LINK cable is fragile and can be broken easily if too much force is used when connecting.

i.LINK is displayed after unassigned device names (e.g. DV-868AVi [i.LINK]).

If a connected devices cannot output (playback) a source using the i.LINK connection, [- - - -]is displayed after the input device name (e.g. DV- 868AVi [- - - -]). Non-compatible devices cannot be assigned to inputs.

When the cables for an assigned input device become loose or the power is cut to the device, an asterisk (*) appears before the device name (e.g. *DV-868AVi [CD]).

3When you're finished, press RETURN. You will return to the Other Setup menu.

About i.LINK

2Assign the i.LINK component to the input you want, then make any necessary output settings on the component.

See The Input Setup menu on page 60 to assign the component to an input function on this receiver. Follow the operating instructions that came with the component to make any necessary output settings.

You can connect several components together using i.LINK. See Creating an i.LINK network below.

i.LINK is a trademark name for IEEE1394, a high-speed interface for digital audio, video and other data found on personal computers, digital camcorders, and other kinds of audio and audio/visual equipment. A single i.LINK connector can both send and receive data at the same time, so only one cable is required to connect compo- nents for two-way communication.

“i.LINK” and the “i.LINK” logo are trademarks of Sony Corporation.

49

En

Page 49
Image 49
Pioneer VSX-AX4AVi-G, VSX-AX2AV-G manual About i.LINK, Checking the i.LINK inputs

VSX-AX4AVi-G, VSX-AX2AV-G specifications

The Pioneer VSX-AX4AVi-G and VSX-AX2AV-G are two impressive receivers that exemplify Pioneer’s commitment to high-fidelity audio performance and advanced home theater technology. Both models cater to audio enthusiasts and casual listeners alike with their robust feature sets and innovative technologies.

The VSX-AX4AVi-G is a flagship model that boasts a powerful 7.1 channel surround sound system, delivering an immersive audio experience. With 130 watts per channel, it ensures that even the most demanding soundtracks are reproduced with clarity and strength. Supporting various surround sound formats, including Dolby TrueHD and DTS-HD Master Audio, the receiver creates a cinema-like experience at home. The inclusion of Pioneer's proprietary MCACC (Multi-Channel Acoustic Calibration System) enables automatic speaker setup and calibration, optimizing audio quality based on the specific characteristics of the room.

In contrast, the VSX-AX2AV-G is designed for those seeking high-end audio without a plethora of features. While it also supports 7.1 channel playback, it focuses on delivering a more straightforward user experience. The AX2AV-G offers similar power output per channel, ensuring rich and full-bodied sound reproduction. Its straightforward user interface makes it accessible for users who want quality audio without the complexity.

Both models feature advanced video processing capabilities and support high-definition video formats. They can upscale standard-definition content to 1080p through HDMI, ensuring that users get the best quality possible from their video sources. The HDMI connectivity allows for multiple input sources and supports 4K video resolution, making both receivers future-proof for evolving home theater setups.

In terms of connectivity, the VSX-AX4AVi-G and VSX-AX2AV-G offer a wide range of inputs and outputs, including multiple HDMI ports, component video inputs, and composite connections, accommodating various devices such as Blu-ray players, gaming consoles, and streaming devices. The receivers also feature advanced digital signal processing, enhancing sound quality and making music playback more enjoyable.

Additionally, these receivers come equipped with a range of audio enhancement features such as Phase Control and Advanced Sound Retriever, which help to improve audio playback by enhancing high frequencies and restoring lost details, especially when streaming compressed audio formats.

In summary, the Pioneer VSX-AX4AVi-G and VSX-AX2AV-G represent two excellent options in the receiver market. With their combined focus on high-quality audio, advanced video processing, and user-friendly operation, they provide an ideal solution for anyone looking to enhance their home entertainment experience.