Connecting Your Equipment

Video Components

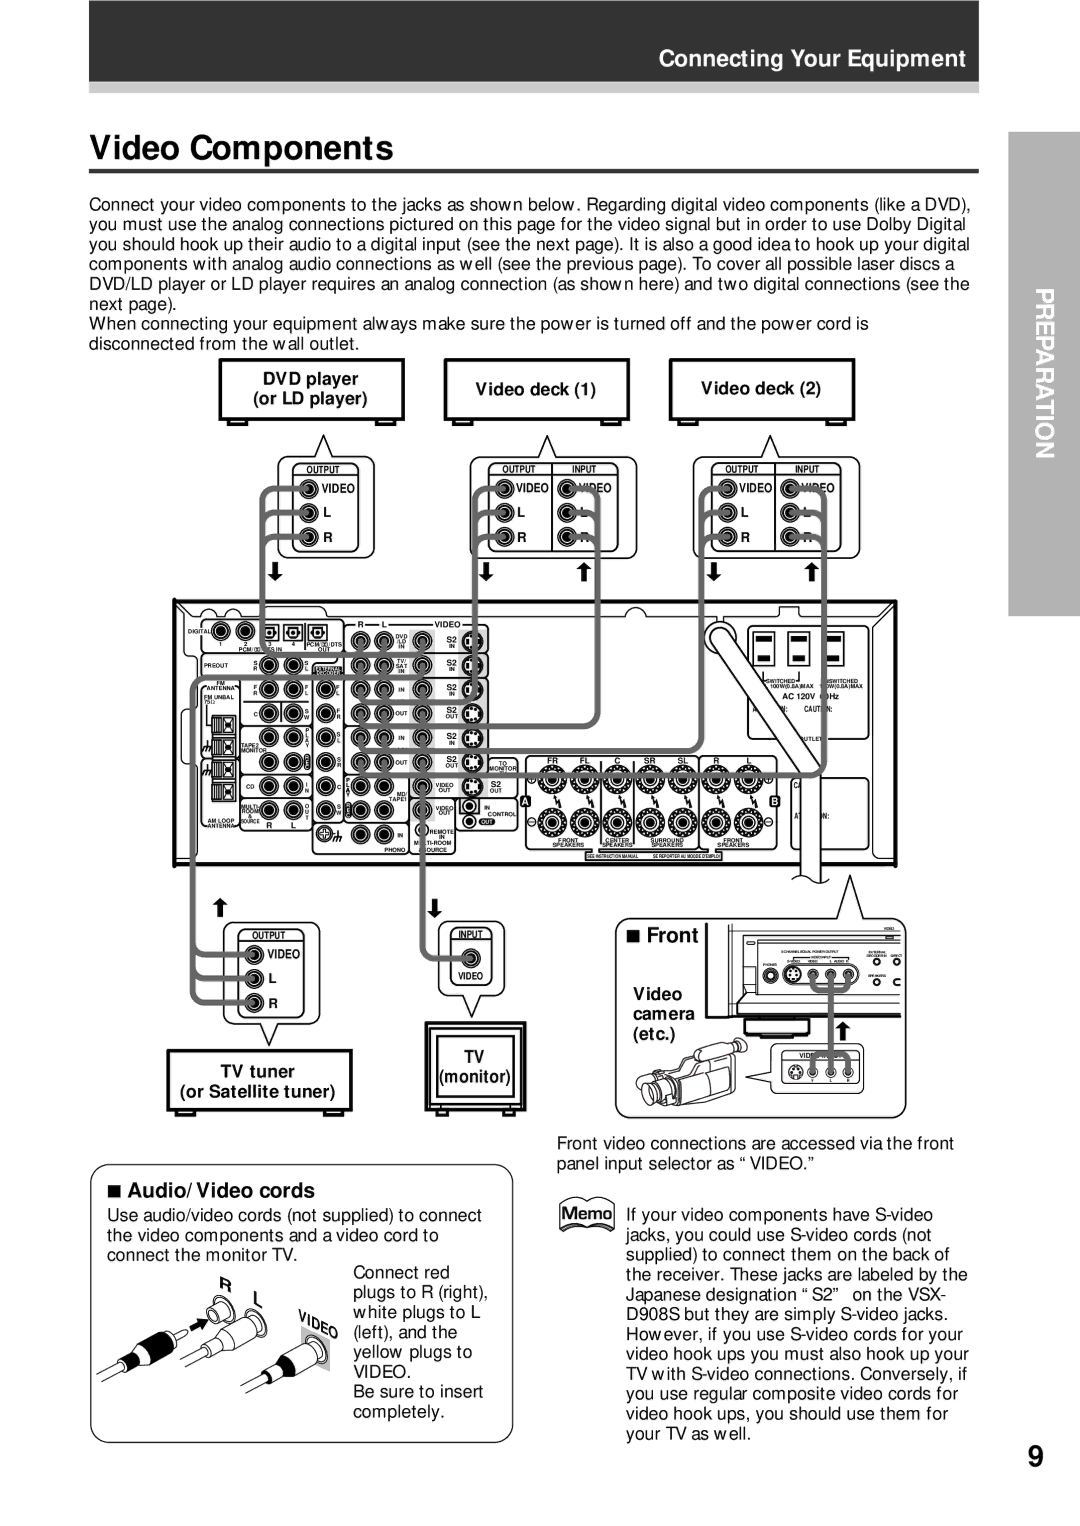
Connect your video components to the jacks as shown below. Regarding digital video components (like a DVD), you must use the analog connections pictured on this page for the video signal but in order to use Dolby Digital you should hook up their audio to a digital input (see the next page). It is also a good idea to hook up your digital components with analog audio connections as well (see the previous page). To cover all possible laser discs a DVD/LD player or LD player requires an analog connection (as shown here) and two digital connections (see the next page).

When connecting your equipment always make sure the power is turned off and the power cord is disconnected from the wall outlet.

DVD player

Video deck (1)

Video deck (2)

(or LD player)


OUTPUT

OUTPUT

INPUT

OUTPUT

INPUT

VIDEO

VIDEO

VIDEO

VIDEO

VIDEO


L


L

L


L

L


R


R

R


R

R

DIGITAL


R

L

VIDEO


DVD

S2


1

2

3

4

PCM/

/DTS


/LD


IN

IN


PCM/

/DTS IN


OUT


PREOUT

S


S


TV/

S2


R


L

EXTERNAL


SAT

IN


DECODER


IN


FM


IN


SWITCHED

UNSWITCHED


S2


ANTENNA

F


F


F


IN


TOTAL 100W(0.8A)MAX 100W(0.8A)MAX

FM UNBAL

R


L


L


IN


AC 120V 60Hz

75Ω


VCR1

S2


ATTENTION:

CAUTION:


C


S


F


OUT


W


R


OUT


P


S


S2


L


IN


AC OUTLETS


A


L


IN


TAPE2


Y


MONITOR


VCR2


R


S


S2


FR

FL

C

SR

SL

R

L


E


OUT

TO


C


R


OUT

MONITOR


TV


I


P


S2


CAUTION:


CD


C

L


VIDEO


N


A

MD/

OUT

OUT


Y


A


B


R

TAPE1


MULTI-


O


S


VIDEO

IN


ROOM


U


W

E


OUT

CONTROL


ATTENTION:

AM LOOP

&


T


C


SOURCE

R

L


OUT


ANTENNA


REMOTE


IN


IN


FRONT


CENTER

SURROUND


FRONT


MULTI-ROOM


SPEAKERS

SPEAKERS

SPEAKERS

SPEAKERS


PHONO

&SOURCE


SEE INSTRUCTION MANUAL

SE REPORTER AU MOODE D'EMPLOI


PREPARATION

OUTPUT

VIDEO

L

R

TV tuner

(or Satellite tuner)

INPUT

VIDEO

TV

(monitor)

7Front

Video camera (etc.)


VIDEO

5-CHANNEL EQUAL POWER OUTPUT

EXTERNAL


VIDEO INPUT

DECODER IN

DIRECT

S-VIDEO

VIDEO

L AUDIO R


PHONES


SPEAKERS


VIDEO INPUT

V L R

7Audio/Video cords

Use audio/video cords (not supplied) to connect the video components and a video cord to connect the monitor TV.

R


Connect red

L

plugs to R (right),


white plugs to L


VIDEO


(left), and the


yellow plugs to


VIDEO.


Be sure to insert


completely.

Front video connections are accessed via the front panel input selector as “VIDEO.”

If your video components have S-video jacks, you could use S-video cords (not supplied) to connect them on the back of the receiver. These jacks are labeled by the Japanese designation “S2” on the VSX- D908S but they are simply S-video jacks. However, if you use S-video cords for your video hook ups you must also hook up your TV with S-video connections. Conversely, if you use regular composite video cords for video hook ups, you should use them for your TV as well.

9

Page 9
Image 9
Pioneer VSX-D908S operating instructions Video Components, Front, Audio/Video cords

VSX-D908S specifications

The Pioneer VSX-D908S is a remarkable home theater receiver that epitomizes the blend of advanced technology and user-friendly design. Launched in the early 2000s, this versatile component remains a popular choice for audio enthusiasts seeking to enhance their home entertainment experience.

One of the standout features of the VSX-D908S is its powerful amplification system, capable of delivering up to 100 watts per channel across five channels. This ensures that users can enjoy dynamic sound reproduction, even with demanding audio tracks or during intense movie scenes. The receiver supports both Dolby Digital and DTS surround formats, making it an ideal choice for those looking to immerse themselves in a cinematic experience at home.

The VSX-D908S also boasts multiple inputs and outputs, allowing users to connect a variety of audio and video sources. With several composite, S-video, and component video inputs, it accommodates a range of devices, from DVD players to gaming consoles. Furthermore, the receiver features a built-in AM/FM tuner and supports the playback of music CDs, making it a comprehensive solution for all entertainment needs.

Another notable characteristic is the advanced DSP (Digital Signal Processing) technology that the VSX-D908S incorporates. This technology allows for the simulation of different acoustic environments, enabling the user to customize their listening experience according to their preferences. With multiple preset sound fields, including options for concert halls and theaters, the receiver adapts to various audio situations seamlessly.

For those who value ease of use, the VSX-D908S includes a user-friendly interface and remote control. The intuitive layout of the front panel makes it simple to navigate settings, adjust volumes, and switch between sources. The inclusion of a multi-language on-screen display further enhances the user experience, catering to a broader audience.

In addition to its impressive audio capabilities, the Pioneer VSX-D908S also emphasizes build quality, featuring solid construction and reliability. With its robust design, users can expect long-term performance without compromising on sound quality.

Overall, the Pioneer VSX-D908S stands out as a home theater receiver that harmonizes performance, versatility, and user-friendliness. It continues to be a solid option for anyone seeking to elevate their audio-visual setup, making it a notable piece of equipment in the world of home entertainment.