2. Identify the Right Upright (10). Note: The Left Upright (9) |
has the Latch Housing (77, see step 3) attached to it. |
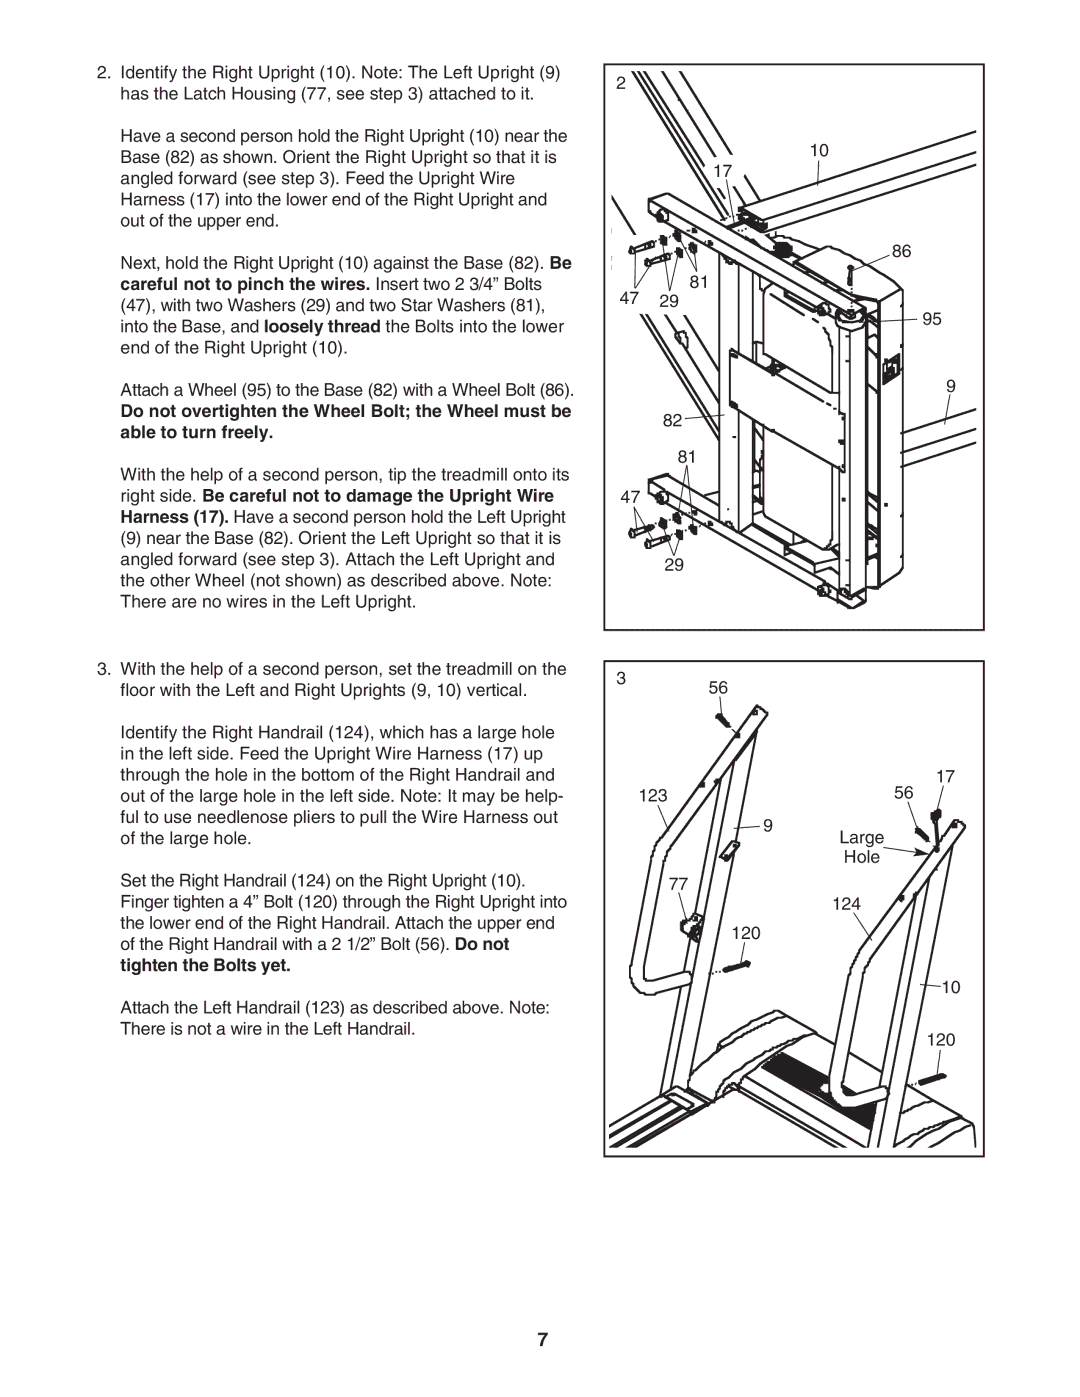
Have a second person hold the Right Upright (10) near the |
Base (82) as shown. Orient the Right Upright so that it is |
angled forward (see step 3). Feed the Upright Wire |
Harness (17) into the lower end of the Right Upright and |
out of the upper end. |
Next, hold the Right Upright (10) against the Base (82). Be |
careful not to pinch the wires. Insert two 2 3/4” Bolts |
(47), with two Washers (29) and two Star Washers (81), |
into the Base, and loosely thread the Bolts into the lower |
end of the Right Upright (10). |
Attach a Wheel (95) to the Base (82) with a Wheel Bolt (86). |
Do not overtighten the Wheel Bolt; the Wheel must be |
able to turn freely. |
With the help of a second person, tip the treadmill onto its |
right side. Be careful not to damage the Upright Wire |
Harness (17). Have a second person hold the Left Upright |
(9) near the Base (82). Orient the Left Upright so that it is |
angled forward (see step 3). Attach the Left Upright and |
the other Wheel (not shown) as described above. Note: |
There are no wires in the Left Upright. |
3. With the help of a second person, set the treadmill on the |
floor with the Left and Right Uprights (9, 10) vertical. |
Identify the Right Handrail (124), which has a large hole |
in the left side. Feed the Upright Wire Harness (17) up |
through the hole in the bottom of the Right Handrail and |
out of the large hole in the left side. Note: It may be help- |
ful to use needlenose pliers to pull the Wire Harness out |
2 |
|
|
|
| 10 |
| 17 |
|
|
| 86 |
47 | 81 |
|
29 | 95 | |
|
| |
|
| 9 |
| 82 |
|
| 81 |
|
47 |
|
|
| 29 |
|
3 | 56 |
|
|
| |
|
| 17 |
123 | 56 | |
of the large hole. |
Set the Right Handrail (124) on the Right Upright (10). |
9
77
Large
Hole ![]()
![]()
Finger tighten a 4” Bolt (120) through the Right Upright into |
the lower end of the Right Handrail. Attach the upper end |
of the Right Handrail with a 2 1/2” Bolt (56). Do not |
tighten the Bolts yet. |
Attach the Left Handrail (123) as described above. Note: |
There is not a wire in the Left Handrail. |
124
120
10
120
7