Installed Sound Professional Audio Amplifiers
2-Channel Low-impedanceModels CX302 CX502 CX702
CX902 CX1102 4-Channel Low-impedanceModels CX254
CX404
Page
Unpacking
Introduction
Front Panel
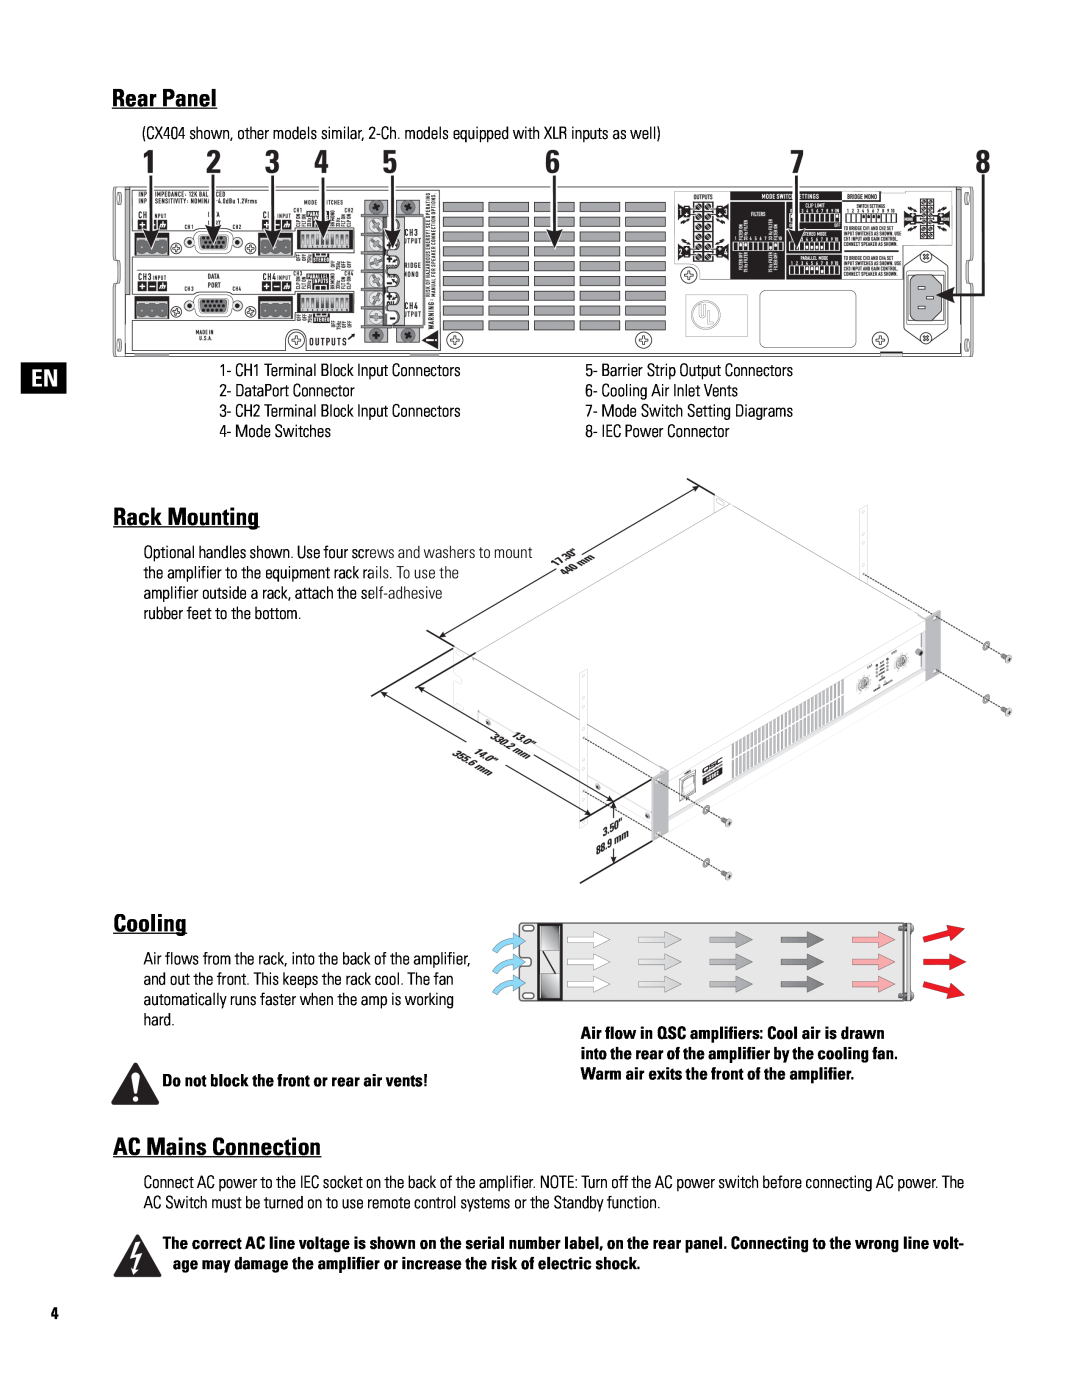
Rear Panel
Rack Mounting
Cooling
AC Mains Connection
Setting the Mode Switches
Setting Clip Limiters
Setting Low Frequency Filters
Selecting Stereo, Parallel, or Bridge Mode
Terminal Block Connectors
DataPort
Inputs
DataPort Tips
Outputs
Low Impedance Outputs
Distributed Outputs “V” models, 70V/140V
Loads Rated by Model
LED Indicators
LED indicators on 2-channelmodels
LED indicators on 4-channelmodels
Abnormal indication
Gain Controls
Gain Control Security Plate
Specifications 2-Channel Low-ImpedanceModels
SPECIFICATIONS SUBJECT TO CHANGE WITHOUT NOTICE
Specifications 4-Channel Low-ImpedanceModels
SPECIFICATIONS SUBJECT TO CHANGE WITHOUT NOTICE
SPECIFICATIONS SUBJECT TO CHANGE WITHOUT NOTICE
CX204V
Thermal Loss Table
Current Draw Table in Amperes
NOTE! Current draw shown is for 120 VAC line. For
VAC models, multiply values shown by
Page
Desembalaje
Introducción
Panel frontal
Panel posterior
Montaje en bastidor
Enfriamiento
Conexión a la línea principal de CA
Ajuste de los conmutadores de modo
Ajuste de los limitadores de recorte
Selección del modo Estéreo, Paralelo o Puenteado
Ajuste de los filtros de baja frecuencia
DataPort
Entradas
Sugerencias sobre el DataPort
Conectadores del bloque de terminales
Salidas
Salidas de baja impedancia
Salidas distribuidas modelos “V”, 70V/140V
Cargas clasificadas por modelo
Indicadores LED
Indicación anormal
BRDG y PAR
Indicadores LED en modelos de 2 canales
Controles de Ganancia
Placa de Seguridad del Control de Ganancia
Tabla de pérdida térmica
Tabla de gasto de corriente en amperios
Cómo comunicarse con QSC Audio Products
Dirección postal
1- Lire ces instructions
Déballage
Introduction
Panneau avant
Installation sur bâti
Panneau arrière
Refroidissement
Branchement de l’alimentation secteur ~
Réglage des commutateurs de mode
Réglage des limiteurs d’amplitude
Sélection du mode Stéréo, Parallèle ou Pont
Réglage des filtres basse fréquence
Conseils relatifs aux connecteurs DataPort
Entrées
Connecteurs de bornier
Entrées XLR modèles à 2 canaux seulement
Sorties
Sorties à faible impédance
Sorties distribuées modèles V, 70 V/140
Charges nominales indiquées par modèle
Voyants
Indication anormale
BRDG et PAR
Voyants sur les modèles à 2 canaux
Commandes de Gain
Couvercle de Sécurité des Commandes de Gain
Tableau de déperdition de chaleur
Tableau d’appel de courant en ampères
Comment prendre contact avec QSC Audio Products
Adresse postale
Page
Auspacken
Einführung
Frontplatte
Rückplatte
Rack-Einbau
Kühlung
Netzanschluss
Einstellen der Clipbegrenzer
Einstellen der Betriebsartenschalter
Einstellen der Niederfrequenzfilter
Eingänge
Tipps zum Gebrauch des DataPort
Klemmenleistenanschlüsse
XLR-Eingängenur bei 2-Kan.-Modellen
Ausgänge
Niederohmige Ausgänge
Verteilte Ausgänge „V“-Modelle,70 V/140
Nennlasten nach Modell
LED-Anzeigen
Nicht normale Anzeige
BRDG und PAR
LED-Anzeigenan 2-Kanal-Modellen
Verstärkungsregler
Verstärkungsregler-sicherheitsplatte
Stromaufnahmetabelle in Ampere
Wärmeverlusttabelle
Kontaktinformationen für QSC Audio Products
重要的安全注意事项和符号说明
非常感谢您购买 QSC 功率放大器。请阅读以下说明,以获得产品的最佳效果。 CX 型号的连线特点:
出厂包装箱内包括以下内容:
运送放大器时使用同一类型的包装箱。
(所示为 CX404,其它型号类似)
机架安装
交流电源连接
不要挡住前面或后面的通风口!
正确的交流线压在后面板的序列号标签上注明。连接错误的线压会损坏放大器或增加电击危险。
设置模式切换器
设置削波限制器
选择立体声、并行或桥式模式
设置低频滤波器
接线盒连接器
数据埠技巧:
XLR 输入 仅限双通道 型号)
低阻抗输出
分布式输出 (“V”型,70V/140V)
按型号额定负载
确保所用型号的放大 器与该负载匹配!
LED 指示灯
异常显示:
信号, -20dB, -10dB:绿色,在各削波LED 的下方。
桥接和并行模式:
增益控制安全板
增益控制
所示 CX902 装有增益控制安全板。
最大电流表 (单位:安培)
联系 QSC Audio Products
Page
Page
How to Contact QSC Audio Products
联系 QSC Audio Products
Cómo comunicarse con QSC Audio Products
Comment prendre contact avec QSC Audio Products