Standard Fingering — lets you play chords on the accompaniment keys using standard chord formations of three or four notes (see “Standard Fingering”).

￿￿￿￿￿￿￿￿￿￿￿￿"

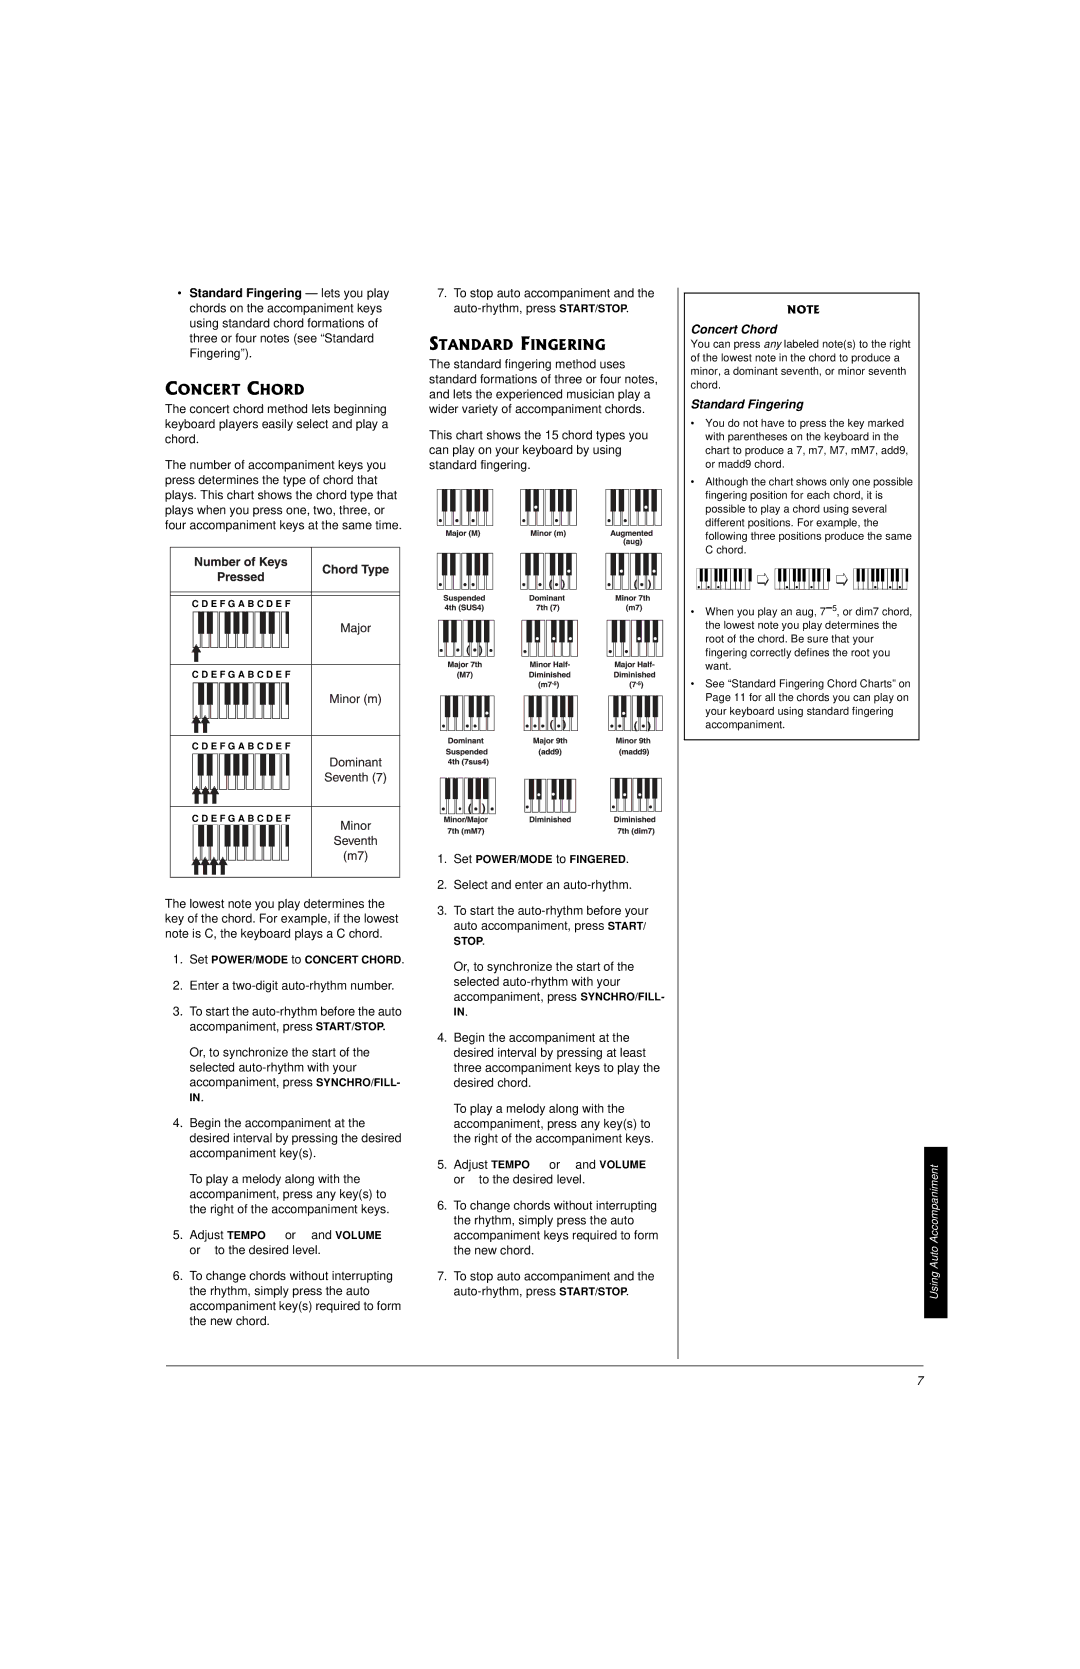
The concert chord method lets beginning keyboard players easily select and play a chord.

The number of accompaniment keys you press determines the type of chord that plays. This chart shows the chord type that plays when you press one, two, three, or four accompaniment keys at the same time.

7.To stop auto accompaniment and the auto-rhythm, press START/STOP.

￿￿￿￿"￿￿"￿￿￿￿ ￿￿￿￿

The standard fingering method uses standard formations of three or four notes, and lets the experienced musician play a wider variety of accompaniment chords. ￿

This chart shows the 15 chord types you can play on your keyboard by using standard fingering.

￿￿￿￿￿￿￿￿￿

Concert Chord

You can press any labeled note(s) to the right of the lowest note in the chord to produce a minor, a dominant seventh, or minor seventh chord.

Standard Fingering

• You do not have to press the key marked

with parentheses on the keyboard in the

chart to produce a 7, m7, M7, mM7, add9,

or madd9 chord.

• Although the chart shows only one possible

fingering position for each chord, it is

possible to play a chord using several

different positions. For example, the

following three positions produce the same

C chord.

C D E F G A B C D E F

C D E F G A B C D E F

C D E F G A B C D E F

C D E F G A B C D E F

1. Set POWER/MODE to FINGERED.

• When you play an aug, 75, or dim7 chord,

the lowest note you play determines the

root of the chord. Be sure that your

fingering correctly defines the root you

want.

• See “Standard Fingering Chord Charts” on

Page 11 for all the chords you can play on

your keyboard using standard fingering

accompaniment.

The lowest note you play determines the key of the chord. For example, if the lowest note is C, the keyboard plays a C chord. ￿

1.Set POWER/MODE to CONCERT CHORD.

2.Enter a two-digit auto-rhythm number.

3.To start the auto-rhythm before the auto accompaniment, press START/STOP.

Or, to synchronize the start of the selected auto-rhythm with your accompaniment, press SYNCHRO/FILL- IN.

4.Begin the accompaniment at the desired interval by pressing the desired accompaniment key(s).

To play a melody along with the accompaniment, press any key(s) to the right of the accompaniment keys.

5.Adjust TEMPO ￿ or ￿ and VOLUME ￿ or ￿￿to the desired level.

6.To change chords without interrupting the rhythm, simply press the auto accompaniment key(s) required to form the new chord.

2.Select and enter an auto-rhythm.

3.To start the auto-rhythm before your auto accompaniment, press START/ STOP.

Or, to synchronize the start of the selected auto-rhythm with your accompaniment, press SYNCHRO/FILL- IN.

4.Begin the accompaniment at the desired interval by pressing at least three accompaniment keys to play the desired chord.

To play a melody along with the accompaniment, press any key(s) to the right of the accompaniment keys.

5.Adjust TEMPO ￿ or ￿ and VOLUME ￿ or ￿￿to the desired level.

6.To change chords without interrupting the rhythm, simply press the auto accompaniment keys required to form the new chord.

7.To stop auto accompaniment and the auto-rhythm, press START/STOP.

Using Auto Accompaniment

7

Page 7
Image 7
Radio Shack LK-1161 owner manual Standard Fingering, Set POWER/MODE to Fingered, Set POWER/MODE to Concert Chord

LK-1161 specifications

The Radio Shack LK-1161 is a notable entry in the realm of personal computing, particularly recognized for its balance of affordability and functionality. Released in the early 1980s, the LK-1161 was a powerful home computer that captured the attention of tech enthusiasts and casual users alike.

One of the standout features of the LK-1161 was its keyboard design, which catered to users looking for an efficient and pleasant typing experience. The integrated keyboard not only streamlined the design of the computer but also provided tactile feedback that many found appealing. This made the LK-1161 a popular option for those who required a reliable interface for programming and word processing.

The LK-1161 was powered by a robust Zilog Z80 microprocessor, a popular choice in many 8-bit computers of that era. This processor enabled the computer to handle various software applications efficiently, making it suitable for both home and educational use. With a clock speed of 4 MHz, users could enjoy a responsive system capable of multitasking between simple applications.

In terms of memory, the LK-1161 was equipped with 64KB of RAM, expandable to higher capacities with additional modules. This flexibility allowed users to adapt the computer to their needs, install more advanced software, or handle larger projects. The built-in BASIC programming language also provided a foundation for users to explore coding, making the LK-1161 a popular choice among budding programmers.

The graphics capabilities of the LK-1161 were modest compared to modern standards but were acceptable for its time. With support for several display modes, users could enjoy text and simple graphics, making the computer suitable for early gaming experiences and educational software.

Storage options included a built-in cassette interface for loading and saving programs, and users could also connect external floppy disk drives to enhance storage capabilities. This adaptability made it easy for users to manage data and software without relying solely on cassette tapes.

Connectivity was another strong point, with RS-232 serial ports allowing users to connect printers and modems. This facilitated data transfer and made it easier to print documents or connect to bulletin board systems.

Overall, the Radio Shack LK-1161 emerged as a versatile computing solution in its era, offering a way for individuals to engage with technology. With its blend of operational efficiency, user-friendly design, and expandability, it remains a memorable piece of computing history, symbolizing the early days of personal computing and its journey towards the modern era.