Connections & Setup
HDMI cable
•If you are done connecting devices to your TV, go to page 13 to complete the Assisted Setup.
•To find out more about connecting audio/video receivers, go to the next page.
OR
•If your set-top box has an HDMI jack, connect an HDMI cable.
Connect an HDMI cable to the HDMI 1 INPUT (or HDMI 2 INPUT if your TV has this jack and it’s more convenient) jack on the back of the TV and to the HDMI Out jack on the back of the device.
Notes: To view the picture from the connected device, refer to Chapter 2, Using the Remote Control. The section is called, Using the INPUT Button.
You can set up the TV to automatically tune to the correct device you want to view. This is called Auto Tuning. See Chapter 3 for more information on Auto Tuning.
Advanced Audio Connection Information
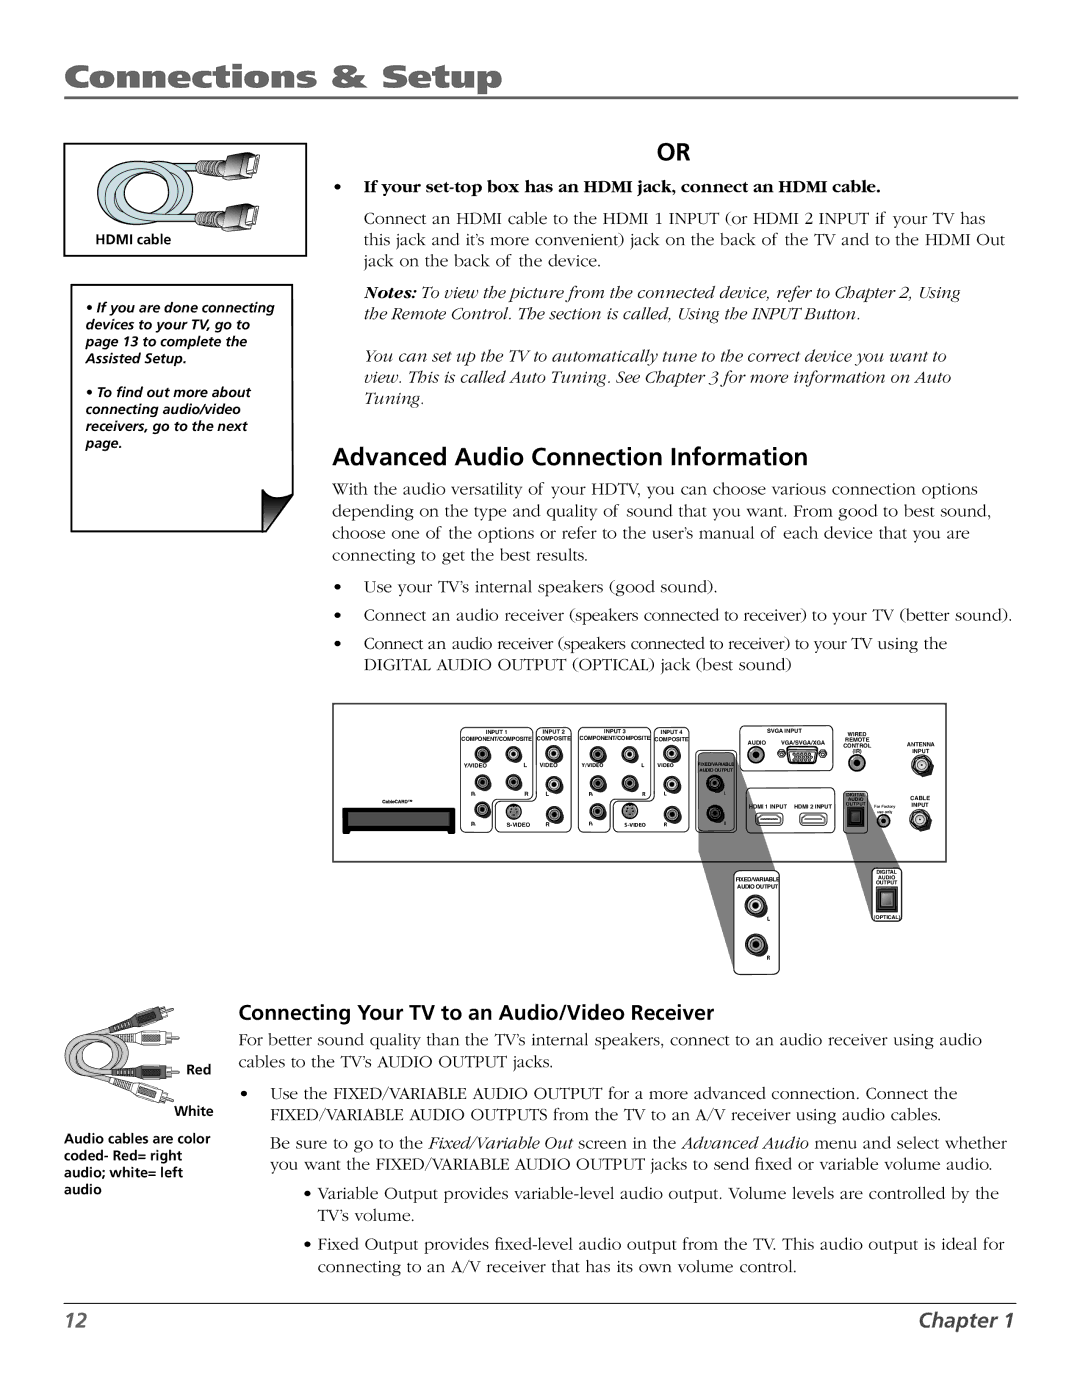
With the audio versatility of your HDTV, you can choose various connection options depending on the type and quality of sound that you want. From good to best sound, choose one of the options or refer to the user’s manual of each device that you are connecting to get the best results.
•Use your TV’s internal speakers (good sound).
•Connect an audio receiver (speakers connected to receiver) to your TV (better sound).
•Connect an audio receiver (speakers connected to receiver) to your TV using the DIGITAL AUDIO OUTPUT (OPTICAL) jack (best sound)
INPUT 1 | INPUT 2 |
| INPUT 3 | INPUT 4 |
|
|
| SVGA INPUT |
| WIRED |
|
|
| ||||||||||
COMPONENT/COMPOSITE | COMPOSITE | COMPONENT/COMPOSITE | COMPOSITE |
| AUDIO | VGA/SVGA/XGA | REMOTE | ANTENNA | |||||||||||||||
|
|
|
|
|
|
|
|
|
| CONTROL | |||||||||||||
Y/VIDEO |
|
| L | VIDEO | Y/VIDEO |
| L | VIDEO | FIXED/VARIABLE |
|
|
|
|
|
| (IR) | INPUT | ||||||
|
|
|
|
|
|
|
|
|
|
|
|
|
|
|
|
| |||||||
PB |
|
| R |
| PB |
| R | L | AUDIO OUTPUT |
|
|
| DIGITAL |
|
|
|
|
|
|
| |||
|
|
|
|
|
|
|
|
|
| CABLE | |||||||||||||
|
|
|
|
|
|
|
|
|
|
|
| ||||||||||||
|
|
|
|
|
|
|
|
|
|
|
|
|
|
| AUDIO |
|
|
|
| ||||
|
|
|
|
|
|
|
|
|
| HDMI 1 INPUT HDMI 2 INPUT |
| OUTPUT |
| For Factory | INPUT | ||||||||
PR |
|
|
|
|
|
|
|
|
|
|
|
|
|
|
|
|
| use only |
|
|
| ||
|
|
|
|
|
|
|
|
|
|
|
|
|
|
|
|
|
|
|
|
|
|
| |
| PR |
| R |
|
|
|
|
|
|
|
|
|
|
|
|
|
|
| |||||
|
| FIXED/VARIABLE |
|
|
|
|
| DIGITAL |
|
|
| ||||||||||||
|
|
|
|
|
|
|
|
|
|
|
|
|
|
|
|
|
| ||||||
|
|
|
|
|
|
|
|
|
|
|
|
|
|
| AUDIO |
|
|
| |||||
|
|
|
|
|
|
|
|
|
| AUDIO OUTPUT |
|
|
|
|
| OUTPUT |
|
|
| ||||
|
|
|
|
|
|
|
|
|
|
|
|
|
|
|
|
|
|
|
|
|
|
|
|
|
|
|
|
|
|
|
|
|
|
|
| L |
|
|
|
|
| (OPTICAL) |
|
|
| ||
R
| Connecting Your TV to an Audio/Video Receiver |
| For better sound quality than the TV’s internal speakers, connect to an audio receiver using audio |
Red | cables to the TV’s AUDIO OUTPUT jacks. |
|
White
Audio cables are color coded- Red= right audio; white= left audio
•Use the FIXED/VARIABLE AUDIO OUTPUT for a more advanced connection. Connect the FIXED/variable AUDIO OUTPUTS from the TV to an A/V receiver using audio cables.
Be sure to go to the Fixed/Variable Out screen in the Advanced Audio menu and select whether you want the FIXED/VARIABLE AUDIO OUTPUT jacks to send fixed or variable volume audio.
•Variable Output provides
•Fixed Output provides
12 | Chapter 1 |
