DVD-HR720
Warnung
Die gewerbliche Verwendung ist nicht gestattet
Die Festplatte HDD
Wichtige Sicherheitshinweise
Wartung des Gehä uses
Vorsichtsmaßnahmen fü r den Betrieb
Handhabung von Disks
Lagerung der Disks
Disk-Spezifikationen
Unterstützte Kopierformate Inhalt
Kopieren von Disks
Anderenfalls kann das Gerät die Aufnahme nicht wiedergeben
Jpeg Foto
MOTION-JPEGs und progressive JPEGs werden nicht unterstützt
Disk-Format
Schutz
Disk CD-R/RW, DVD-RAM/RW/R
Diese Disks nicht verwenden
Antenne + HDD- und DVD-Recorder + Externe
Kanäle mit der Funktion Automatisches Setup
Inhalt
Weitere Möglichkeiten zum Anschließ en des
Von einem aktuell eingeschaltetem externen
Simultane Aufnahme und Wiedergabe
Auf Festplatte aufnehmen
Von Festplatte auf DVD kopieren
Qualitativ hochwertige progressive Abtastung
Verwenden
Wichtige Informationen zum Gebrauch der Bedienungsanleitung
Umständen zu Datenverlust kommen
Fernbedienung einrichten
Zubehö r
Fernbedienung vorbereiten
Berprüfen Sie, ob folgendes Zubehör beiliegt
Falls mehrere Codes für die Marke Ihres
Die verschiedenen Funktionen lassen sich
Fernbedienungscodes fü r Fernsehgerä te
Display auf der Gerä tevorderseite
Das Ausgangssignal des DVD-Players wird
Rü ckseite
Funktionen der Fernbedienung
RÜ Ckwä RTS/VORWÄ RTS Springen
Antenne + HDD- und DVD-Recorder + Externe
Weitere Möglichkeiten zum Anschließ en des
HDD- und DVD-Recorder anschließen
Die HF-Kabelverbindung dieses Produkts
An, um DVDs über den HDD- und DVD- Recorder wiederzugeben
Die Modi S-Video, Component-Video und Progressive Ausgabe
Antenne + HDD- und DVD-Recorder + Externe Decoderbox + TV
Weitere Möglichkeiten zum Anschließen des Videokabels
Ausgabe bei progressiver Abtastung 576p
Option An einen S-Video-Ausgang anschließen
Option An einen Composite- Video-Ausgang anschließen
Siehe Seite
Weitere Möglichkeiten zum Anschließen des Audiokabels
Option An ein Fernsehgerät anschließen
Option Component-Video- Ausgä nge
Und Einrichten
An AV3 IN/DV-Eingang anschließen
Option Camcorder an den DV IN- Eingang anschließen
Taste OK
Taste Menu
Tasten …†, œ √
Taste Return
Inbetriebnahme und automatisches Setup
Wählen Sie mit den Tasten …† und œ √ die
Uhrzeit einstellen
Ihr HDD- und DVD-Recorder ist jetzt
Wählen Sie mit den Tasten …† die Option
Um die Funktion Autom. Zeiteinst
Bei der Lä nderauswahl wird die folgende Tabelle angezeigt
Bei Auswahl von Bearb. Sie können
Gelangen Sie zurück ins vorherige
Sprachoptionen einstellen
Durch Drücken der Taste Return oder
Das Menü zu verlassen
Automatische Abschaltung einstellen
Anfang an wiedergegeben
Wird ein Verbotssymbol angezeigt
Titels ist, wird der nächste Titel von
Als die verbleibende Zeit in der
Drücken Sie im Stopp-Modus die Taste Menu
EP-Modus Zeit einstellen
Wählen Sie mit den Tasten …† die Option
System, und drücken Sie die Taste OK oder √
Display-Helligkeit einstellen
Möchten
Aus Wählen Sie diese Option, wenn Sie den
Kapitelgenerator nicht verwenden
Ein Wählen Sie diese Option, wenn Sie den
Einstellung, und drücken Sie die Taste OK oder √
DivX R Registrierung
Durch Drücken der Taste Return oder œ
Digitalausgabe
Kompatibilitä t zu V-Modus
Dynamische Kompression
Bildformat
Das Setup-Menü Video wird geöffnet
Optionen für die Video- Anzeige einstellen
Wählen Sie mit den Tasten …† die Option Video
Optionen für Videoausgang einstellen
Verfü gbare Videoausgä nge
Component-Modus
Fernsehgerät den Progressive Scan-Eingang. Zur
Wenn Sie während der Wiedergabe die
Die Meldung Bitte aktivieren Sie an Ihrem
Deaktivierung drücken Sie die Stopptaste. wird
Beenden
Menü. Drücken Sie die Taste MENU, um
Kindersicherung einstellen
Falls Sie Ihr Kennwort vergessen haben
Geben Sie das vierstellige Kennwort mit den
Falls Sie Ihr Kennwort vergessen haben
Informationen zur Funktion Kennwort ä ndern
Informationen ü ber die Sicherungsstufe
Gehen Sie wie auf Seite 44 beschrieben vor
Nicht abspielbare Disks
Vor der Wiedergabe
Regionscode nur bei DVD-Videos
Disk-Typ
Es sei denn, Sie entnehmen die Disk, ziehen
Disk wiedergeben
Erneutes Drücken der Taste Wiedergabe
Oder drücken zwei Mal die Taste Stopp
Bei DVD-VIDEO-Disks
Disc- und Titelmenü verwenden
Such- und Überspringen- Funktionen verwenden
Kapitel oder Titel durchsuchen
Wiedergabe in Zeitlupe
Wiedergabe Zeitlupe/Einzelbildern
Kapitel, Titel oder Indexmarken überspringen
Die mit dieser Funktion eingestellte
Bei MPEG4-Disks können Einzelbilder nur
Einzelschritt-Wiedergabe
Eine Szene mit Anykey direkt auswä hlen
Anykey
Abhängig vom Disk-Typ eventuell keine
Bei manchen Disks ist dies unter
CD-DA oder MP3-Disks erscheint
Informationsanzeige
Die Taste Info
Titelliste abspielen
Die Taste Title List
Drücken Sie im Stoppmodus oder im
Navigation, und drücken Sie die Taste OK
Navigationsmenü
Szenennavigation
Szenennavigation, und drücken Sie die Taste
Zeitnavigation
Die Taste Anykey
Die Option Szenennavigation ist nur
Zeitnavigation, und drücken Sie die Taste OK
Indexmarken verwenden
Die Taste Marker
Drücken Sie die Tasten œ √, um eine mit einer
Indexmarken wiedergeben
Indexmarken lö schen
Marker
Verloren
Lesezeichen wiedergeben
Lesezeichen lö schen
Die Untertitelanzeige fällt unterschiedlich
Untertitelsprache wählen
Die Taste Subtitle
Subtitle
Jede Disk verfügt über eine eigene
Tonoptionen auswählen
Die Taste Audio
Audio
Wiederholen
Kamerawinkel ändern
Wiedergabe
Wiederholte Wiedergabe
Bei HDD/DVD-RAM/-RWs VR-Modus
Wiederholen
Die Taste Repeat A-B
Wiederholt werden
Normalformat X2 X4
Zoom Ein
Wenn Sie die Stelle B vor Ablauf von
Normalformat
Medium wählen
Audio-CD CD-DA wiedergeben
Bildschirmoptionen fü r Audio-CDs CD-DA
Nach dem Einlegen der Disk der MP3
MP3-Disk wiedergeben
MP3-Bildschirmoptionen
Bzw. JPEG-Bildschirm angezeigt
Taste Repeat
Tasten auf der Fernbedienung fü r die MP3-Wiedergabe
CD CD-DA und MP3 wiederholt abspielen
Rü ckkehr zur normalen Wiedergabe
Neue Wiedergabeliste
Wiedergabeliste die Taste Anykey
Wiedergabeliste
Drücken Sie zum Speichern der
Wiedergabeliste, und drücken Sie die Taste OK
Wiedergabeliste lö schen
Wiedergabeliste lö schen , und drücken Sie die
Editor f. Wiedergabeliste, und drücken Sie die
Zur Musikliste wechseln
Wählen Sie mit den Tasten …† die Option Zum
Die Wiedergabeliste wird bearbeitet
Bilddaten-CDs wiedergeben
Medium wä hlen MP3
Disk Jpeg + MP3 + DivX ein
Diashow, und drücken Sie die Taste OK
Diashow
Diashow anhalten
Wählen Sie mit den Tasten …† die Diashow
Rotationsfunktion aufheben 1 Drücken Sie die Taste Anykey
Rotieren
Zoom
Zoomfunktion aufheben
Zur Fotoliste wechseln
Die Taste Menu
DivX-Untertitel
Beschreibbare Disks
Aufnahmemodus
Über Kopierschutzsignale
Aufnahmeformate
Kopiergeschütztes Material
Medium
Content Protection for Recordable Media Cprm
Mehr möglich
Mit Cprm VR-Modus
Während einer Aufnahme können
Aufnahme unterbrechen
Aufnahme anhalten
Gewechselt werden
Bevor Sie beginnen
SP LP EP XP
Wiedergabe drücken
030 100 .. Aus
Der Timer-Zähler zählt minutenweise von
Die Taste Info
Aufnahme anhalten
Der Bildschirm mit der Titelliste wird geöffnet
Während der Aufnahme
Wiedergabe / Aufnahme anhalten
Die Titelliste für die Aufnahme aus
Der Bildschirm mit der Titelliste wird geöffnet
Drücken Sie im Aufnahmemodus die Taste Title
List
Wählen Sie mit den Tasten …† und
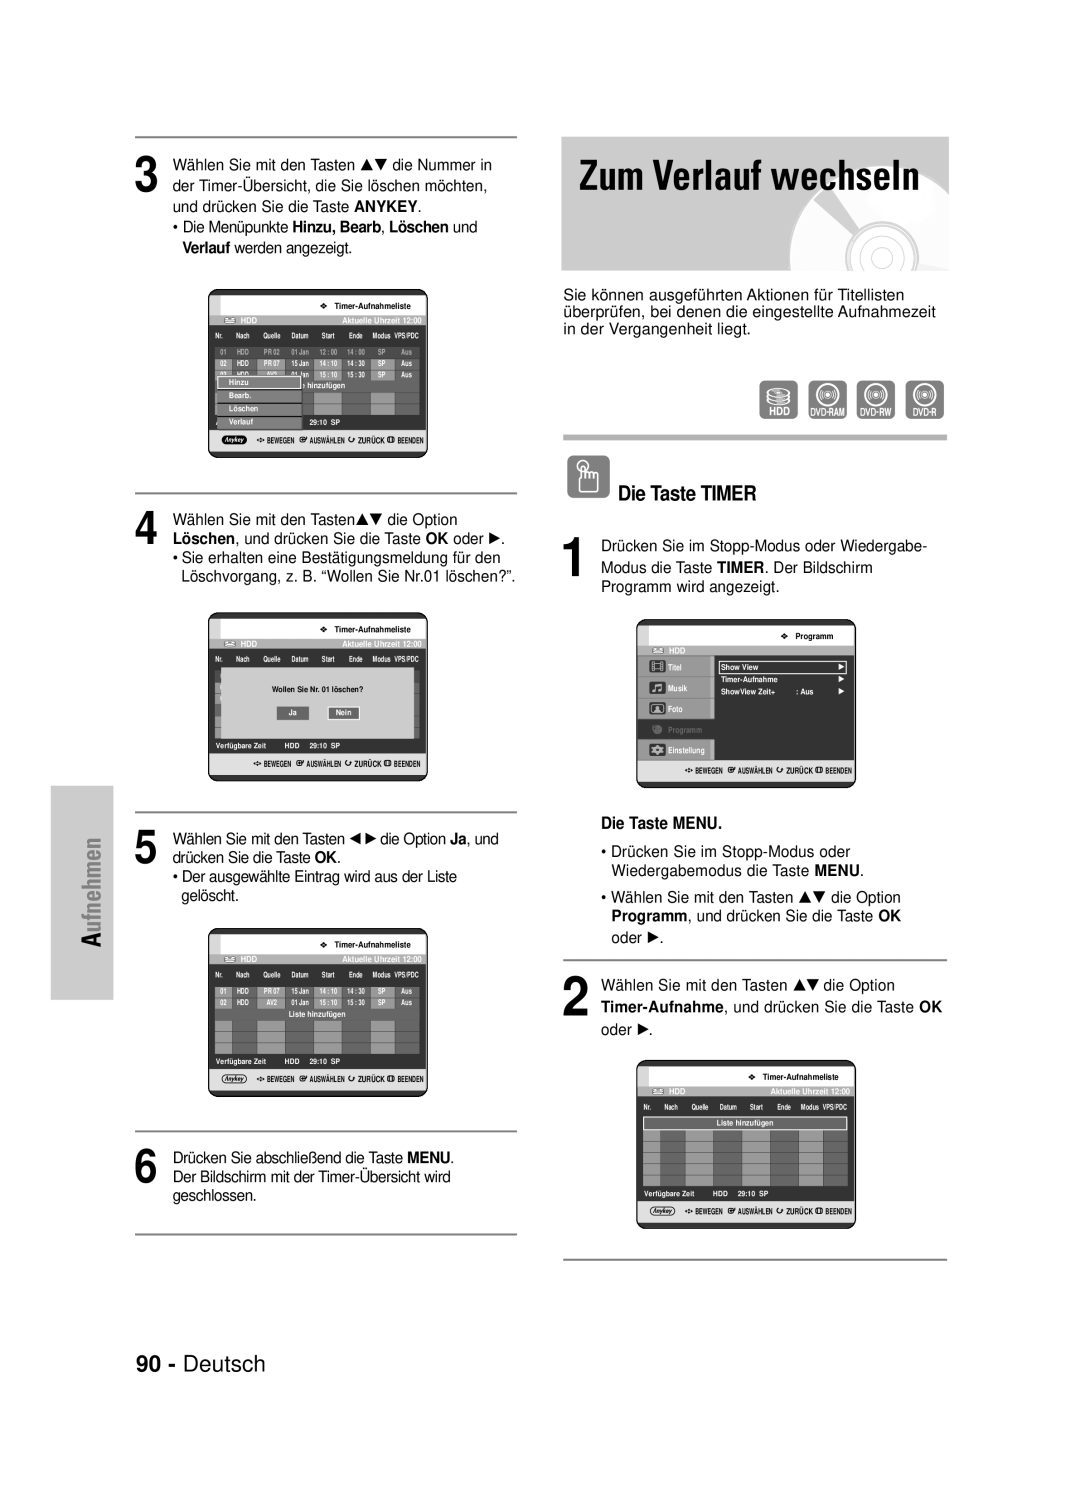
Wählen Sie mit den Tasten …† die Option Timer
Timeraufnahme programmieren
Die Taste Timer
Drücken Sie im Stopp-Modus oder
Überschneidungen bei den
Weicht die Zeit für die Timer-Aufnahme
Bei Aufnahmen im EP-Modus auf einer
Aufnahme innerhalb von 2 Minuten vor
Nur für Timer-Aufnahmen
Timer-Übersicht bearbeiten
Flexible Aufnahme
Timer-Übersicht löschen
Aufnahme, und drücken Sie die Taste OK oder √
Zum Verlauf wechseln
Sie erhalten eine Bestätigungsmeldung für den
Löschvorgang, z. B. Wollen Sie Nr.01 löschen?
Verlauf, und drücken Sie die Taste OK oder √
Informationen zum Verlauf
Verlauf löschen
Der Bildschirm mit dem Verlauf wird geöffnet
Zur Timer-Aufnahmeliste wechseln
Verlauf vollständig löschen
ShowView-Funktion verwenden
Geben Sie den Code der gewünschten Sendung
Erweitertes ShowView
Die Nummern, die in den
Oder √
MP3- und JPEG-Dateien von einer Disk auf
Titelliste
Wiedergabeliste
Einen Titel umbenennen beschriften
Cancel
Einfache Bearbeitung Titelliste
Titelliste, den Sie umbenennen möchten, und
Einen Titel sperren schützen
Wiedergabemodus die Taste Title List
Einen Titel löschen
Drücken Sie im Stopp-Modus oder im
Wählen Sie mit den Tasten œ√ die Option Ja
Falls Sie einen geschützten Eintrag
Einen Titelabschnitt trennen Teilen
Ist nicht möglich
Löschen möchten, wählen Sie im Menü
Wiedergabe , Suchen
Wählen Sie mit den Tasten …† die Option Teilweise
VR mode
Einen Titelabschnitt löschen teilweise löschen
Haben, drücken Sie die Taste OK
Wiedergabe , Suchen
Das Bild und die Endzeit werden im Fenster für
Erweiterte Bearbeitung Wiedergabeliste
Eine Wiedergabeliste erstellen
Titel aus der Wiedergabeliste abspielen
Die Taste Play List
Wiedergabeliste erstellen
Einen Titel in der Wiedergabeliste umbenennen
Der Bildschirm Wiedergabeliste bearbeiten wird angezeigt
Eine Szene für die Wiedergabeliste bearbeiten
Manager
Wiedergabeliste bearbeiten, und drücken Sie
Erreicht haben, drücken Sie die Taste OK
Zum Einrichten befolgen Sie Schritt 1 bis 3 auf Seite
Wählen Sie mit den Tasten …† œ √ die Szene aus
Wiedergabe , Suchen aus
Zum Einrichten befolgen Sie Schritt 1 bis 3 auf Seite
An die Position der nächsten Szene
Verschieben, da die ausgewählte Szene
Wählen Sie mit den Tasten …† die Option Hinzu
Der Bildschirm Szene hinzufügen wird geöffnet
Wiedergabe , Überspringen aus
Einen Titel aus der Wiedergabeliste löschen
Wählen Sie mit den Tasten …† œ √ die Szene aus
Von Festplatte auf DVD kopieren
Über den Kopierbildschirm
Sie einen beschreibbaren Rohling in die Disk
Die Taste Copy
Drücken Sie die Taste OPEN/CLOSE, und legen
Wählen Sie mit den Tasten …† den Titel aus, den
Einen nicht bearbeiteten Titel kopieren
Einen bereits bearbeiteten Titel kopieren
1Die Meldung Wollen Sie eine Schnellkopie? 9 wird angezeigt
Mehrere Titel gleichzeitig kopieren
Aufnahmemodus ändern
Beschrieben ausgeführt
Andernfalls wird Schritt 9-1auf Seite
Ausgeführt
Unerwünschte Titel aus der Kopierliste löschen
Vorschau von ausgewählten Titeln der Kopierliste
Kopierbildschirm einen Titel aus, dessen
Aufnahmemodus jedes Titels in der Kopierliste auswählen
Aufnahmemodus aller Titel in der Kopierliste ändern
Aufnahmemodus Sie ändern möchten
Drücken Sie im Stoppmodus oder im
Der Kopierbildschirm wird geöffnet
Kopiergeschützter Titel
Dateikopie
Aufgenommener Videotitel
Einmal kopierbarer Titel
Ordnerkopie
Wählen Sie mit den Tasten …† die Option Disk
Disk-Name bearbeiten
Wenn Sie während des Kopiervorgangs
Manager, und drücken Sie die Taste OK oder √
Wählen Sie mit den Tasten …† die Option Disk
Disk-Schutz
Der Disk wird ein Disk-Name zugewiesen
Manager, und drücken Sie die Taste OK oder √
DVD-RW
Eine Disk formatieren
Festplatte/DVD-RAM
DVD-VR und DVD-V werden nach ihrem
Musik
Alle Titel-, Musik und Fotolisten löschen
Wählen Sie mit den Tasten œ √ die Option Alle
Foto
Alle Titellisten löschen
Eine Disk fixieren
Sobald eine Disk fixiert ist, können Sie
Fixierung einer Disk aufheben V-/VR-Modus
Fixierung aufheben, und drücken Sie die Taste
Möglich
Stromversorgung
Aufnehmen
Wiedergabe
Festplatte kopiert werden
Timer-Aufnahme
Video
Ton
Fernbedienung
Sonstiges
Entfernen Sie ggf
Audioausgang
Deutschland
Electronics