editing

Moving a Scene (Changing the Position of a Scene)

To setup, follow steps 1 to 3 on page 89.

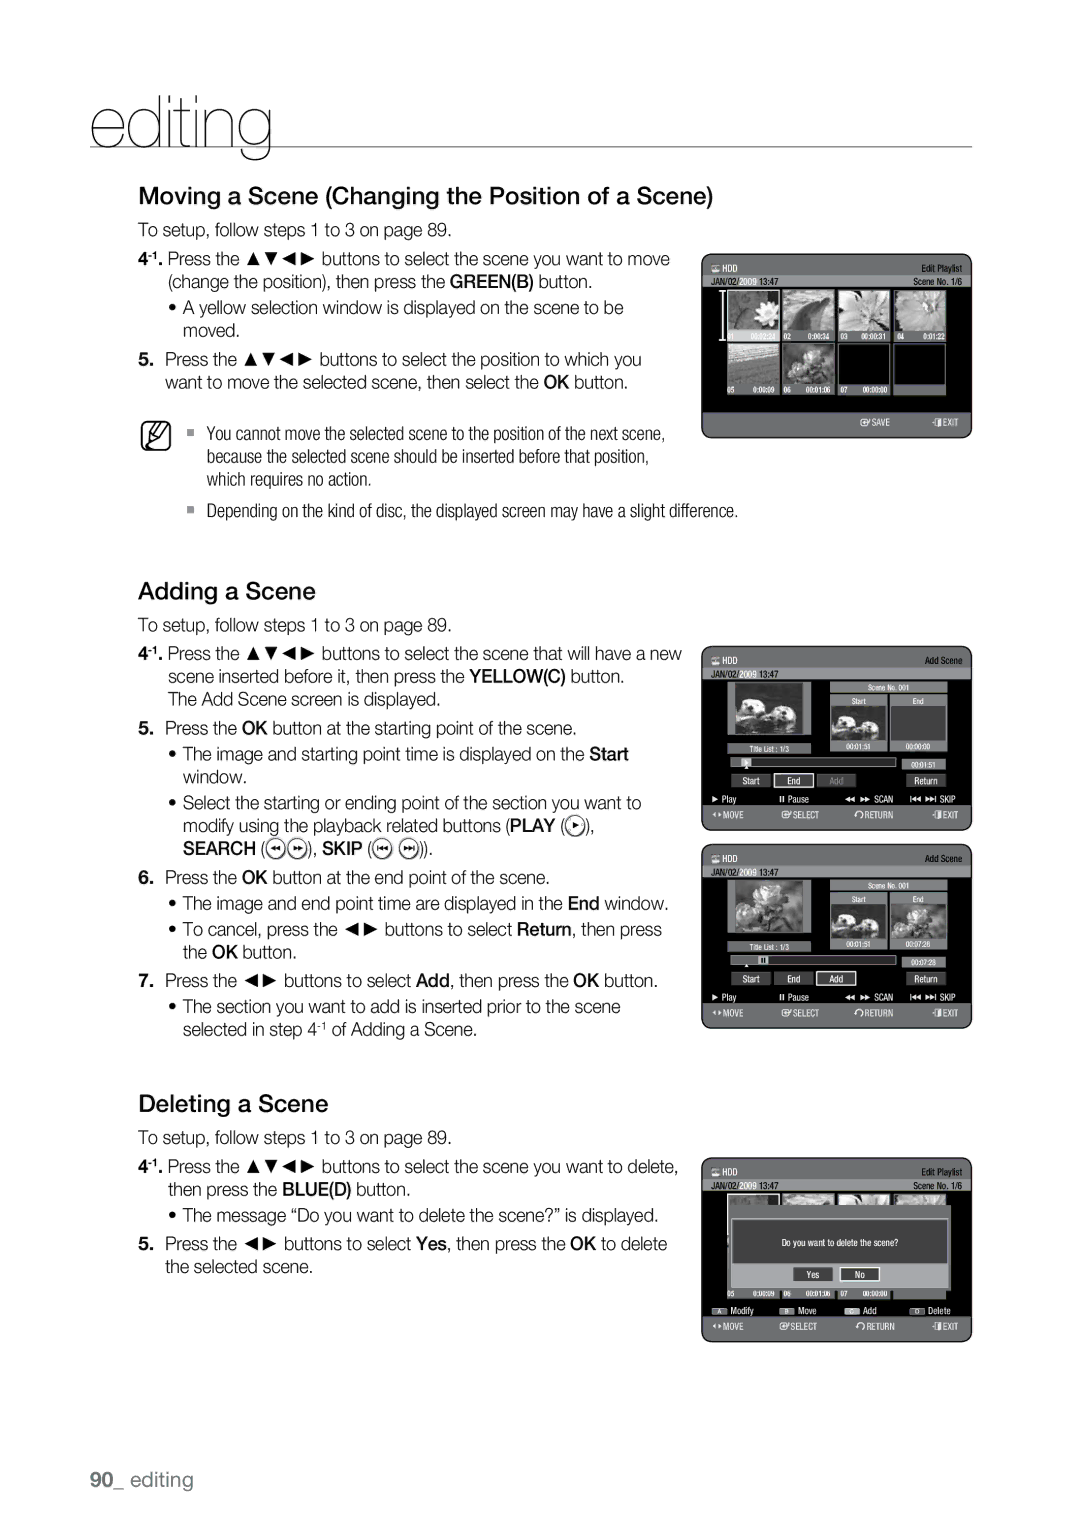
4-1.Press the ▲▼◀▶ buttons to select the scene you want to move

HDD

Edit Playlist

(change the position), then press the GREEN(B) button.

JAN/02/2009 13:47

Scene No. 1/6


~A yellow selection window is displayed on the scene to be moved.

01

00:02:24

02

0:00:34

03

00:00:31

04

0:01:22

. Press the ▲▼◀▶ buttons to select the position to which you


want to move the selected scene, then select the OK button.

05 0:00:09 06 00:01:06 07 00:00:00

M `

`

You cannot move the selected scene to the position of the next scene, because the selected scene should be inserted before that position, which requires no action.

Depending on the kind of disc, the displayed screen may have a slight difference.

sSave eExit

Adding a Scene

To setup, follow steps 1 to 3 on page 89.

4-1.Press the ▲▼◀▶ buttons to select the scene that will have a new scene inserted before it, then press the YELLOW(C) button.

The Add Scene screen is displayed.

. Press the OK button at the starting point of the scene.

~The image and starting point time is displayed on the Start window.

~Select the starting or ending point of the section you want to modify using the playback related buttons (PLAY (),

SEARCH (), SKIP ()).

. Press the OK button at the end point of the scene.

~The image and end point time are displayed in the End window.

~To cancel, press the ◀▶ buttons to select Return, then press the OK button.

. Press the ◀▶ buttons to select Add, then press the OK button.

~The section you want to add is inserted prior to the scene selected in step 4-1of Adding a Scene.

HDD

Add Scene

JAN/02/2009 13:47


Scene No. 001


Start

End

Title List : 1/3

00:01:51

00:00:00


00:01:51

Start

End


Add


Return


+ Play

# Pause


( ) SCAN

[ ] SKIP

<Move

sSelect


rReturn

eExit

HDD


Add Scene

JAN/02/2009 13:47


Scene No. 001


Start

End

Title List : 1/3

00:01:51

00:07:28


#


00:07:28

Start

End

Add

Return

+ Play

# Pause

( ) SCAN

[ ] SKIP

<Move

sSelect

rReturn

eExit

Deleting a Scene

To setup, follow steps 1 to 3 on page 89.

4-1.Press the ▲▼◀▶ buttons to select the scene you want to delete, then press the BLUE(D) button.

~The message “Do you want to delete the scene?” is displayed.

. Press the ◀▶ buttons to select Yes, then press the OK to delete the selected scene.

HDD

Edit Playlist

JAN/02/2009 13:47

Scene No. 1/6

01

00:02:24

02

0:00:34

03

00:00:31

04

0:01:22


Do you want to delete the scene?


Yes


No


05

0:00:09


06

00:01:06


07

00:00:00


Modify


Move


Add

Delete

<Move


sSelect


rReturn

eExit

90_ editing

Page 90
Image 90
Samsung DVD-HR775A/EDC, DVD-HR777A/EDC Moving a Scene Changing the Position of a Scene, Adding a Scene, Deleting a Scene

DVD-HR773A/XER, DVD-HR775A/HAC, DVD-HR773A/EDC, DVD-HR775A/EDC, DVD-HR775A/MEA specifications

The Samsung DVD-HR777A/EDC, DVD-HR773A/XEG, DVD-HR775A/XEG, DVD-HR775A/XEB, and DVD-HR777A/AUS are part of Samsung's innovative DVD recorder lineup that combines advanced recording features with versatile playback options. These models cater to a range of home entertainment needs, providing users with the ability to record their favorite TV shows while also enjoying an array of multimedia functionalities.

One of the standout features of these DVD recorders is their built-in hard disk drives, which allow for convenient storage of recorded content. With capacities ranging up to 160GB, users can easily record several hours of programming without the hassle of running out of space. The HDD recording capability simplifies the process of archiving and re-watching shows, making it easy to keep track of favorite episodes or important events.

These models support a variety of recording formats, including DVD-R, DVD-RW, DVD+R, and DVD+RW, ensuring compatibility with various types of blank media. The inclusion of formats such as VR mode further enhances users' ability to edit and manage recordings. The high-quality video output features progressive scan technology that delivers stunning clarity and detail, enhancing the viewing experience.

Samsung's DVD recorders also integrate digital tuners, allowing users to easily access free-to-air digital broadcasts without the need for additional equipment. This functionality broadens the range of content that can be recorded, making it possible to capture local TV channels in high-quality resolution.

Another significant characteristic of the DVD-HR series is their compatibility with various multimedia formats. Users can play back CDs, DVDs, and even view JPEG images on the big screen, providing a comprehensive home entertainment experience. Additionally, the HDMI output facilitates a direct connection to modern televisions, ensuring that users benefit from high-definition picture quality.

These DVD recorders also boast user-friendly interfaces and remote control operation, allowing for seamless navigation through menus and settings. The variety of recording options, including one-touch recording and timer recording capabilities, makes capturing content straightforward and hassle-free.

In conclusion, the Samsung DVD-HR777A/EDC, DVD-HR773A/XEG, DVD-HR775A/XEG, DVD-HR775A/XEB, and DVD-HR777A/AUS models offer impressive features that combine recording versatility with playback convenience, making them excellent additions to any home theater setup. With their robust set of functionalities, they cater to both casual viewers and serious enthusiasts alike.