DVD-R120/R121
Spanish
Advertencia
No se conceden derechos para su uso comercial
Precauciones de manejo
Precaución
Mantenimiento del armario
Manejo del disco
Especificaciones del disco
Almacenamiento del disco
Utilización de CD-R/RW
Utilización de discos MPEG4
DVD-RW modo VR
Grabación y reproducción de discos DVD-RAM
DVD-RW modo de Vídeo
Contenido
Configuración de las opciones del panel
Preajuste de canales con la función Auto
Grabación flexible
Realización de una grabación con
Grabación de la lista de grabaciones
Barrido progresivo de alta calidad
Características generales
Reproducción de MPEG4
Del usuario De DVD
Antes de leer el manual
Paso 2 Formatear el disco para iniciar la grabación
Al utilizar un disco DVD-RW en modo Vídeo
Al utilizar un disco DVD-RW en modo VR
Al utilizar un disco DVD-R
Accesorios
Desembalaje
Ajuste del mando a distancia
Instale las pilas en el mando a distancia
Códigos de TV controlables
Panel frontal DVD-R120
Descripción
Pantalla del panel frontal DVD-R120
Pantalla del panel frontal DVD-R121
Panel frontal DVD-R121
Receptor de mando a distancia 11. PR
Ventilador
Panel posterior
Manejo del mando a distancia
Antena + Grabador de DVD + decodificador externo + TV
Visión general
Conexión a AV3 IN, y a la toma de entrada de
Conexiones adicionales
Conexión del grabador de
Modo DVD
Modo TV
Modos de salida S-Video, Vídeo Componente y Progresivo
Otro tipo de conexión del cable de salida de vídeo
Conecte los cables de antena RF como se muestran
Consulte las páginas 21 y
Caso 2 Conexión a una toma de salida de S-Video
Caso 3 Tomas de salida de Vídeo componente
Otro tipo de conexión del cable de salida de audio
Caso 1 Conexión a un TV
Spondiente del TV
Rojo blanco
La selección de AV 3 in se realizará
Si la entrada no se selecciona automáti
Botón Menu
Desplazamiento por el menú en pantalla
Botones … † , œ √
Botón OK
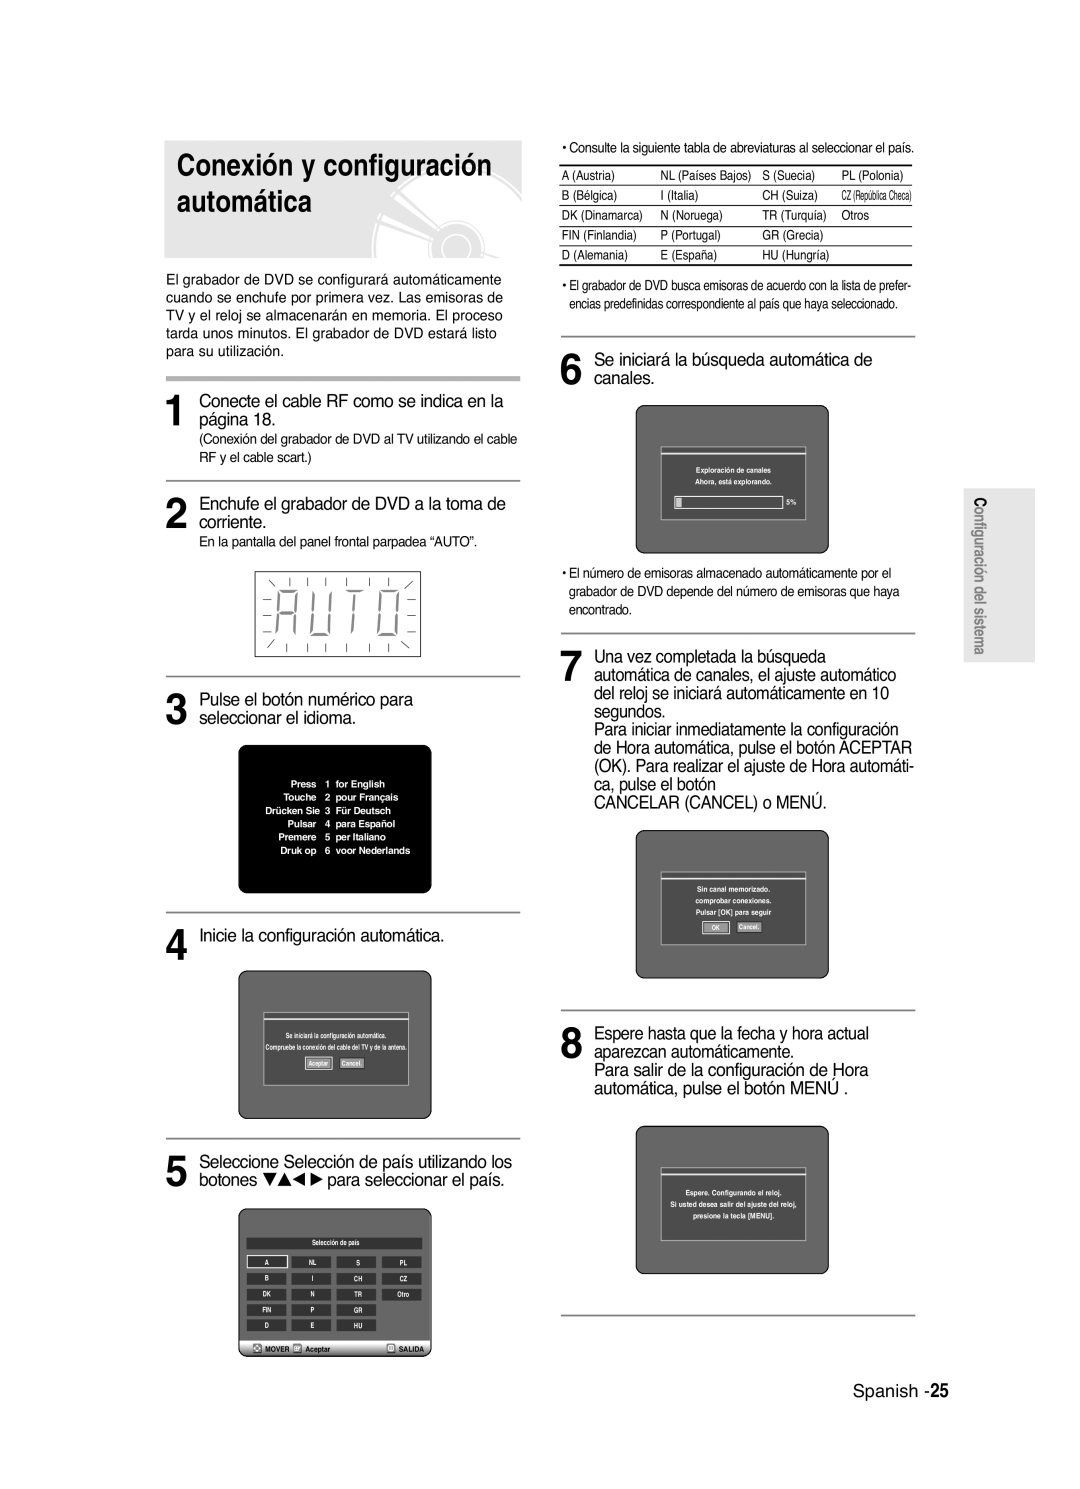
Conexión y configuración automática
Compruebe la fecha y hora
Ajuste de la hora
Con la unidad en modo Parar / No Disco, pulse el botón Menu
Pulse el botón OK y se guardará la fecha y hora
Consulte la siguiente tabla al seleccionar el país
Pulse los botones †…œ √ para seleccionar el país
Seleccione Modif., Eliminar o Swap
Aparecerá el menú de configuración de Idioma
Configuración de las opciones de idioma
Pulse los botones …† seleccionar el
Pulse el botón Volver o el œ botón oe
Aparecerá el menú Sistema
Ajuste de la hora en modo
Capítulos
Creación automática de
Ajuste el brillo de la pantalla del panel frontal
Configuración de las opciones del panel frontal
DivXR Registo
Configuración de las opciones de Nicam
Opciones de Audio Audio
Configuración de las opciones de audio
Pulse los botones …† seleccionar la
OK o √
Toma de salida de vídeo disponible
Configuración de las opciones de Salida DE Vídeo
Progresivo
Configuración del ajuste
No pulse el botón P.SCAN si está utilizando
Opciones de pantalla Vídeo
Configuración de las
Opciones de pantalla Vídeo
No Normal
Paterno
Configuración del control
Si olvida la contraseña
Información sobre el nivel de calificación
Información sobre el cambio de contraseña
Nivel de Calificación
Cambiar Contraseña
Discos grabables
Antes de grabar
Modo Grabación
Formatos de grabación
Vídeo no grabable
Señales de control de copia relativas
Acerca de la tecla Info
Grabar el programa de TV que está viendo
Pulse el botón OPEN/CLOSE para cerrar la bandeja del disco
Antes de empezar
Pulse el botón REC
SP LP EP XP
Para detener la grabación
Para pausar la grabación
Grabación desde el equipo externo que está viendo
Pulse el botón Entrada para seleccionar DV
Copia desde una videocámara
El origen de entrada mientras graba
Pulse el botón REC para iniciar la grabación
Grabación de un toque OTR
Pulse de forma repetida el botón REC para
Ajustar el tiempo de grabación que desea
Modo Mode Modo de grabación
Con la unidad en modo de parada, pulse el botón Timer
Realización de una grabación con temporizador
Utilización del botón Menu
Cómo editar una grabación programada estándar
Grabación flexible sólo para Grabación programada
Pulse el botón OK
Pulse el botón OK o √
La entrada seleccionada se eliminará de la lista
Cómo eliminar una grabación programada estándar
Uso del botón Menu
Cómo utilizar la función ShowView
Pulse el botón OK
Grabación de la lista de grabaciones programadas estándar
ShowView Extened
Con la unidad en modo de parada, pulse el botón Menu
Haga clic en el botón Menu tras finalizar la operación
Código de región sólo en DVD-Vídeo
Antes de reproducir
Tipos de discos que no pueden reproducirse
Consúltela si es necesario
Reproducción de un disco
Grabador recuerda dónde se detuvo
De nuevo, reanudará donde se paró
Buscar un capítulo o pista
Utilización de las funciones de búsqueda
Pulse el botón Disc Menu para acceder al menú del disco
Pulse el botón Title List para ir a Lista de título
Reproducción por pasos
Reproducción a cámara lenta
Saltar capítulos o pistas
Ir a una escena directamente con Anykey
Reproducción repetida repetir reproducción
Utilización de la función de repetición
Si desea ir a una hora para encontrar una escena
Pulse los botones …† para seleccionar la Tempo
En discos MP3, puede seleccionar Track, Carpeta o Disco
Para Repetir A-B A-B Repeat, consulte la página
Pulse el botón Repeat varias veces para seleccionar No
Pulse el botón Subtitle durante la reproducción
Selección del subtítulo
Seleccionar el idioma de subtítulo que desee
Cambio del ángulo de la cámara
Selección del idioma de audio
Utilización del botón Anykey
Pulse el botón Anykey durante la
Utilización de marcadores
Acercar
Pulse el botón Marker durante la reproducción
Pulse el botón OK cuando aparezca la escena deseada
Borrar un marcador
Reproducir un marcador
El número 01 aparece y la escena se memoriza
El número 02 aparecerá y la escena se memorizará
Reproducción de CD CD-DA de audio
Reproducción de CD/MP3 de audio
Elementos de pantalla del CD de audio CD-DA
Inserte un CD de audio CD-DA en la bandeja del disco
Para reproducción de CD de audio CD-DA
Botones del mando a distancia utilizados
Inserte un disco MP3 en la bandeja
Pulse el botón / reproducción rápida X2, X4
Botones del mando a distancia
Elementos de la pantalla MP3
Carpetas aparece en un orden definido
Introduc. o Lista de reproducción
Modo Opción Reproducir Para programar pistas
Opción de reproducción y pulse los botones
1Si pulsa el botón Play aparecerá la pantalla Presentación
Reproducción de imágenes
Volverá a la pantalla Álbum
Inserte un disco MPEG4 en la bandeja de disco
Reproducción de MPEG4
Descripción de la función MPEG4
Formato de audio .MP3, .MPEG, .WMA LPCM, .AAC, .Ogg
Pulse el botón Menu
Reproducción de la lista de reproducción
El menú Modificar aparecerá a la derecha
Se reproducirá la entrada título seleccionada
Para detener la reproducción del título Pulse el botón Stop
Lista de título
Controlador de discos
Lista de reproducción
Uso del botón Menu
Edición básica Lista de Título
Aparece la pantalla Cambiar nombre
Eliminación de un título
Bloquear proteger un título
Cambia al estado de bloqueo
El mensaje puede depender del tipo de disco
Eliminación de una sección de un título
Aparecerá la pantalla Modificar lista de títulos
Pulse el botón OK en la función Eliminar
Pulse el botón OK en el punto final
Modificar los elementos de la pantalla Lista de título
Crear una Lista de Reproducción
Edición avanzada Lista de Reproducción
Use los botones …† para seleccionar
Term. y después pulse el botón OK
Se reproducirán las entradas de la lista de reproducción
Reproducción de entradas en la Lista de Reproducción
Volverá a la pantalla Modificar Lista de Reproducción
Escriba los caracteres que desee con los botones …† œ √
Pulse el botón Play List durante la reproducción
Reproducción de una escena seleccionada
Modificación de una escena de la Lista de Reproducción
Pulse los botones …† œ √ para
Aparecerá la pantalla Modificar escena
Pulse el botón OK en el punto de inicio de la escena
Para configurar, siga los pasos del 1 al 3 de la página
Pulse el botón OK en el punto final de la escena
Pulse los botones …† seleccionar Añadir y pulse el botón OK
Añadir una escena
Pulse los botones …† œ √ para
Eliminación de una escena
Aparecerá la pantalla Modificar Lista de Reproducción
Pulse el botón Menu durante la reproducción
Los números reales
Eliminación de una entrada de Lista de Reproducción de ésta
Modificar el nombre del disco
Controlador de discos
Siga estas instrucciones para dar nombre a un disco
Aparecerá la pantalla Cambiar Nombre
Formatear un disco
Protección de disco
Se eliminarán las listas de título
DVD-VR y DVD-V se definen según su formato de grabación
Aparecerá el mensaje ¿Desea finalizar este disco?
Finalización de un disco
Pulse el botón Menu durante la
Después pulse el botón OK
Reproducción
Alimentación
Solución de problemas
Grabación
Reproducción
Grabación con temporizador
Vídeo
Sonido
Mando a distancia
El mando a distancia no funciona Otros problemas
Otros
Apague y encienda el grabador de DVD
Especificaciones
España Spain
Servicios Técnicos Oficiales Gama Marrón
Nombre Dirección
Madrid SAMSUNGATE, S.L Bravo Murillo
Localidad Nombre Dirección
AK68-00688A-00